如何在CentOS上设置透明的HTTPS过滤代理
HTTPS 协议在当今的网络中使用得越来越多。虽然这可能有利于隐私,但它使现代网络管理员无法阻止可疑或成人内容进入他/她的网络。此前人们认为这个问题没有一个好的解决方案。我们的操作指南将尝试证明事实并非如此。
本指南将告诉您如何在 Diladele Web Safety ICAP 服务器(适用于 Linux、BSD 和 MacOS 的商业解决方案)的帮助下在 CentOS/RedHat Linux 上设置 Squid 以透明过滤 HTTP 和 HTTPS 流量。本教程中使用的 Diladele Web Safety Linux 安装程序包含全功能密钥,其有效期为 3 个月,因此您可以在此试用期内测试其全部功能。
假设和要求
在本教程中,我将假设以下内容。您的网络的 IP 地址来自 192.168.1.0 子网,网络掩码为 255.255.255.0,并且所有工作站均设置为使用 192.168.1.1 作为默认网关。在此默认网关上,您有两个 NIC - 一个面向 IP 地址为 192.168.1.1 的 LAN,另一个插入 ISP 网络并通过 DHCP 获取其公共 Internet 地址。还假设您的网关已启动并运行 CentOS 或 RedHat Linux。
步骤1.更新和升级
在进一步操作之前,请运行以下脚本将系统升级到最新状态。
#!/bin/bash
set -e

# update should be done as root
if [[ $EUID -ne 0 ]]; then
   echo "This script must be run as root" 1>&2
   exit 1
fi

# update and upgrade
yum update && yum upgrade

# disable selinux
sed -i s/SELINUX=enforcing/SELINUX=disabled/g /etc/selinux/config

# and reboot
reboot
步骤 2. 安装 Apache Web 服务器
Diladele Web Safety 拥有先进的 Web 管理员控制台,可以轻松管理过滤设置和策略。该 Web UI 是使用 Python Django Web 框架构建的,需要 Apache Web 服务器才能正常运行。运行以下脚本来安装它们。
#!/bin/bash
set -e

# all web packages are installed as root
if [[ $EUID -ne 0 ]]; then
   echo "This script must be run as root" 1>&2
   exit 1
fi

# install python libs
yum install python-setuptools python-ldap

# install python django for web ui
easy_install django==1.5

# install apache web server to run web ui
yum install httpd php mod_wsgi

# make apache autostart on reboot
chkconfig httpd on

# this fixes some apache errors when working with python-django wsgi
echo "WSGISocketPrefix /var/run/wsgi" >> /etc/httpd/conf.d/wsgi.conf

# and restart apache
service httpd restart
步骤 3. 安装 Diladele Web 安全
使用以下脚本下载并安装最新版本的 Diladele Web Safety。
#!/bin/bash

# all packages are installed as root
if [[ $EUID -ne 0 ]]; then
   echo "This script must be run as root" 1>&2
   exit 1
fi

# detect current architecture (default assumes x86_64)
ARCH_1=`uname -m`
ARCH_2="amd64"
if [[ $ARCH_1 == 'i686' ]]; then
        ARCH_1="i386"
        ARCH_2="i386"
fi

# bail out on any error
set -e

# get latest qlproxy
curl http://updates.diladele.com/qlproxy/binaries/3.2.0.4CAF/$ARCH_2/release/centos6/qlproxy-3.2.0-4CAF.$ARCH_1.rpm > qlproxy-3.2.0-4CAF.$ARCH_1.rpm

# install it
yum -y --nogpgcheck localinstall qlproxy-3.2.0-4CAF.$ARCH_1.rpm

# qlproxy installed everything needed for apache, so just restart
service httpd restart
步骤 4. 安装所需的构建工具
为了能够进行HTTP/HTTPS透明过滤,我们需要获取最新版本的Squid(CentOS/RedHat默认自带的版本太旧了),并从源代码重建它。以下脚本安装所需的所有构建工具。
#!/bin/bash

# install all build tools
if [[ $EUID -ne 0 ]]; then
   echo "This script must be run as root" 1>&2
   exit 1
fi

# install development packages required
yum install -y gcc-c++ pam-devel db4-devel expat-devel libxml2-devel libcap-devel libtool redhat-rpm-config rpm-build openldap-devel openssl-devel krb5-devel

# squid needs perl and needs additional perl modules not present by default in CentOS 6
curl http://dl.fedoraproject.org/pub/epel/6/x86_64/epel-release-6-8.noarch.rpm > epel-release-6-8.noarch.rpm
rpm -Uvh epel-release-6*.rpm
yum install -y perl-Crypt-OpenSSL-X509
步骤 5. 从源代码构建 Squid
通过运行以下脚本重建 Squid RPM。
#!/bin/bash

# stop on any error
set -e

# rpm build MUST be run as normal user
if [[ $EUID -eq 0 ]]; then
   echo "This script must NOT be run as root" 1>&2
   exit 1
fi

# get squid sources
pushd rpmbuild/SOURCES
curl http://www.squid-cache.org/Versions/v3/3.4/squid-3.4.4.tar.xz > squid-3.4.4.tar.xz
curl http://www.squid-cache.org/Versions/v3/3.4/squid-3.4.4.tar.xz.asc > squid-3.4.4.tar.xz.asc
popd

# build the binaries RPMs out of sources
pushd rpmbuild/SPECS
rpmbuild -v -bb squid.spec
popd
步骤 6. 安装 Squid
构建完成后,安装 Squid。建议取消注释生成您自己的根证书颁发机构的行。 Diladele Web Safety 的默认安装确实有自己的 ca,但如果您的设备由网络之外的用户使用,信任它可能会带来严重的安全风险。
#!/bin/bash

# stop on every error
set -e

# install RPMs as root
if [[ $EUID -ne 0 ]]; then
   echo "This script must be run as root" 1>&2
   exit 1
fi

# detect current architecture (default assumes x86_64)
ARCH_1=`uname -m`
ARCH_2="amd64"
ARCH_3="lib64"

if [[ $ARCH_1 == 'i686' ]]; then
        ARCH_2="i386"
        ARCH_3="lib"
fi

pushd rpmbuild/RPMS/$ARCH_1
yum localinstall -y squid-3.4.4-0.el6.$ARCH_1.rpm
popd

# set up the ssl_crtd daemon
if [ -f /bin/ssl_crtd ]; then
   rm -f /bin/ssl_crtd
fi

ln -s /usr/$ARCH_3/squid/ssl_crtd /bin/ssl_crtd
/bin/ssl_crtd -c -s /var/spool/squid_ssldb
chown -R squid:squid /var/spool/squid_ssldb

# uncomment to regenerate certificates for SSL bumping if you do not like defaults
# openssl req -new -newkey rsa:1024 -days 1365 -nodes -x509 -keyout myca.pem  -out myca.pem
# openssl x509 -in myca.pem -outform DER -out myca.der
# then copy certificates
# cp myca.pem /etc/opt/quintolabs/qlproxy/
# cp myca.der /etc/opt/quintolabs/qlproxy/

# make squid autostart after reboot
chkconfig squid on
步骤 7. 将 Squid 与 Diladele Web Safety 集成
通过运行以下脚本集成 Squid 和 Diladele Web Safety。
#!/bin/bash

# stop on any error
set -e

# integration should be done as root
if [[ $EUID -ne 0 ]]; then
   echo "This script must be run as root" 1>&2
   exit 1
fi

# allow web ui read-only access to squid configuration file
chmod o+r /etc/squid/squid.conf

# perform integration by replacing squid.conf file
mv /etc/squid/squid.conf /etc/squid/squid.conf.original && mv squid.conf /etc/squid/squid.conf

# parse the resulting config just to be sure
/usr/sbin/squid -k parse

# restart squid to load all config
/sbin/service squid restart
步骤 8. 将 HTTPS 流量透明地重定向到 Squid
HTTP 和 HTTPS 流量的透明过滤器将通过使用 iptables 将端口 80 和 443 的流量重定向到 Squid 来实现。这意味着带有 Squid 的盒子充当 LAN 的默认网关。请注意,这只是实现透明过滤的一种方法。 Squid 的 Wiki 中描述了其他可能的解决方案。
#!/bin/bash

# firewall setup should be done as root
if [[ $EUID -ne 0 ]]; then
   echo "This script must be run as root" 1>&2
   exit 1
fi

# check kernel forwarding is enabled
enabled=`cat /proc/sys/net/ipv4/ip_forward`
if [[ $enabled -ne 1 ]]; then
        echo "Kernel forwarding seems to be disabled, enable it in /etc/sysctl.conf, reboot and rerun this script" 1>&2
        exit 1
fi

# set the default policy to accept first (not to lock ourselves out from remote machine)
iptables -P INPUT ACCEPT

# flush all current rules from iptables
iptables -F

# allow pings from eth0 and eth1 for debugging purposes
iptables -A INPUT -p icmp -j ACCEPT

# allow access for localhost
iptables -A INPUT -i lo -j ACCEPT

# accept packets belonging to established and related connections
iptables -A INPUT -m state --state ESTABLISHED,RELATED -j ACCEPT

# allow ssh connections to tcp port 22 from eth0 and eth1
iptables -A INPUT -p tcp --dport 22 -j ACCEPT

# allow connection from LAN to ports 3126, 3127 and 3128 squid is running on
iptables -A INPUT -i eth0 -p tcp --dport 3126 -j ACCEPT
iptables -A INPUT -i eth0 -p tcp --dport 3127 -j ACCEPT
iptables -A INPUT -i eth0 -p tcp --dport 3128 -j ACCEPT

# redirect all HTTP(tcp:80) traffic coming in through eth0 to 3126
iptables -t nat -A PREROUTING -i eth0 -p tcp -m tcp --dport 80 -j REDIRECT --to-ports 3126

# redirect all HTTPS(tcp:443) traffic coming in through eth0 to 3127
iptables -t nat -A PREROUTING -i eth0 -p tcp -m tcp --dport 443 -j REDIRECT --to-ports 3127

# configure forwarding rules
iptables -A FORWARD -i eth0 -o eth1 -p tcp --dport 22 -j ACCEPT
iptables -A FORWARD -i eth1 -o eth0 -p tcp --sport 22 -j ACCEPT
iptables -A FORWARD -p icmp -j ACCEPT
iptables -A FORWARD -i eth0 -o eth1 -p tcp --dport 80 -j ACCEPT
iptables -A FORWARD -i eth1 -o eth0 -p tcp --sport 80 -j ACCEPT
iptables -A FORWARD -i eth0 -o eth1 -p tcp --dport 53 -j ACCEPT
iptables -A FORWARD -i eth0 -o eth1 -p udp --dport 53 -j ACCEPT
iptables -A FORWARD -m state --state ESTABLISHED,RELATED -j ACCEPT
iptables -A FORWARD -j REJECT --reject-with icmp-host-prohibited

# enable NAT for clients within LAN
iptables -t nat -A POSTROUTING -o eth1 -j MASQUERADE

# set default policies for INPUT, FORWARD (drop) and OUTPUT (accept) chains
iptables -P INPUT DROP
iptables -P FORWARD DROP
iptables -P OUTPUT ACCEPT

# list created rules
iptables -L -v

# save the rules so that after reboot they are automatically restored
/sbin/service iptables save

# enable the firewall
chkconfig iptables on

# and reboot machine
reboot
检查HTTPS是否被透明过滤
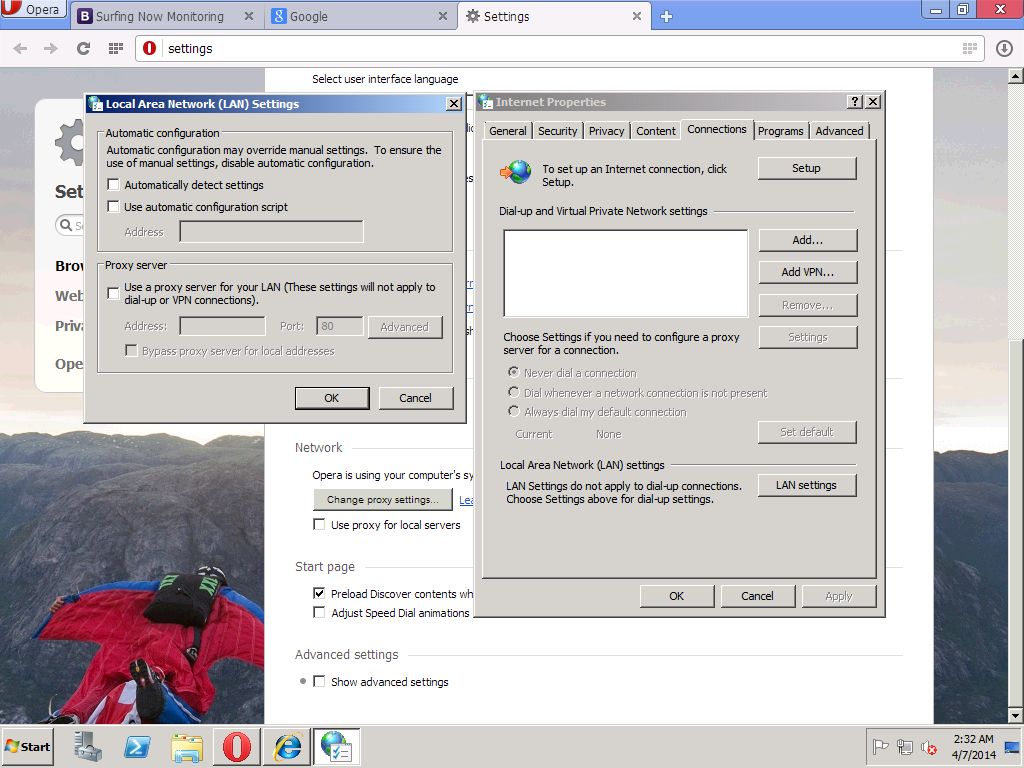
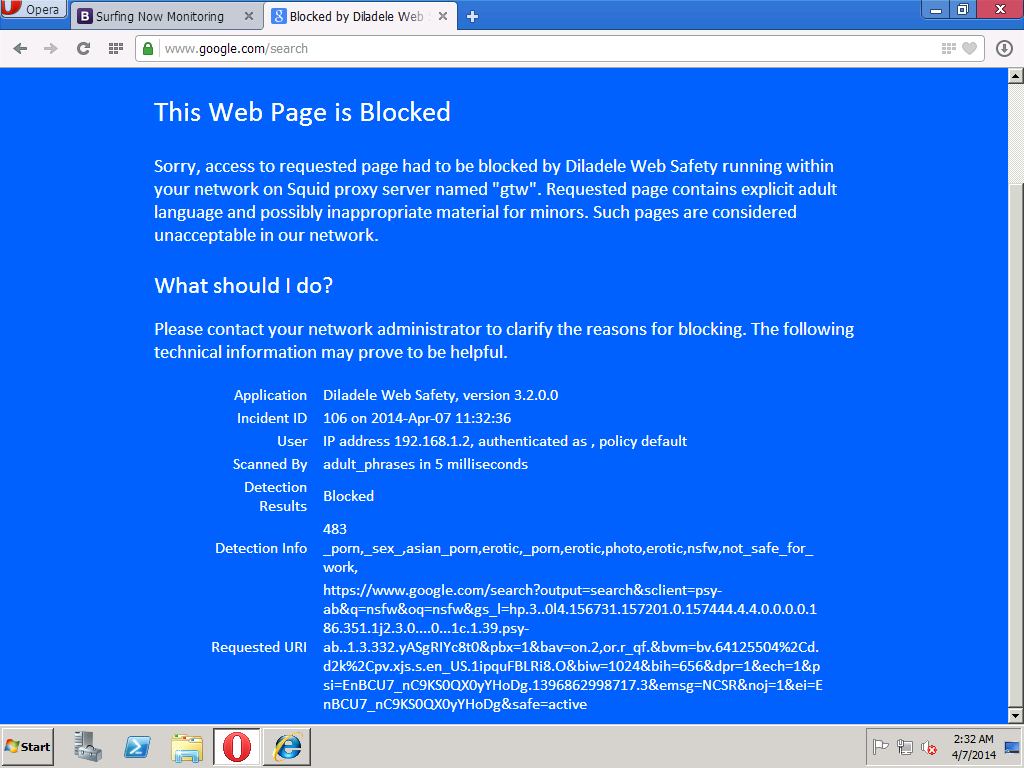
请注意,为了使 HTTPS 过滤正常工作,我们必须将 /etc/opt/quintolabs/qlproxy/myca.der 中的代理证书安装到网络中所有工作站上的受信任根认证中。下面的截图显示HTTPS请求被透明地解密和过滤。
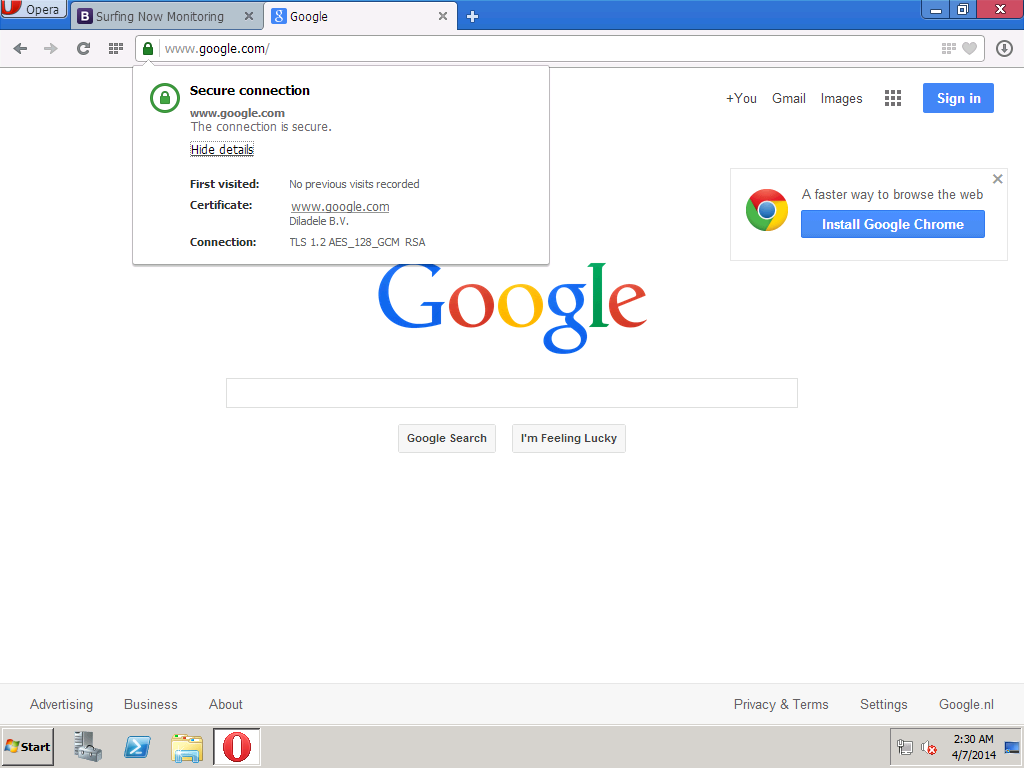
浏览 Google 并搜索成人术语(例如 NSFW),我们会透明地过滤和阻止 HTTPS 请求。
恢复
现在,我们的网络中的默认网关能够透明地过滤 HTTP 和 HTTPS 流量。我们网络中的所有工作站都信任来自代理的根证书,从而解密和过滤其 HTTPS 请求。我们网络中的浏览环境变得更加安全。有关更多详细信息,请参阅 Diladele Web Safety 的文档。