如何在 Rocky Linux 9 上使用 Matrix Synapse 和 Element 安装和创建聊天服务器
在此页面上
- 先决条件
- 第 1 步 - 配置防火墙
- 第 2 步 - 安装和配置 PostgreSQL
- 第 3 步 - 安装 Matrix Synapse
- 第 4 步 - 安装 Nginx
- 第 5 步 - 安装 SSL
- 第 6 步 - 配置 SELinux
- 第 7 步 - 创建 Matrix Systemd 服务
- 第 8 步 - 配置 Matrix Synapse
- 步骤 9 - 配置 Nginx
- 第 10 步 - 安装 Coturn
- 第 11 步 - 访问矩阵
- 第 12 步 - 安装元件
- 第 13 步 - 配置元素
- 结论
Matrix 是去中心化和端到端加密通信的开放标准。它是使用实时同步的标准化 API 相互通信的服务器和服务的集合。它使用家庭服务器来存储帐户信息和聊天历史记录。如果一台家庭服务器出现故障,由于去中心化的性质,其他服务器可以继续通信而不会出现问题。您可以使用由其他人托管的 Matrix 家庭服务器或托管您自己的服务器来保持对数据的控制。
在本教程中,您将学习如何使用 Synapse(Matrix 的家庭服务器实现)安装和创建聊天服务器。 Element 是使用 Matrix React SDK 构建的 Matrix Web 客户端。这将允许您在网络上提供 Matrix 聊天。您还可以将该服务器与任何其他 Matrix 客户端一起使用。我们还将安装 Coturn 服务器以启用语音和视频通话。如果您不感兴趣,Coturn 服务是可选的。
先决条件
运行 Debian 12 的服务器。
具有 root 权限的非 sudo 用户。
简单的防火墙(UFW)已启用并正在运行。
Matrix、Element 和 Coturn 的完全限定域名 (FQDN) 指向您的服务器。我们将分别使用 matrix.example.com、element.example.com 和 coturn.example.com 这三个服务。
确保一切都已更新。
$ sudo dnf update
您的系统需要的软件包很少。
$ sudo dnf install wget curl nano unzip yum-utils policycoreutils-python-utils -y
其中一些软件包可能已经安装在您的系统上。
第 1 步 - 配置防火墙
在安装任何软件包之前,第一步是配置防火墙以打开 HTTP、HTTPS 和 Synapse 端口。 Rocky Linux 使用 Firewalld 防火墙。检查防火墙的状态。
$ sudo firewall-cmd --state
running
防火墙适用于不同的区域,公共区域是我们将使用的默认区域。列出防火墙上所有活动的服务和端口。
$ sudo firewall-cmd --zone=public --list-all
它应该显示以下输出。
public
  target: default
  icmp-block-inversion: no
  interfaces: enp1s0
  sources:
  services: cockpit dhcpv6-client ssh
  ports:
  protocols:
  forward: yes
  masquerade: no
  forward-ports:
  source-ports:
  icmp-blocks:
  rich rules:
在防火墙中打开 HTTP、HTTPS 和 Synapse 端口。
$ sudo firewall-cmd --zone=public --add-port=8448/tcp
$ sudo firewall-cmd --zone=public --add-service=http
$ sudo firewall-cmd --zone=public --add-service=https
重新检查防火墙的状态。
$ sudo firewall-cmd --zone=public --list-all
您应该看到类似的输出。
public
  target: default
  icmp-block-inversion: no
  interfaces: enp1s0
  sources:
  services: cockpit dhcpv6-client http https ssh
  ports: 8448/tcp
  protocols:
  forward: yes
  masquerade: no
  forward-ports:
  source-ports:
  icmp-blocks:
  rich rules:
使所有更改永久化并重新加载防火墙以启用更改。
$ sudo firewall-cmd --runtime-to-permanent
$ sudo firewall-cmd --reload
第 2 步 - 安装和配置 PostgreSQL
Rocky Linux 9 默认附带 PostgreSQL 13。我们将使用官方存储库中的 PostgreSQL 16。
安装 PostgreSQL RPM 存储库。
$ sudo dnf install -y https://download.postgresql.org/pub/repos/yum/reporpms/EL-9-x86_64/pgdg-redhat-repo-latest.noarch.rpm
禁用内置 PostgreSQL 模块。
$ sudo dnf -qy module disable postgresql
现在,您可以使用以下命令安装 PostgreSQL。
$ sudo dnf install -y postgresql16-server postgresql16-contrib postgresql16-devel
sudo dnf 安装 postgresql16-devel
导出 PATH=` 路径:/usr/pgsql-16/bin
postgresql-contrib 包包含一些额外的实用程序。
验证版本。
$ psql --version
psql (PostgreSQL) 16.1
初始化 PostgreSQL 数据库。
$ sudo /usr/pgsql-16/bin/postgresql-16-setup initdb
Initializing database ... OK
启用 PostgreSQL 服务。
$ sudo systemctl enable postgresql-16
启动 PostgreSQL 服务。
$ sudo systemctl start postgresql-16
检查 PostgreSQL 服务的状态。
$ sudo systemctl status postgresql-16
? postgresql-16.service - PostgreSQL 16 database server
     Loaded: loaded (/usr/lib/systemd/system/postgresql-16.service; enabled; preset: disabled)
     Active: active (running) since Tue 2024-01-30 11:55:26 UTC; 10s ago
       Docs: https://www.postgresql.org/docs/16/static/
    Process: 9610 ExecStartPre=/usr/pgsql-16/bin/postgresql-16-check-db-dir ${PGDATA} (code=exited, status=0/SUCCESS)
   Main PID: 9615 (postgres)
      Tasks: 7 (limit: 12225)
     Memory: 17.4M
        CPU: 98ms
     CGroup: /system.slice/postgresql-16.service
             ??9615 /usr/pgsql-16/bin/postgres -D /var/lib/pgsql/16/data/
             ??9616 "postgres: logger "
             ??9617 "postgres: checkpointer "
             ??9618 "postgres: background writer "
             ??9620 "postgres: walwriter "
             ??9621 "postgres: autovacuum launcher "
             ??9622 "postgres: logical replication launcher "

Jan 30 11:55:26 matrix.example.com systemd[1]: Starting PostgreSQL 16 database server...
Jan 30 11:55:26 matrix.example.com postgres[9615]: 2024-01-30 11:55:26.482 UTC [9615] LOG:  redirecting log output to logging collector process
Jan 30 11:55:26 matrix.example.com postgres[9615]: 2024-01-30 11:55:26.482 UTC [9615] HINT:  Future log output will appear in directory "log".
Jan 30 11:55:26 matrix.example.com systemd[1]: Started PostgreSQL 16 database server.
您可以看到该服务默认已启用并正在运行。
登录 postgres 系统帐户。
$ sudo -su postgres
为 PostgreSQL 创建一个新的数据库用户和数据库。创建用户时,系统将提示您输入密码。
$ createuser --pwprompt synapse
$ createdb --encoding=UTF8 --locale=C --template=template0 --owner=synapse synapsedb
退出 postgres 帐户。
$ exit
第 3 步 - 安装 Matrix Synapse
Matrix Synapse 没有针对基于 CentOS 的发行版(例如 Rocky Linux)的预构建软件包。因此,我们将从 PyPI 将其安装为 Python 模块。
第一步是安装 Synapse 工作所需的先决条件。我们还需要 EPEL 存储库,其中包含 python3-virtualenv 包。
$ sudo dnf install epel-release
$ sudo dnf install --enablerepo=crb libtiff-devel libjpeg-devel libzip-devel \
                 freetype-devel libwebp-devel libxml2-devel libxslt-devel \
                 libpq-devel  python3-virtualenv libffi-devel openssl-devel \
                 python3-devel libicu-devel
$ sudo dnf groupinstall "Development Tools"
$ sudo dnf install postgresql16-devel
为 Synapse 创建一个目录。
$ mkdir -p ~/synapse
在该目录下创建Python虚拟环境。
$ virtualenv -p python3 ~/synapse/env
激活虚拟环境。
$ source ~/synapse/env/bin/activate
确保您拥有最新版本的 pip 和 setuptools。
(env) $ pip install --upgrade pip
(env) $ pip install --upgrade setuptools
安装矩阵突触。
(env) $ pip install "matrix-synapse[postgres]"
这将从 PyPI 下载 Synapse 并将其及其使用的 Python 库安装到 ~/synapse/env 文件夹下的虚拟环境中。它还将安装 Synapse 连接 PostgreSQL 服务器所需的 PostgreSQL Python 库。上述命令是 pip install matrix-synapse 和 pip install psycopg2 命令的组合。
下一步是生成包含一些基本设置的配置文件。切换到 Synapse 目录。
(env) $ cd ~/synapse
运行以下命令生成配置文件。
(env) $ python -m synapse.app.homeserver \
    --server-name matrix.example.com \
    --config-path homeserver.yaml \
    --generate-config \
    --report-stats=[yes|no]
--server-name 变量的值构成 Matrix ID 的一部分。输入您的 Matrix 域名作为其值。这将作为您的家庭服务器地址。
您可以选择是否希望通过 --report-stats 变量将有关您的家庭服务器的匿名统计信息发送回 Matrix。根据您的选择选择是或否。
您将得到以下输出。
Generating config file homeserver.yaml
Generating log config file /home/navjot/synapse/matrix.example.com.log.config which will log to /home/navjot/synapse/homeserver.log
Generating signing key file /home/navjot/synapse/matrix.example.com.signing.key
A config file has been generated in 'homeserver.yaml' for server name 'matrix.example.com'. Please review this file and customise it to your needs.
您可以稍后在 ~/synapse/homeserver.yaml 或 /home/ 文件中更改这些设置。上述命令生成的密钥将允许您的家庭服务器向其他家庭服务器标识自己。
现在是运行 Matrix 服务器的时候了。确保您位于 Synapse 目录中并且虚拟环境处于活动状态。
启动家庭服务器。
(env) $ synctl start
您应该看到类似的输出。
This server is configured to use 'matrix.org' as its trusted key server via the
'trusted_key_servers' config option. 'matrix.org' is a good choice for a key
server since it is long-lived, stable and trusted. However, some admins may
wish to use another server for this purpose.

To suppress this warning and continue using 'matrix.org', admins should set
'suppress_key_server_warning' to 'true' in homeserver.yaml.
--------------------------------------------------------------------------------
started synapse.app.homeserver(homeserver.yaml)
要停止服务器,请运行以下命令。
(env) $ synctl stop
停用虚拟环境。
(env) $ deactivate
第 4 步 - 安装 Nginx
对于生产环境,建议使用 Nginx 代理运行 Synapse 服务器。
Rocky Linux 9 附带旧版本的 Nginx。您需要使用官方 Nginx 存储库来安装最新版本。
创建并打开文件 /etc/yum.repos.d/nginx.repo 进行编辑。
$ sudo nano /etc/yum.repos.d/nginx.repo
将以下代码粘贴到其中。
[nginx-stable]
name=nginx stable repo
baseurl=http://nginx.org/packages/centos/$releasever/$basearch/
gpgcheck=1
enabled=1
gpgkey=https://nginx.org/keys/nginx_signing.key
module_hotfixes=true

[nginx-mainline]
name=nginx mainline repo
baseurl=http://nginx.org/packages/mainline/centos/$releasever/$basearch/
gpgcheck=1
enabled=0
gpgkey=https://nginx.org/keys/nginx_signing.key
module_hotfixes=true
完成后,按 Ctrl + X 并在出现提示时输入 Y 来保存文件。
我们将安装 Nginx 主线,因此启用它的包。
$ sudo dnf config-manager --enable nginx-mainline
安装 Nginx。
$ sudo dnf install nginx -y
验证安装。
$ nginx -v
nginx version: nginx/1.25.3
启用并启动 Nginx 服务器服务。
$ sudo systemctl enable nginx --now
检查服务的状态。
$ sudo systemctl status nginx
? nginx.service - nginx - high performance web server
     Loaded: loaded (/usr/lib/systemd/system/nginx.service; enabled; preset: disabled)
     Active: active (running) since Tue 2024-01-30 12:50:34 UTC; 4s ago
       Docs: http://nginx.org/en/docs/
    Process: 10810 ExecStart=/usr/sbin/nginx -c /etc/nginx/nginx.conf (code=exited, status=0/SUCCESS)
   Main PID: 10811 (nginx)
      Tasks: 3 (limit: 12225)
     Memory: 3.1M
        CPU: 24ms
     CGroup: /system.slice/nginx.service
             ??10811 "nginx: master process /usr/sbin/nginx -c /etc/nginx/nginx.conf"
             ??10812 "nginx: worker process"
             ??10813 "nginx: worker process"
第 5 步 - 安装 SSL
我们需要安装 Certbot 来生成 SSL 证书。为此,我们将使用 Snapd 软件包安装程序。由于 Rocky Linux 未附带,因此请安装 Snapd 安装程序。它需要 EPEL(企业 Linux 额外包)存储库才能工作。但由于我们已经在步骤 3 中安装了它,所以我们可以直接继续。
安装 Snapd 软件包。
$ sudo dnf install snapd -y
启用并启动 Snap 服务。
$ sudo systemctl enable snapd --now
安装 Snap 核心包,并确保您的 Snapd 版本是最新的。
$ sudo snap install core
$ sudo snap refresh core
创建 Snapd 工作所需的链接。
$ sudo ln -s /var/lib/snapd/snap /snap
$ echo 'export PATH=$PATH:/var/lib/snapd/snap/bin' | sudo tee -a /etc/profile.d/snapd.sh
安装证书机器人。
$ sudo snap install --classic certbot
使用以下命令确保可以通过创建到 /usr/bin 目录的符号链接来运行 Certbot 命令。
$ sudo ln -s /snap/bin/certbot /usr/bin/certbot
检查 Certbot 版本。
$ certbot --version
certbot 2.8.0
运行以下命令生成 SSL 证书。
$ sudo certbot certonly --nginx --agree-tos --no-eff-email --staple-ocsp --preferred-challenges http -m [email -d matrix.example.com
上述命令会将证书下载到服务器上的 /etc/letsencrypt/live/matrix.example.com 目录中。
生成 Diffie-Hellman 组证书。
$ sudo openssl dhparam -dsaparam -out /etc/ssl/certs/dhparam.pem 4096
检查 Certbot 续订调度程序服务。
$ systemctl list-timers
您会发现 snap.certbot.renew.service 是计划运行的服务之一。
NEXT                        LEFT         LAST                        PASSED      UNIT                         ACTIVATES                   ----------------------------------------------------------------------------------------------------------------------------------
Tue 2024-01-30 14:37:50 UTC 29min left   Tue 2024-01-30 13:05:13 UTC 1h 3min ago dnf-makecache.timer          dnf-makecache.service
Tue 2024-01-30 15:13:00 UTC 1h 4min left -                           -           snap.certbot.renew.timer     snap.certbot.renew.service
Wed 2024-01-31 00:00:00 UTC 9h left      Tue 2024-01-30 06:35:44 UTC 7h ago      logrotate.timer              logrotate.service
对该过程进行一次演练,以检查 SSL 续订是否正常工作。
$ sudo certbot renew --dry-run
如果没有看到任何错误,则一切都已准备就绪。您的证书将自动更新。
第 6 步 - 配置 SELinux
SELinux 会阻止您运行二进制文件位于用户主目录中的系统服务。因此,如果我们为Synapse创建服务文件,它就会被SELinux阻止。为了解决这个问题,我们需要运行以下命令以允许 Python 二进制文件作为系统服务运行。
$ sudo chcon -R -t bin_t /home/username/synapse/env/bin/python
应用该策略以允许与外部主机建立连接。
$ sudo setsebool -P httpd_can_network_connect 1
应用策略以允许 Nginx 授予对 PostgreSQL 的访问权限。
$ sudo setsebool -P httpd_can_network_connect_db 1
第 7 步 - 创建 Matrix Systemd 服务
重新启动后不会保存 Synapse 服务状态,这意味着如果重新启动服务器,则需要手动启动服务器。为了解决这个问题,我们需要为其创建 Systemd 文件。
在继续之前,请确保 Synapse 服务已停止。
$ cd ~/synapse
$ source env/bin/activate
(env) $ synctl stop
(env) $ deactivate
在 /etc/systemd/system/ 目录中创建并打开 matrix-synapse.service 文件进行编辑。
$ sudo nano /etc/systemd/system/matrix-synapse.service
将以下代码粘贴到其中。将 username 变量替换为安装 Synapse 的 Linux 系统用户。
# This assumes that Synapse has been installed by a user named username.
# This assumes that Synapse has been installed in a virtualenv in
# the user's home directory: `/home/username/synapse/env`.

[Unit]
Description=Synapse Matrix homeserver
After=postgresql-16.service

[Service]
Type=notify
NotifyAccess=main
ExecReload=/bin/kill -HUP $MAINPID
Restart=on-abort

WorkingDirectory=/home/username/synapse
ExecStart=/home/username/synapse/env/bin/python -m synapse.app.homeserver --config-path=/home/username/synapse/homeserver.yaml
SyslogIdentifier=matrix-synapse

# adjust the cache factor if necessary
# Environment=SYNAPSE_CACHE_FACTOR=2.0

[Install]
WantedBy=multi-user.target
完成后,按 Ctrl + X 并在出现提示时输入 Y 来保存文件。
重新加载服务守护进程。
$ sudo systemctl daemon-reload
启用 Matrix Synapse 服务。
$ sudo systemctl enable matrix-synapse
启动 Matrix Synapse 服务。
$ sudo systemctl start matrix-synapse
检查服务状态。
$ sudo systemctl status matrix-synapse
您应该看到以下输出。
? matrix-synapse.service - Synapse Matrix homeserver
     Loaded: loaded (/etc/systemd/system/matrix-synapse.service; enabled; preset: disabled)
     Active: active (running) since Tue 2024-01-30 14:20:20 UTC; 5s ago
   Main PID: 14687 (python)
      Tasks: 8 (limit: 12225)
     Memory: 77.6M
        CPU: 3.527s
     CGroup: /system.slice/matrix-synapse.service
             ??14687 /home/navjot/synapse/env/bin/python -m synapse.app.homeserver --config-path=/home/navjot/synapse/homeserver.yaml

Jan 30 14:20:16 matrix.example.com systemd[1]: Starting Synapse Matrix homeserver...
Jan 30 14:20:19 matrix.example.com matrix-synapse[14687]: This server is configured to use 'matrix.org' as its trusted key server via the
Jan 30 14:20:19 matrix.example.com matrix-synapse[14687]: 'trusted_key_servers' config option. 'matrix.org' is a good choice for a key
Jan 30 14:20:19 matrix.example.com matrix-synapse[14687]: server since it is long-lived, stable and trusted. However, some admins may
Jan 30 14:20:19 matrix.example.com matrix-synapse[14687]: wish to use another server for this purpose.
Jan 30 14:20:19 matrix.example.com matrix-synapse[14687]: To suppress this warning and continue using 'matrix.org', admins should set
Jan 30 14:20:19 matrix.example.com matrix-synapse[14687]: 'suppress_key_server_warning' to 'true' in homeserver.yaml.
Jan 30 14:20:19 matrix.example.com matrix-synapse[14687]: --------------------------------------------------------------------------------
Jan 30 14:20:20 matrix.example.com systemd[1]: Started Synapse Matrix homeserver.
第 8 步 - 配置 Matrix Synapse
在继续之前,请先创建一个秘密注册密钥。密钥应该受到保护,因为它允许任何人注册新用户,即使注册被禁用。
$ echo "registration_shared_secret: '$(cat /dev/urandom | tr -cd '[:alnum:]' | fold -w 256 | head -n 1)'"
registration_shared_secret: '1y75ja0RUxvbWcS6SdZhakenukUwHHEjOXWC9Mu3FpO0QenOnpKRsc6NBZSxuzPcHYsOEuIQziwVjSZcP87dlWK4ZkIGYniurMqNsCYL4xg5xXs4bJDuTJH2CUXab4U9liv399lmkIZFaMpJCLxV9lVWB9mKHILYsjeLgGY5wAARv1SiK07bFsQOwKJGFqIvsUXmxymx5QCNDzTHw8R4ShqZ7elnnZrbdYk4r2f7qogERNHvQaRV7IEYUIOtMhVP'
复制上面行的输出并保存。
您可以通过文件 /home/username/synapse/homeserver.yaml 配置 Matrix 服务器。打开它进行编辑。
$ nano ~/synapse/homeserver.yaml
将注册密钥命令的输出粘贴到文件底部。
默认情况下,Synapse 配置为使用 SQLite 数据库。我们需要编辑它以添加 PostgreSQL 凭据。
在文件中找到以下部分并将其注释掉,如图所示。
#database:
#  name: sqlite3
#  args:
#    database: /home/navjot/synapse/homeserver.db
在其下方添加以下部分。将 your-password 字段替换为您在步骤 3 中创建的 PostgreSQL 用户密码。如果您在其他地方托管数据库,请将 localhost 替换为您的服务器的 IP 地址。
database:
  name: psycopg2
  args:
    user: synapse
    password: 'your-password'
    database: synapsedb
    host: localhost
    cp_min: 5
    cp_max: 10
默认情况下,Synapse 启用状态指示器来显示人员是否在线。它可能会导致 CPU 使用率较高,因此您可以禁用它。将以下行粘贴到底部。
presence:
  enabled: false
完成后,按 Ctrl + X 并在出现提示时输入 Y 来保存文件。
创建一个新的矩阵用户。系统将要求您提供用户名和密码。由于这是我们创建的第一个用户,因此当询问是否让该用户成为管理员时,请键入 yes。您将需要激活虚拟环境来创建用户。
$ cd ~/synapse
$ source env/bin/activate
(env) $ register_new_matrix_user -c homeserver.yaml http://localhost:8008
New user localpart [navjot]: navjot
Password:
Confirm password:
Make admin [no]: yes
Sending registration request...
Success!
(env) $ deactivate
您可以看到我们在上面的命令中使用了端口 8008。这是因为它是 Matrix Synapse 侦听的默认端口。
默认情况下,禁用新用户注册,这意味着您需要像上面一样手动注册每个用户。如果您想开放公共注册,可以通过编辑 homeserver.yaml 文件来实现。
再次打开它进行编辑。
$ nano ~/synapse/homeserver.yaml
将以下行粘贴到底部。
enable_registration: true
默认情况下,Synapse 不允许在没有电子邮件验证的情况下进行注册。要启用电子邮件验证,请粘贴以下行。
registrations_require_3pid:
  - email

email:
  smtp_host: mail.example.com
  smtp_port: 587

  # If mail server has no authentication, skip these 2 lines
  smtp_user: '[email '
  smtp_pass: 'password'

  # Optional, require encryption with STARTTLS
  require_transport_security: true

  app_name: 'HowtoForge Example Chat'  # defines value for %(app)s in notif_from and email subject
  notif_from: "%(app)s <[email >"
要禁用电子邮件验证,请粘贴以下行。
enable_registration_without_verification: true
完成后,按 Ctrl + X 并在出现提示时输入 Y 来保存文件。
重新启动 Synapse 以应用配置。
$ sudo systemctl restart matrix-synapse
步骤 9 - 配置 Nginx
打开文件 /etc/nginx/nginx.conf 进行编辑。
$ sudo nano /etc/nginx/nginx.conf
在 include /etc/nginx/conf.d/*.conf; 行之前添加以下行。
server_names_hash_bucket_size 64;
按 Ctrl + X 并在出现提示时输入 Y 来保存文件。
创建并打开文件 /etc/nginx/conf.d/synapse.conf 进行编辑。
$ sudo nano /etc/nginx/conf.d/synapse.conf
将以下代码粘贴到其中。
# enforce HTTPS
server {
    # Client port
    listen 80;
    listen [::]:80;
    server_name matrix.example.com;
    return 301 https://$host$request_uri;
}

server {
    server_name matrix.example.com;

    # Client port
    listen 443 ssl;
    listen [::]:443 ssl;
    http2 on;

    # Federation port
    listen 8448 ssl default_server;
    listen [::]:8448 ssl default_server;

    access_log  /var/log/nginx/synapse.access.log;
    error_log   /var/log/nginx/synapse.error.log;

    # TLS configuration
    ssl_certificate /etc/letsencrypt/live/matrix.example.com/fullchain.pem;
    ssl_certificate_key /etc/letsencrypt/live/matrix.example.com/privkey.pem;
    ssl_trusted_certificate /etc/letsencrypt/live/matrix.example.com/chain.pem;
    ssl_session_timeout 1d;
    ssl_session_cache shared:MozSSL:10m;
    ssl_session_tickets off;
    ssl_prefer_server_ciphers on;
    ssl_stapling on;
    ssl_stapling_verify on;
    ssl_dhparam /etc/ssl/certs/dhparam.pem;
    resolver 1.1.1.1 1.0.0.1 [2606:4700:4700::1111] [2606:4700:4700::1001] 8.8.8.8 8.8.4.4 [2001:4860:4860::8888] [2001:4860:4860::8844] valid=60s;
    resolver_timeout 2s;

    ssl_protocols TLSv1.2 TLSv1.3;
    ssl_ciphers ECDHE-ECDSA-AES128-GCM-SHA256:ECDHE-RSA-AES128-GCM-SHA256:ECDHE-ECDSA-AES256-GCM-SHA384:ECDHE-RSA-AES256-GCM-SHA384:ECDHE-ECDSA-CHACHA20-POLY1305:ECDHE-RSA-CHACHA20-POLY1305:DHE-RSA-AES128-GCM-SHA256:DHE-RSA-AES256-GCM-SHA384;

    tcp_nopush on;
    gzip on;

    location ~ ^(/_matrix|/_synapse/client) {
            proxy_pass http://localhost:8008;
            proxy_http_version 1.1;

            proxy_set_header X-Forwarded-For $remote_addr;
            proxy_set_header X-Forwarded-Proto $scheme;
            proxy_set_header Host $host;

            # Nginx by default only allows file uploads up to 1M in size
            # Increase client_max_body_size to match max_upload_size defined in homeserver.yaml
            client_max_body_size 50M;
    }
}
完成后按 Ctrl + X 并在出现提示时输入 Y 来保存文件。上述配置的假设是 example.com 和 matrix.example.com 域的 IP 地址指向同一服务器。如果不是,则对 example.com 服务器使用以下配置文件。
server {
    server_name example.com;

    listen 443 ssl http2;
    listen [::]:443 ssl http2;

    # TLS configuration
    ssl_certificate /etc/letsencrypt/live/matrix.example.com/fullchain.pem;
    ssl_certificate_key /etc/letsencrypt/live/matrix.example.com/privkey.pem;
    ssl_trusted_certificate /etc/letsencrypt/live/matrix.example.com/chain.pem;
    ssl_session_timeout 1d;
    ssl_session_cache shared:MozSSL:10m;
    ssl_session_tickets off;
    ssl_prefer_server_ciphers on;
    ssl_stapling on;
    ssl_stapling_verify on;
    ssl_dhparam /etc/ssl/certs/dhparam.pem;
    resolver 1.1.1.1 1.0.0.1 [2606:4700:4700::1111] [2606:4700:4700::1001] 8.8.8.8 8.8.4.4 [2001:4860:4860::8888] [2001:4860:4860::8844] valid=60s;
    resolver_timeout 2s;

    ssl_protocols TLSv1.2 TLSv1.3;
    ssl_ciphers ECDHE-ECDSA-AES128-GCM-SHA256:ECDHE-RSA-AES128-GCM-SHA256:ECDHE-ECDSA-AES256-GCM-SHA384:ECDHE-RSA-AES256-GCM-SHA384:ECDHE-ECDSA-CHACHA20-POLY1305:ECDHE-RSA-CHACHA20-POLY1305:DHE-RSA-AES128-GCM-SHA256:DHE-RSA-AES256-GCM-SHA384;

    # Redirect
    location ~ ^(/_matrix|/_synapse/client) {
            return 301 "https://matrix.example.com$request_uri";
    }

    # Client homeserver autodiscovery
    location /.well-known/matrix/client {
        default_type application/json;
        add_header Access-Control-Allow-Origin *;

        return 200 '{ "m.homeserver": { "base_url": "https://matrix.example.com" } }';
    }

    # Domain delegation
    location /.well-known/matrix/server {
        default_type application/json;
        add_header Access-Control-Allow-Origin *;

        return 200 '{ "m.server": "matrix.example.com" }';
    }
}
验证 Nginx 配置文件语法。
$ sudo nginx -t
nginx: the configuration file /etc/nginx/nginx.conf syntax is ok
nginx: configuration file /etc/nginx/nginx.conf test is successful
重新启动 Nginx 服务。
$ sudo systemctl restart nginx
第 10 步 - 安装 Coturn
您需要在 NAT (TURN) 服务器周围安装使用中继进行遍历以启用语音和视频呼叫。为此,我们将安装 Coturn 包。如果您不需要此功能,可以跳过此步骤。
安装 Coturn。
$ sudo dnf install coturn
打开 TURN 和 UDP 端口。
$ sudo firewall-cmd --zone=public --add-port=3478/{tcp,udp}
$ sudo firewall-cmd --zone=public --add-port=5349/{tcp,udp}
$ sudo firewall-cmd --zone=public --add-port=49152-65535/udp
$ sudo firewall-cmd --runtime-to-permanent
$ sudo firewall-cmd --reload
为 Turn (coturn.example.com) 生成 SSL 证书。
$ sudo certbot certonly --nginx --agree-tos --no-eff-email --staple-ocsp --preferred-challenges http -m [email -d coturn.example.com
为 Coturn 生成身份验证密钥。
$ echo "static-auth-secret=$(cat /dev/urandom | tr -cd '[:alnum:]' | fold -w 256 | head -n 1)"
static-auth-secret=u3ksgJ9X876sFMO00A8KabXwZvzVwCmV30wWvZ7DzGiepRwNRYSCTYzf2E8olNzdDHu7oO3XpT3l5bv5mVdhXEQ3pnoTWBquSVPFFBJtyD6y9gBxiMaD2TYTD2WohQLE9s7OKJVpkDeKTnZQnkmjrFadE3M9DRxPL1W5Lgdg6XLLKABgb5XGkutRgkJOV0JRH4sBYsot63fWq9mcGTm6nAMdIycvDVDOs7vhoeqRzcTbMF0wsfAHVJNhXpGGFDyZ
打开配置文件进行编辑。
$ sudo nano /etc/coturn/turnserver.conf
我们将浏览该文件并启用我们需要的设置。首先,通过取消注释 use-auth-secret 行来启用身份验证方法。
# Be aware that use-auth-secret overrides some parts of lt-cred-mech.
# The use-auth-secret feature depends internally on lt-cred-mech, so if you set
# this option then it automatically enables lt-cred-mech internally
# as if you had enabled both.
#
# Note that you can use only one auth mechanism at the same time! This is because,
# both mechanisms conduct username and password validation in different ways.
#
# Use either lt-cred-mech or use-auth-secret in the conf
# to avoid any confusion.
#
use-auth-secret
接下来,我们将使用上面创建的值配置 static-auth-secret 变量。稍后我们还需要此密钥来配置 Synapse。
# 'Static' authentication secret value (a string) for TURN REST API only.
# If not set, then the turn server
# will try to use the 'dynamic' value in the turn_secret table
# in the user database (if present). The database-stored  value can be changed on-the-fly
# by a separate program, so this is why that mode is considered 'dynamic'.
#
static-auth-secret=u3ksgJ9X876sFMO00A8KabXwZvzVwCmV30wWvZ7DzGiepRwNRYSCTYzf2E8olNzdDHu7oO3XpT3l5bv5mVdhXEQ3pnoTWBquSVPFFBJtyD6y9gBxiMaD2TYTD2WohQLE9s7OKJVpkDeKTnZQnkmjrFadE3M9DRxPL1W5Lgdg6XLLKABgb5XGkutRgkJOV0JRH4sBYsot63fWq9mcGTm6nAMdIycvDVDOs7vhoeqRzcTbMF0wsfAHVJNhXpGGFDyZ
我们需要更改的下一个值是realm。它指的是我们为 Coturn 选择的域名。
# The default realm to be used for the users when no explicit
# origin/realm relationship is found in the database, or if the TURN
# server is not using any database (just the commands-line settings
# and the userdb file). Must be used with long-term credentials
# mechanism or with TURN REST API.
#
# Note: If the default realm is not specified, then realm falls back to the host domain name.
#       If the domain name string is empty, or set to '(None)', then it is initialized as an empty string.
#
realm=coturn.example.com
接下来,定义会话数和每个用户的会话数。选择适合您的服务器的值。
# Per-user allocation quota.
# default value is 0 (no quota, unlimited number of sessions per user).
# This option can also be set through the database, for a particular realm.
#
user-quota=12

# Total allocation quota.
# default value is 0 (no quota).
# This option can also be set through the database, for a particular realm.
#
total-quota=1200
接下来,我们需要禁用 TCP,因为 VOIP 是 UDP。
# Uncomment if no TCP relay endpoints are allowed.
# By default TCP relay endpoints are enabled (like in RFC 6062).
#
no-tcp-relay
我们还需要配置为 Coturn 创建的证书的位置。
# Certificate file.
# Use an absolute path or path relative to the
# configuration file.
# Use PEM file format.
#
cert=/etc/letsencrypt/live/coturn.example.com/fullchain.pem

# Private key file.
# Use an absolute path or path relative to the
# configuration file.
# Use PEM file format.
#
pkey=/etc/letsencrypt/live/coturn.example.com/privkey.pem
接下来,我们需要禁用到私有 IP 范围的流量并禁止多播地址上的对等点以提高安全性。
# Flag that can be used to disallow peers on well-known broadcast addresses (224.0.0.0 and above, and FFXX:*).
# This is an extra security measure.
#
no-multicast-peers

...............

# Option to allow or ban specific ip addresses or ranges of ip addresses.
# If an ip address is specified as both allowed and denied, then the ip address is
# considered to be allowed. This is useful when you wish to ban a range of ip
# addresses, except for a few specific ips within that range.
#
# This can be used when you do not want users of the turn server to be able to access
# machines reachable by the turn server, but would otherwise be unreachable from the
# internet (e.g. when the turn server is sitting behind a NAT)
#
# Examples:
# denied-peer-ip=83.166.64.0-83.166.95.255
# allowed-peer-ip=83.166.68.45
denied-peer-ip=0.0.0.0-0.255.255.255
denied-peer-ip=10.0.0.0-10.255.255.255
denied-peer-ip=100.64.0.0-100.127.255.255
denied-peer-ip=127.0.0.0-127.255.255.255
denied-peer-ip=169.254.0.0-169.254.255.255
denied-peer-ip=172.16.0.0-172.31.255.255
denied-peer-ip=192.0.0.0-192.0.0.255
denied-peer-ip=192.0.2.0-192.0.2.255
denied-peer-ip=192.88.99.0-192.88.99.255
denied-peer-ip=192.168.0.0-192.168.255.255
denied-peer-ip=198.18.0.0-198.19.255.255
denied-peer-ip=198.51.100.0-198.51.100.255
denied-peer-ip=203.0.113.0-203.0.113.255
denied-peer-ip=240.0.0.0-255.255.255.255
denied-peer-ip=::1
denied-peer-ip=64:ff9b::-64:ff9b::ffff:ffff
denied-peer-ip=::ffff:0.0.0.0-::ffff:255.255.255.255
denied-peer-ip=100::-100::ffff:ffff:ffff:ffff
denied-peer-ip=2001::-2001:1ff:ffff:ffff:ffff:ffff:ffff:ffff
denied-peer-ip=2002::-2002:ffff:ffff:ffff:ffff:ffff:ffff:ffff
denied-peer-ip=fc00::-fdff:ffff:ffff:ffff:ffff:ffff:ffff:ffff
denied-peer-ip=fe80::-febf:ffff:ffff:ffff:ffff:ffff:ffff:ffff
完成后,按 Ctrl + X 并在出现提示时输入 Y 来保存文件。
重新启动 Coturn 以应用配置。
$ sudo systemctl restart coturn
打开 Synapse 配置 (homeserver.yaml) 文件以添加 Coturn 设置。
$ nano ~/synapse/homeserver.yaml
将以下行粘贴到其中。将 turn_shared_secret 值替换为 \etc\coturn\turnserver.conf 文件中的 static-auth-secret 值。
turn_uris: [ "turn:coturn.example.com?transport=udp", "turn:coturn.example.com?transport=tcp" ]
turn_shared_secret: 'static-auth-secret'
turn_user_lifetime: 86400000
turn_allow_guests: True

# vim:ft=yaml
按 Ctrl + X 并在出现提示时输入 Y 来保存文件。
重新启动 Synapse 以应用更改。
$ sudo systemctl restart matrix-synapse
第 11 步 - 访问矩阵
您可以使用 Element 的 Web 客户端访问 Matrix Chat,网址为 https://app.element.io。单击登录按钮继续。

单击主服务器下的编辑链接。输入 matrix.example.com 作为您的家庭服务器。
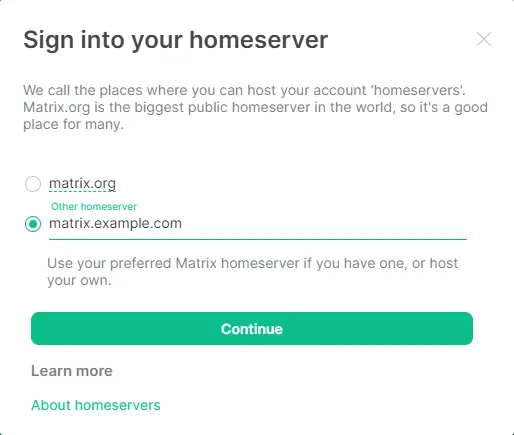
如果客户端正确检测到您的家庭服务器,边界和文本将变为绿色,否则将显示为红色。单击继续继续。
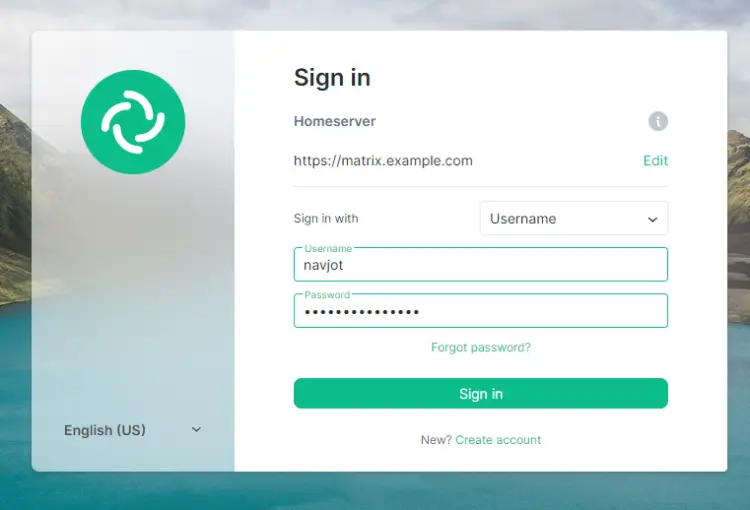
输入您在配置 Synapse 时在步骤 8 中创建的用户名和密码。单击登录按钮登录。系统将要求您创建安全且加密的备份。
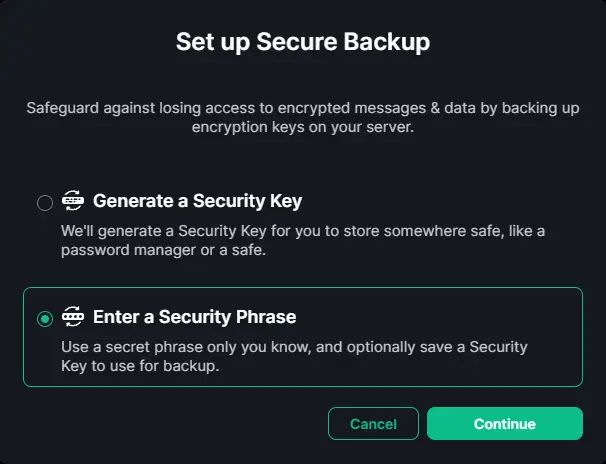
选择输入安全短语选项来创建每次登录时都需要的安全短语。单击继续继续。
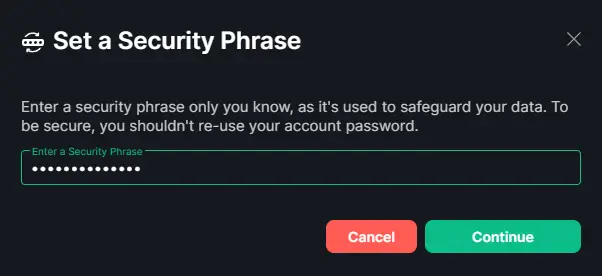
输入安全短语并单击继续按钮继续。系统将要求您在下一个屏幕上再次确认。

再次输入该短语,然后单击继续继续。

您将获得一组安全密钥,如果您忘记了安全短语,可以使用这些密钥。单击下载按钮保存它们。
单击继续按钮继续。
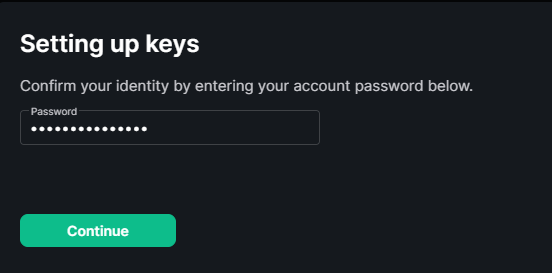
系统会要求您提供帐户密码。输入密码并单击继续按钮完成加密备份的设置。
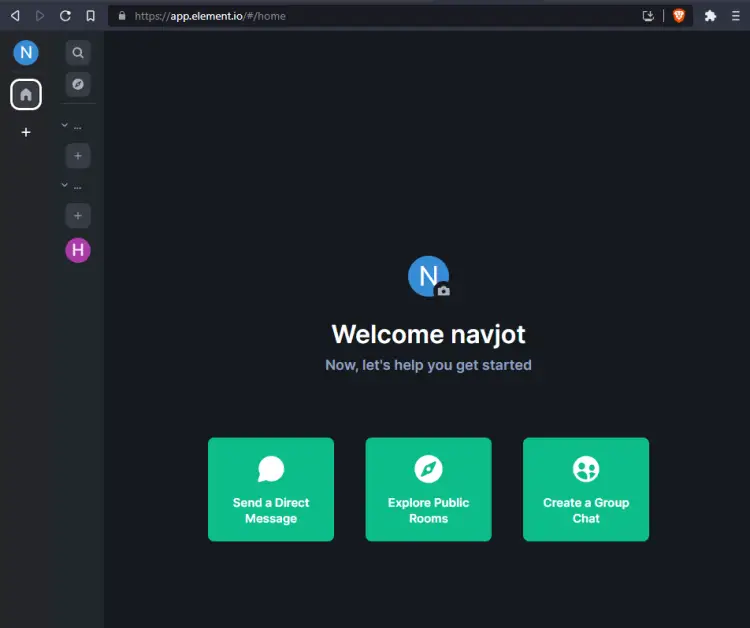
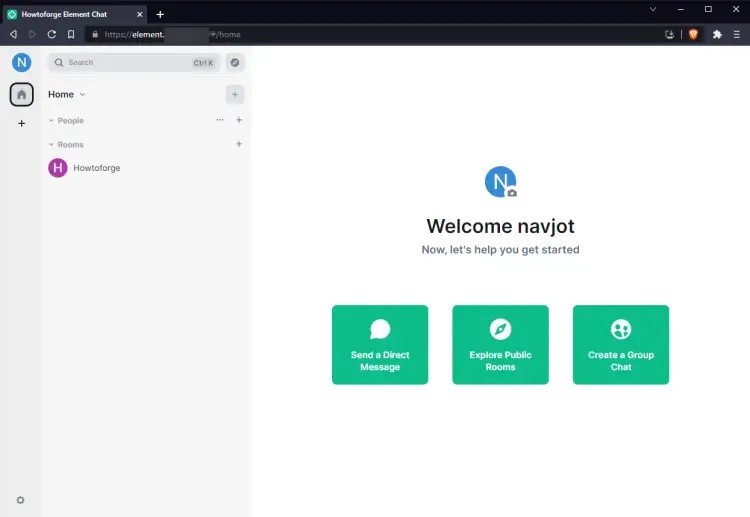
我们使用主页上的创建群聊按钮创建了一个名为HowtoForge的群聊室。单击按钮时,您将看到以下弹出窗口。
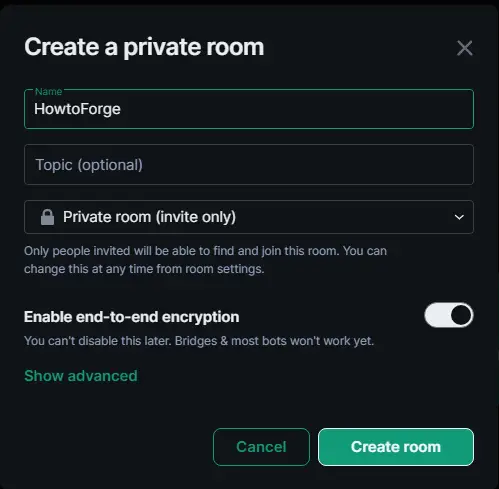
您可以通过展开高级菜单并选择该选项来限制域成员。单击创建房间按钮完成房间创建。
第 12 步 - 安装元件
为 Element 创建一个目录。
$ sudo mkdir -p /var/www/html/element
创建一个新文件以获取最新的 Element 版本。
$ sudo nano /var/www/html/element/update.sh
将以下行添加到其中。
#!/bin/sh
set -e

install_location="/var/www/html/element"
latest="$(curl -I https://github.com/element-hq/element-web/releases/latest | awk -F '/' '/^location/ {print  substr($NF, 1, length($NF)-1)}')"

cd "$install_location"

[ ! -d "archive" ] && mkdir -p "archive"
[ -d "archive/element-${latest}" ] && rm -r "archive/element-${latest}"
[ -f "archive/element-${latest}.tar.gz" ] && rm "archive/element-${latest}.tar.gz"

wget "https://github.com/element-hq/element-web/releases/download/${latest}/element-${latest}.tar.gz" -P "archive"
tar xf "archive/element-${latest}.tar.gz" -C "archive"

[ -L "${install_location}/current" ] && rm "${install_location}/current"
ln -sf "${install_location}/archive/element-${latest}" "${install_location}/current"
ln -sf "${install_location}/config.json" "${install_location}/current/config.json"
按 Ctrl + X 并在出现提示时输入 Y 来保存文件。
使文件可执行。
$ sudo chmod +x /var/www/html/element/update.sh
运行脚本以下载 Element。
$ sudo /var/www/html/element/update.sh
第 13 步 - 配置元素
复制相同的元素配置文件。
$ sudo cp /var/www/html/element/current/config.sample.json /var/www/html/element/config.json
打开配置文件进行编辑。
$ sudo nano /var/www/html/element/config.json
找到以下几行。
"m.homeserver": {
    "base_url": "https://matrix-client.matrix.org",
    "server_name": "matrix.org"
},
将默认 Matrix 主服务器地址更改为您的主服务器并删除 server_name 变量。
"m.homeserver": {
    "base_url": "https://matrix.example.com",
    "server_name": "example.com"
},
如果您想在网站标题中使用您的名字而不是 Element,请更改品牌名称。
"brand": "HowtoForge Example Chat",
将 disable_guests 变量设置为 true 以禁止来宾使用 Element。
"disable_guests": true,
按 Ctrl + X 并在出现提示时输入 Y 来保存文件。
为 Element 客户端生成 SSL 证书。
$ sudo certbot certonly --nginx --agree-tos --no-eff-email --staple-ocsp --preferred-challenges http -m [email -d element.example.com
创建并打开文件 /etc/nginx/conf.d/element.conf 进行编辑。
$ sudo nano /etc/nginx/conf.d/element.conf
将以下行粘贴到其中。
server {
    listen 80;
    listen [::]:80;
    server_name element.example.com;
    return 301 https://$host$request_uri;
}

server {
    listen 443 ssl;
    listen [::]:443 ssl;
    http2 on;

    server_name element.example.com;

    root /var/www/html/element/current;
    index index.html;

    access_log  /var/log/nginx/element.access.log;
    error_log   /var/log/nginx/element.error.log;

    add_header Referrer-Policy "strict-origin" always;
    add_header X-Content-Type-Options "nosniff" always;
    add_header X-Frame-Options "SAMEORIGIN" always;

    # TLS configuration
    ssl_certificate /etc/letsencrypt/live/element.example.com/fullchain.pem;
    ssl_certificate_key /etc/letsencrypt/live/element.example.com/privkey.pem;
    ssl_trusted_certificate /etc/letsencrypt/live/element.example.com/chain.pem;
    ssl_session_timeout 1d;
    ssl_session_cache shared:MozSSL:10m;
    ssl_session_tickets off;
    ssl_prefer_server_ciphers on;
    ssl_stapling on;
    ssl_stapling_verify on;
    ssl_dhparam /etc/ssl/certs/dhparam.pem;
    resolver 1.1.1.1 1.0.0.1 [2606:4700:4700::1111] [2606:4700:4700::1001] 8.8.8.8 8.8.4.4 [2001:4860:4860::8888] [2001:4860:4860::8844] valid=60s;
    resolver_timeout 2s;

    ssl_protocols TLSv1.2 TLSv1.3;
    ssl_ciphers ECDHE-ECDSA-AES128-GCM-SHA256:ECDHE-RSA-AES128-GCM-SHA256:ECDHE-ECDSA-AES256-GCM-SHA384:ECDHE-RSA-AES256-GCM-SHA384:ECDHE-ECDSA-CHACHA20-POLY1305:ECDHE-RSA-CHACHA20-POLY1305:DHE-RSA-AES128-GCM-SHA256:DHE-RSA-AES256-GCM-SHA384;
}
按 Ctrl + X 并在出现提示时输入 Y 来保存文件。
验证 Nginx 配置文件语法。
$ sudo nginx -t
nginx: the configuration file /etc/nginx/nginx.conf syntax is ok
nginx: configuration file /etc/nginx/nginx.conf test is successful
重新启动 Nginx 服务。
$ sudo systemctl restart nginx
在访问 Element 之前我们需要配置 SELinux 设置。运行以下命令以允许 Element 运行。
$ sudo semanage fcontext -a -t httpd_sys_rw_content_t "/var/www/html/element(/.*)?"
$ sudo restorecon -Rv /var/www/html/element/
您可以在浏览器中通过 URL https://element.example.com 访问 Element 客户端。登录后,您将进入应用程序仪表板。系统会要求您首先使用 https://app.element.io 验证应用程序,确保您已登录原始 Element 应用程序,然后系统会要求您匹配表情符号字符。通过验证后,您将获得以下仪表板。
结论
关于在 Debian 12 计算机上使用 Nginx 作为代理服务器安装 Matrix Synapse Chat 服务器以及 Coturn 和 Element Web 客户端的教程到此结束。如果您有任何疑问,请在下面的评论中发表。