如何在 Ubuntu 22.04 上安装 Bitwarden 密码管理器
本教程适用于这些操作系统版本
- Ubuntu 22.04(Jammy Jellyfish)
- Ubuntu 20.04(Focal Fossa)
在此页
- 先决条件
- 开始
- 安装 Docker CE 存储库
- 安装 Docker CE
- 安装 Docker Compose
- 为 Bitwarden 创建一个用户
- 在 Ubuntu 22.04 上安装 Bitwarden 密码管理器
- 访问 Bitwarden 网络界面
- 结论
Bitwarden 是一款免费的开源密码管理器,可让您存储所有登录名和密码,并在所有设备之间同步它们。它是跨平台的,可用于 Linux 和所有其他主要操作系统,如 Windows 和 macOS。它具有许多有用的功能,包括强加密、双因素身份验证 (2FA)、密码安全审计、密码泄露监控以及云或本地托管选项。
在本文中,我们将向您展示如何在 Ubuntu 22.04 上安装 Bitwarden 密码管理器软件。
先决条件
- 一台运行 Ubuntu 22.04 的服务器。
- 在服务器上配置了根密码。
入门
首先,建议将所有系统软件包更新和升级到最新版本。您可以通过运行以下命令来更新它们:
apt update -y
apt upgrade -y
升级所有包后,运行以下命令以安装其他所需的依赖项:
apt install apt-transport-https ca-certificates curl software-properties-common -y安装所有依赖项后,您可以继续下一步。
安装 Docker CE 存储库
接下来,您需要将 Docker CE 官方存储库添加到 APT。首先,使用以下命令添加 Docker GPG 密钥:
curl -fsSL https://download.docker.com/linux/ubuntu/gpg | apt-key add -接下来,使用以下命令添加 Docker CE 存储库:
add-apt-repository "deb [arch=amd64] https://download.docker.com/linux/ubuntu jammy stable"将 Docker 存储库添加到 APT 后,您可以继续下一步。
安装 Docker CE
现在,您可以使用以下命令安装最新版本的 Docker CE:
apt install docker-ce -y安装 Docker 后,使用以下命令验证 Docker 服务的状态:
systemctl status docker您将在以下输出中获得 Docker 状态:
? docker.service - Docker Application Container Engine
     Loaded: loaded (/lib/systemd/system/docker.service; enabled; vendor preset: enabled)
     Active: active (running) since Sun 2022-08-28 05:52:18 UTC; 47s ago
TriggeredBy: ? docker.socket
       Docs: https://docs.docker.com
   Main PID: 2719 (dockerd)
      Tasks: 7
     Memory: 30.3M
        CPU: 312ms
     CGroup: /system.slice/docker.service
             ??2719 /usr/bin/dockerd -H fd:// --containerd=/run/containerd/containerd.sock

Aug 28 05:52:18 ubuntu2204 dockerd[2719]: time="2022-08-28T05:52:18.379341986Z" level=info msg="scheme \"unix\" not registered, fallback to d>
Aug 28 05:52:18 ubuntu2204 dockerd[2719]: time="2022-08-28T05:52:18.379467088Z" level=info msg="ccResolverWrapper: sending update to cc: {[{u>
Aug 28 05:52:18 ubuntu2204 dockerd[2719]: time="2022-08-28T05:52:18.379593467Z" level=info msg="ClientConn switching balancer to \"pick_first>
Aug 28 05:52:18 ubuntu2204 dockerd[2719]: time="2022-08-28T05:52:18.427861369Z" level=info msg="Loading containers: start."
Aug 28 05:52:18 ubuntu2204 dockerd[2719]: time="2022-08-28T05:52:18.620267088Z" level=info msg="Default bridge (docker0) is assigned with an >
Aug 28 05:52:18 ubuntu2204 dockerd[2719]: time="2022-08-28T05:52:18.713742709Z" level=info msg="Loading containers: done."
Aug 28 05:52:18 ubuntu2204 dockerd[2719]: time="2022-08-28T05:52:18.744925054Z" level=info msg="Docker daemon" commit=a89b842 graphdriver(s)=>
Aug 28 05:52:18 ubuntu2204 dockerd[2719]: time="2022-08-28T05:52:18.745338168Z" level=info msg="Daemon has completed initialization"
Aug 28 05:52:18 ubuntu2204 systemd[1]: Started Docker Application Container Engine.
Aug 28 05:52:18 ubuntu2204 dockerd[2719]: time="2022-08-28T05:52:18.805663866Z" level=info msg="API listen on /run/docker.sock"
安装 Docker 组合
您还需要将 Docker Compose 安装到您的系统中。您可以使用以下命令下载并安装它:
curl -sL "https://github.com/docker/compose/releases/download/1.29.2/docker-compose-$(uname -s)-$(uname -m)" -o /usr/local/bin/docker-compose接下来,使用以下命令为下载的二进制文件设置执行权限:
chmod +x /usr/local/bin/docker-compose接下来,使用以下命令验证 Docker Compose 版本:
docker-compose --version您将获得以下输出:
docker-compose version 1.29.2, build 5becea4c
为 Bitwarden 创建用户
以专用用户身份运行 Bitwarden 是个好主意。您可以使用以下命令创建一个新用户并将其添加到 sudo 和 docker 组:
useradd -G docker,sudo -s /bin/bash -m -d /opt/bitwarden bitwarden接下来,使用以下命令设置用户密码:
passwd bitwarden您应该看到以下输出:
New password:
Retype new password:
passwd: password updated successfully
接下来,将所有权更改为 bitwarden 目录:
chown -R bitwarden: /opt/bitwarden在 Ubuntu 22.04 上安装 Bitwarden 密码管理器
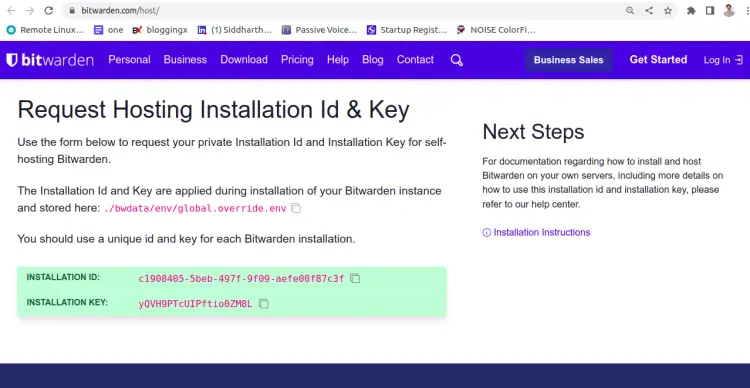
首先,访问 Bitwarden 托管页面并获取 Bitwarden 安装密钥和 ID,如下所示:
接下来,将用户切换到 Bitwarden 并使用以下命令下载 Bitwarden 安装脚本:
su - bitwarden
curl -Lso bitwarden.sh https://go.btwrdn.co/bw-sh
接下来,为下载的脚本设置执行权限:
chmod +x bitwarden.sh接下来,使用以下命令安装 Bitwarden 密码管理器:
sudo ./bitwarden.sh install您将被要求提供您的域或 IP、SSL 信息和数据库名称,如下所示:
 _     _ _                         _
| |__ (_) |___      ____ _ _ __ __| | ___ _ __
| '_ \| | __\ \ /\ / / _` | '__/ _` |/ _ \ '_ \
| |_) | | |_ \ V  V / (_| | | | (_| |  __/ | | |
|_.__/|_|\__| \_/\_/ \__,_|_|  \__,_|\___|_| |_|

Open source password management solutions
Copyright 2015-2022, 8bit Solutions LLC
https://bitwarden.com, https://github.com/bitwarden

===================================================

bitwarden.sh version 2022.8.4
Docker version 20.10.17, build 100c701
docker-compose version 1.29.2, build 5becea4c

(!) Enter the domain name for your Bitwarden instance (ex. bitwarden.example.com): 208.117.81.243

(!) Do you want to use Let's Encrypt to generate a free SSL certificate? (y/n): n

(!) Enter the database name for your Bitwarden instance (ex. vault): bitwarden
提供所有必要的信息,然后按 Enter 键。您将被要求提供 Bitwarden 安装密钥、ID 和 SSL 信息:
2022.8.4: Pulling from bitwarden/setup
1efc276f4ff9: Pull complete
e5aeae5c9ad4: Pull complete
9d8b4edc672a: Pull complete
67bb3a123350: Pull complete
4b31f33ff8ee: Pull complete
8302c6d93c2f: Pull complete
64c1ff0e03a3: Pull complete
289e8b648bb1: Pull complete
c706fe453135: Pull complete
6b18bfe90415: Pull complete
Digest: sha256:257317606bad7b6c06755c81e4f61099b4af8b89829d7a9a2688545b92daa45f
Status: Downloaded newer image for bitwarden/setup:2022.8.4
docker.io/bitwarden/setup:2022.8.4

(!) Enter your installation id (get at https://bitwarden.com/host): c1908405-5beb-497f-9f09-aefe00f87c3f

(!) Enter your installation key: yQVH9PTcUIPftio0ZM8L

(!) Do you have a SSL certificate to use? (y/n): n

(!) Do you want to generate a self-signed SSL certificate? (y/n): y
提供所有必要的信息,然后按 Enter 键。安装 Bitwarden 后,您应该会看到以下输出:
Generating key for IdentityServer.
Generating a RSA private key
.........................++++
.++++
writing new private key to 'identity.key'
-----

!!!!!!!!!! WARNING !!!!!!!!!!
You are not using a SSL certificate. Bitwarden requires HTTPS to operate.
You must front your installation with a HTTPS proxy or the web vault (and
other Bitwarden apps) will not work properly.

Building nginx config.
Building docker environment files.
Building docker environment override files.
Building FIDO U2F app id.
Building docker-compose.yml.

Installation complete

If you need to make additional configuration changes, you can modify
the settings in `./bwdata/config.yml` and then run:
`./bitwarden.sh rebuild` or `./bitwarden.sh update`

Next steps, run:
`./bitwarden.sh start`
现在,使用以下命令启动 Bitwarden 服务:
sudo ./bitwarden.sh start您应该得到以下输出:
bitwarden.sh version 2022.8.4
Docker version 20.10.17, build 100c701
docker-compose version 1.29.2, build 5becea4c

Pulling mssql         ... done
Pulling web           ... done
Pulling attachments   ... done
Pulling api           ... done
Pulling identity      ... done
Pulling sso           ... done
Pulling admin         ... done
Pulling icons         ... done
Pulling notifications ... done
Pulling events        ... done
Pulling nginx         ... done
Creating directory /opt/bitwarden/bwdata/core
Creating directory /opt/bitwarden/bwdata/core/attachments
Creating directory /opt/bitwarden/bwdata/logs
Creating directory /opt/bitwarden/bwdata/logs/admin
Creating directory /opt/bitwarden/bwdata/logs/api
Creating directory /opt/bitwarden/bwdata/logs/events
Creating directory /opt/bitwarden/bwdata/logs/icons
Creating directory /opt/bitwarden/bwdata/logs/identity
Creating directory /opt/bitwarden/bwdata/logs/mssql
Creating directory /opt/bitwarden/bwdata/logs/nginx
Creating directory /opt/bitwarden/bwdata/logs/notifications
Creating directory /opt/bitwarden/bwdata/logs/sso
Creating directory /opt/bitwarden/bwdata/logs/portal
Creating directory /opt/bitwarden/bwdata/mssql/backups
Creating directory /opt/bitwarden/bwdata/mssql/data
Creating network "docker_default" with the default driver
Creating network "docker_public" with the default driver
Creating bitwarden-notifications ... done
Creating bitwarden-events        ... done
Creating bitwarden-icons         ... done
Creating bitwarden-mssql         ... done
Creating bitwarden-attachments   ... done
Creating bitwarden-web           ... done
Creating bitwarden-sso           ... done
Creating bitwarden-identity      ... done
Creating bitwarden-api           ... done
Creating bitwarden-admin         ... done
Creating bitwarden-nginx         ... done
2022.8.4: Pulling from bitwarden/setup
Digest: sha256:257317606bad7b6c06755c81e4f61099b4af8b89829d7a9a2688545b92daa45f
Status: Image is up to date for bitwarden/setup:2022.8.4
docker.io/bitwarden/setup:2022.8.4


Bitwarden is up and running!
===================================================

visit http://bitwarden.example.com
to update, run `./bitwarden.sh updateself` and then `./bitwarden.sh update`
您可以使用以下命令验证所有下载的 docker 镜像:
sudo docker images您将获得以下输出:
REPOSITORY                TAG        IMAGE ID       CREATED       SIZE
bitwarden/mssql           2022.8.4   0fde97fd6c2b   11 days ago   1.4GB
bitwarden/setup           2022.8.4   c3f86466c311   11 days ago   271MB
bitwarden/notifications   2022.8.4   ad800e29d1bf   11 days ago   286MB
bitwarden/identity        2022.8.4   39342ec67118   11 days ago   284MB
bitwarden/nginx           2022.8.4   a9e4cdb98e3d   11 days ago   144MB
bitwarden/icons           2022.8.4   e52e97fcc4c1   11 days ago   285MB
bitwarden/admin           2022.8.4   25fe354a8fa2   11 days ago   346MB
bitwarden/sso             2022.8.4   345ee4d3d544   11 days ago   289MB
bitwarden/events          2022.8.4   012f3c8dc079   11 days ago   284MB
bitwarden/api             2022.8.4   f780a0e0bfbf   11 days ago   289MB
bitwarden/attachments     2022.8.4   8b08874c96fc   11 days ago   214MB
bitwarden/web             2022.8.1   1ac4e585d2dd   2 weeks ago   247MB
要检查所有正在运行的容器,请运行以下命令:
sudo docker ps您应该看到以下输出:
CONTAINER ID   IMAGE                              COMMAND            CREATED          STATUS                             PORTS                                                                                    NAMES
9af240bb8845   bitwarden/nginx:2022.8.4           "/entrypoint.sh"   33 seconds ago   Up 28 seconds (health: starting)   80/tcp, 0.0.0.0:80->8080/tcp, :::80->8080/tcp, 0.0.0.0:443->8443/tcp, :::443->8443/tcp   bitwarden-nginx
4758bb5d8c6c   bitwarden/admin:2022.8.4           "/entrypoint.sh"   39 seconds ago   Up 33 seconds (health: starting)   5000/tcp                                                                                 bitwarden-admin
2814dd1eddd2   bitwarden/identity:2022.8.4        "/entrypoint.sh"   45 seconds ago   Up 35 seconds (healthy)            5000/tcp                                                                                 bitwarden-identity
22fa6c748d4f   bitwarden/sso:2022.8.4             "/entrypoint.sh"   45 seconds ago   Up 34 seconds (health: starting)   5000/tcp                                                                                 bitwarden-sso
9906ace7ea69   bitwarden/api:2022.8.4             "/entrypoint.sh"   45 seconds ago   Up 34 seconds (healthy)            5000/tcp                                                                                 bitwarden-api
1d1f10c10667   bitwarden/mssql:2022.8.4           "/entrypoint.sh"   45 seconds ago   Up 39 seconds (health: starting)                                                                                            bitwarden-mssql
f7ab34d501cc   bitwarden/attachments:2022.8.4     "/entrypoint.sh"   45 seconds ago   Up 37 seconds (healthy)                                                                                                     bitwarden-attachments
6646bf077ba8   bitwarden/web:2022.8.1             "/entrypoint.sh"   45 seconds ago   Up 39 seconds (healthy)                                                                                                     bitwarden-web
e73076475cc7   bitwarden/icons:2022.8.4           "/entrypoint.sh"   45 seconds ago   Up 35 seconds (health: starting)   5000/tcp                                                                                 bitwarden-icons
535f2f7599c1   bitwarden/events:2022.8.4          "/entrypoint.sh"   45 seconds ago   Up 35 seconds (healthy)            5000/tcp                                                                                 bitwarden-events
7a489f258459   bitwarden/notifications:2022.8.4   "/entrypoint.sh"   45 seconds ago   Up 34 seconds (healthy)            5000/tcp                                                                                 bitwarden-notifications
访问 Bitwarden Web 界面
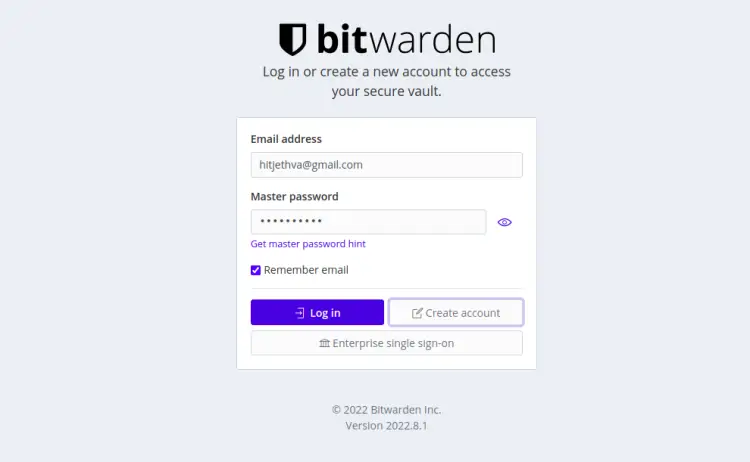
至此,Bitwarden 密码管理器已安装并配置完毕。您现在可以使用 URL https://your-server-ip 访问其 Web UI。您应该会看到 Bitwarden 登录页面:
单击创建帐户按钮。您应该会看到以下页面:
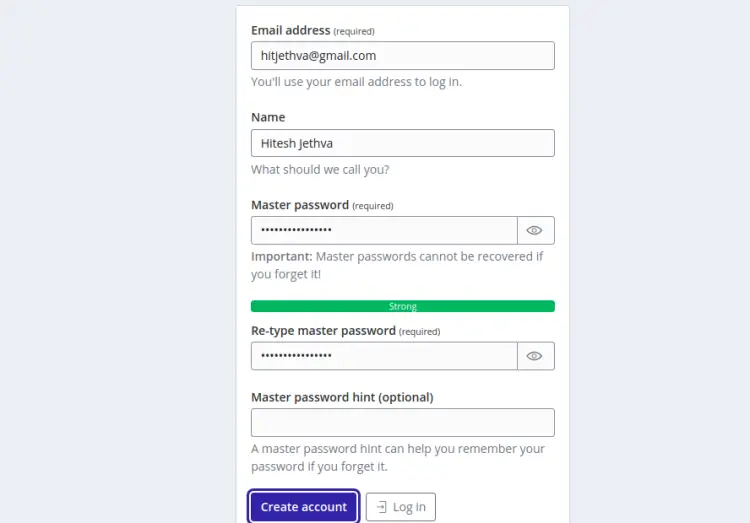
提供您的电子邮件地址、主密码,然后单击“创建帐户”按钮。创建帐户后,您将被重定向到 Bitwarden 登录页面:
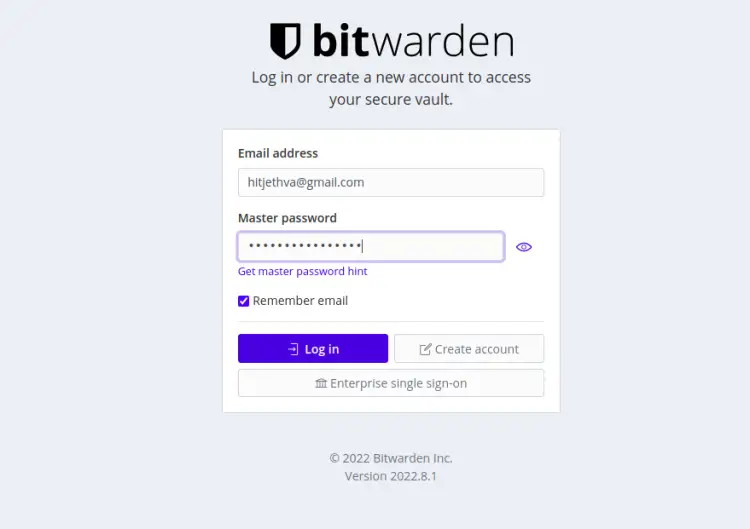
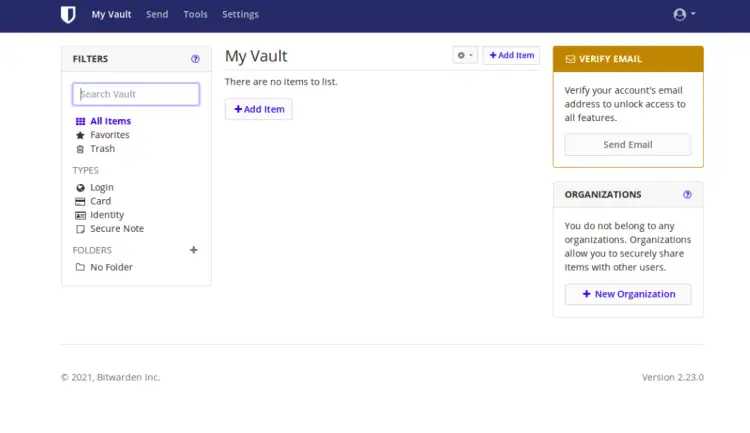
提供您的电子邮件地址、密码,然后单击“登录”按钮。您应该在以下页面上看到 Bitwarden 仪表板:
结论
恭喜!您已经在 Ubuntu 22.04 上成功安装了带有 Docker 的 Bitwarden 密码管理器。您现在可以添加密码并在多个设备之间共享它们。如果您有任何问题,请随时问我。