如何在 CentOS 7 上使用 Pacemaker 和 Corosync 设置 Nginx 高可用性
在此页
- 第 1 步 - 映射主机文件
- 第 2 步 - 安装 Epel 存储库和 Nginx
- 第 3 步 - 安装和配置 Pacemaker、Corosync 和 Pcsd
- 第 4 步 - 创建和配置集群
- 第 5 步 - 禁用 STONITH 并忽略仲裁策略
- 第 6 步 - 添加浮动 IP 和资源
- 第 7 步 - 向集群添加约束规则
- 第 8 步 - 配置防火墙
- 第 9 步 - 测试
- 参考资料
在本教程中,我们将逐步指导您如何使用 Pacemaker、Corosync 和 Pcsd 创建高可用性集群 Nginx Web 服务器。我们将在 CentOS 7 系统上使用 Pacemaker 创建主动-被动集群或故障转移集群 Nginx Web 服务器。
Pacemaker 是一款开源集群管理器软件,可实现服务的最大高可用性。它是由 ClusterLabs 分发的高级且可扩展的 HA 集群管理器。
Corosync Cluster Engine 是基于新 BSD 许可证的 OpenAIS 项目派生的开源项目。它是一个群组通信系统,具有用于在应用程序中实现高可用性的附加功能。
Pacemaker 接口有一些应用程序。 Pcsd 是用于管理 Pacemaker 的 Pacemaker 命令行界面和 GUI 之一。我们可以使用 pcsd 命令 pcs 创建、配置或添加新节点到集群。
先决条件
- 2 个或更多 CentOS 7 服务器
- web01 10.0.15.10
- web02 10.0.15.11
- web03 10.0.15.12
我们将要做什么:
- 映射主机文件
- 安装 Epel 存储库和 Nginx
- 安装和配置 Pacemaker、Corosync 和 Pcsd
- 创建和配置集群
- 禁用 STONITH 并忽略仲裁策略
- 添加浮动 IP 和资源
- 向集群添加规则
- 配置防火墙
- 测试设置
第 1 步 - 映射主机文件
注意:在所有服务器 web01、web02 和 web03 上运行步骤 1 - 3。
我们必须做的第一步是编辑每台服务器上的主机文件,以便映射所有服务器的主机名。我们有 web01、web02 和 web03 服务器,使用 ssh 帐户登录到每个服务器。
ssh [01,02,03]使用 vim 编辑 /etc/hosts 文件。
vim /etc/hosts将以下配置粘贴到那里。
10.0.15.10      web01
10.0.15.11      web02
10.0.15.12      web03
保存并退出。
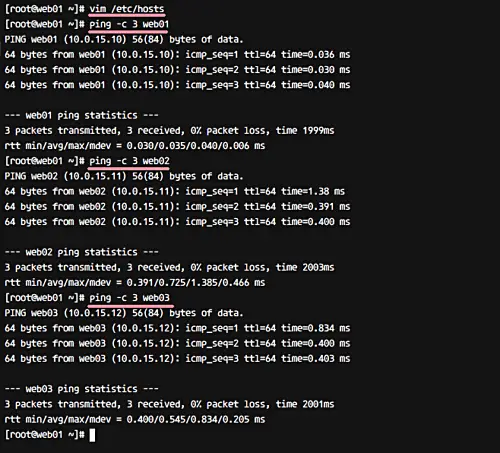
现在测试主机映射配置。
ping -c 3 web01
ping -c 3 web02
ping -c 3 web03
确保将 web01、web02 和 web03 映射到正确的 IP 地址。
第 2 步 - 安装 Epel 存储库和 Nginx
在此步骤中,我们将安装 epel 存储库,然后安装 Nginx Web 服务器。安装 Nginx 软件包需要 EPEL 或 Extra Packages for Enterprise Linux 存储库。
使用以下 yum 命令安装 EPEL 存储库。
yum -y install epel-release现在从 EPEL 存储库安装 Nginx Web 服务器。
yum -y install nginx安装完成后,将每台服务器上的默认 index.html 页面更改为新页面。
#Run Command on 'web01'
echo '<h1>web01 - hakase-labs</h1>' > /usr/share/nginx/html/index.html

#Run Command on 'web02'
echo '<h1>web02 - hakase-labs</h1>' > /usr/share/nginx/html/index.html

#Run Command on 'web03'
echo '<h1>web03 - hakase-labs</h1>' > /usr/share/nginx/html/index.html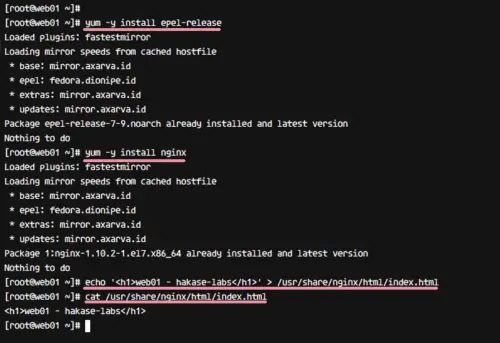
EPEL Repository 和 Nginx 网络服务器现已安装在系统上。
第 3 步 - 安装和配置 Pacemaker、Corosync 和 Pcsd
Pacemaker、Corosync 和 Pcsd 在默认系统存储库中可用。因此,它们都可以使用以下 yum 命令从 CentOS 存储库安装。
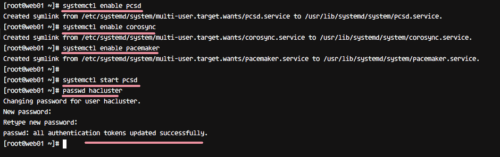
yum -y install corosync pacemaker pcs安装完成后,使用下面的 systemctl 命令使所有服务在系统启动时自动启动。
systemctl enable pcsd
systemctl enable corosync
systemctl enable pacemaker
现在在所有服务器上启动 pcsd Pacemaker 命令行界面。
systemctl start pcsd接下来,为 hacluster 用户创建一个新密码,并为所有服务器使用相同的密码。该用户是在软件安装过程中自动创建的。
下面介绍如何为 hacluster 用户配置密码。
passwd hacluster
Enter new password:
系统上安装了高可用性软件堆栈 Pacemaker、Corosync 和 Pcsd。
第 4 步 - 创建和配置集群
注意:仅在 web01 上运行步骤 4 - 7。
在这一步中,我们将创建一个包含 3 个 centos 服务器的新集群。然后配置浮动 IP 地址并添加新的 Nginx 资源。
要创建集群,我们需要使用 pcs 命令和 hacluster 用户授权所有服务器。
使用 pcs 命令和 hacluster 用户和密码授权所有服务器。
pcs cluster auth web01 web02 web03
Username: hacluster
Password: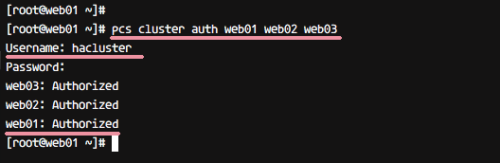
现在是时候设置集群了。定义集群名称和将成为集群一部分的所有服务器。
pcs cluster setup --name hakase_cluster web01 web02 web03现在启动所有集群服务并启用它们。
pcs cluster start --all
pcs cluster enable --all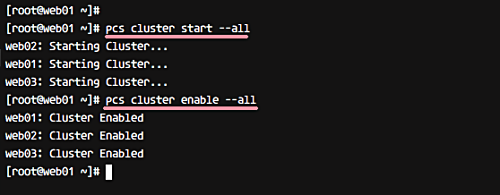
接下来,检查集群状态。
pcs status cluster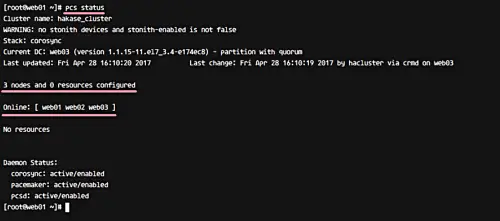
第 5 步 - 禁用 STONITH 并忽略仲裁策略
由于我们没有使用隔离设备,我们将禁用 STONITH。 STONITH 或 Shoot The Other Node In The Head 是 Pacemaker 上的围栏实现。如果您在生产中,最好启用 STONITH。
使用以下 pcs 命令禁用 STONITH。
pcs property set stonith-enabled=false接下来,对于 Quorum 策略,忽略它。
pcs property set no-quorum-policy=ignore检查属性列表并确保禁用 stonith 和仲裁策略。
pcs property list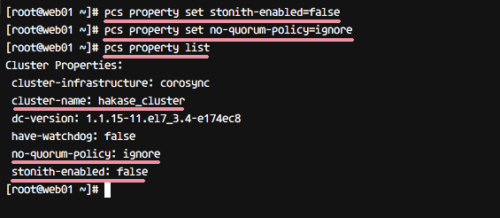
STONITH 和仲裁策略已禁用。
第 6 步 - 添加浮动 IP 和资源
浮动 IP 是可以从一台服务器自动迁移/移动到同一数据中心内另一台服务器的 IP 地址。我们已经将 Pacemaker High-Availability 的浮动 IP 地址定义为 10.0.15.15。现在我们要添加两个资源,名为 virtual_ip 的浮动 IP 地址资源和名为 webserver 的 Nginx Web 服务器的新资源。
使用 pcs 命令添加新的资源浮动 IP 地址 virtual_ip,如下所示。
pcs resource create virtual_ip ocf:heartbeat:IPaddr2 ip=10.0.15.15 cidr_netmask=32 op monitor interval=30s接下来,为 Nginx 网络服务器添加一个新资源。
pcs resource create webserver ocf:heartbeat:nginx configfile=/etc/nginx/nginx.conf op monitor timeout="5s" interval="5s"确保没有错误结果,然后检查可用资源。
pcs status resources您将看到两个资源 virtual_ip 和一个网络服务器。添加了用于浮动 IP 和 Nginx Web 服务器的新资源。

第 7 步 - 向集群添加约束规则
在此步骤中,我们将设置高可用性规则,并使用 pcs 命令行界面设置资源限制。
为 webserver 和 virtual_ip 资源设置排序规则约束,分数为 INFINITY。此外,在所有服务器节点上将网络服务器和 virtual_ip 资源设置为相同。
pcs constraint colocation add webserver virtual_ip INFINITY始终在同一节点服务器上设置 virtual_ip 和 webserver 资源。
pcs constraint order virtual_ip then the webserver接下来,停止集群,然后重新启动。
pcs cluster stop --all
pcs cluster start --all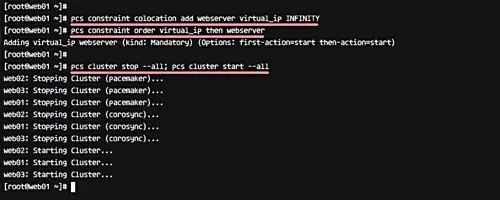
现在,再次检查资源,您会看到它们的状态为已在同一服务器 web01 上启动。
pcs status resources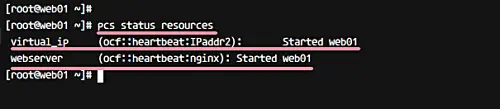
virtual_ip 和 webserver 资源已在同一服务器/节点 web01 上启动。
第 8 步 - 配置 Firewalld
HA-Cluster 将在防火墙配置 firewalld 下运行 - 如果您没有该软件包,请安装它。
yum -y install firewalld使用以下 systemctl 命令启动 firewalld 并使其在每次系统启动时自动运行。
systemctl start firewalld
systemctl enable firewalld
接下来,使用 firewall-cmd 命令向 firewalld 添加新服务——为 Nginx 添加高可用性服务、HTTP 和 HTTPS 服务。
firewall-cmd --permanent --add-service=high-availability
firewall-cmd --permanent --add-service=http
firewall-cmd --permanent --add-service=https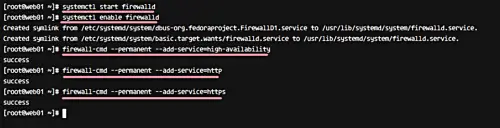
重新加载防火墙配置,并检查所有服务。
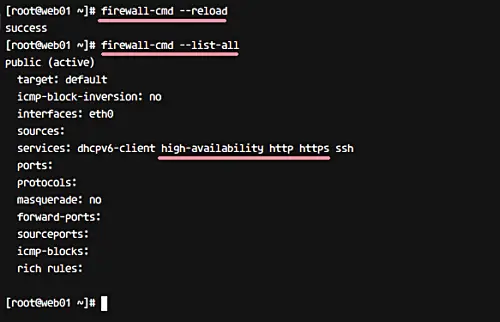
firewall-cmd --reload
firewall-cmd --list-all
确保带有 HTTP 和 https 的 ha 服务在列表中。
第 9 步 - 测试
在这一步中,我们将对集群进行一些测试。测试节点状态(在线或离线),测试corosync成员和状态,然后通过访问浮动IP地址测试Nginx webserver的高可用性。
使用以下命令测试节点状态。
pcs status nodes
所有节点都在线。
测试 corosync 成员。
corosync-cmapctl | grep members您将获得 Corosync 成员的 IP 地址。
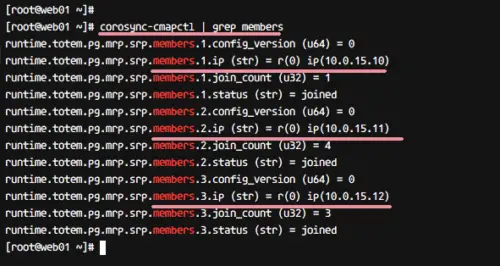
检查 Corosync 成员,您将看到如下所示的结果。
pcs status corosync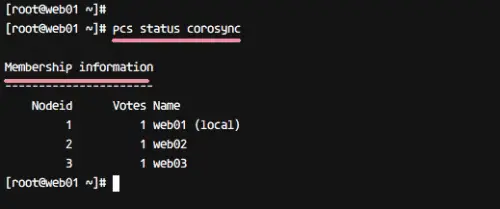
最后,检查网络服务器的高可用性。打开 Web 浏览器并输入浮动 IP 地址 10.0.15.15。
您将看到来自 web01 服务器的网页。

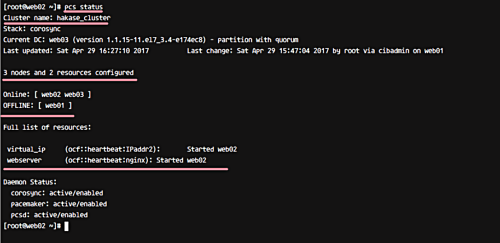
接下来,使用以下命令停止 web01 服务器上的集群。
pcs cluster stop web01再次检查页面,您将从 web02 服务器获取页面,如下所示。

额外的:
使用以下命令检查集群状态。
pcs status您将得到如下所示的结果。
在 CentOS 7 服务器上使用 Pacemaker、Corosync 和 Pcsd 设置 Nginx 网络服务器高可用性已成功完成。
参考
- <李>
- http://www.alexlinux.com/pacemaker-corosync-nginx-cluster/