在 Centos 7 上安装和配置企业开源预订系统
在此页
- 环境
- 安全
- 准备
- 在 Centos 7 上安装 MariaDB、Apache 和 PHP
- 通过终端设置数据库
- 通过 PHPMyAdmin 设置数据库
- 在 Centos 7 上安装 PHPMyAdmin(可选)
在当今的业务中,越来越需要共享工作空间、实验室、工具和任何其他类型的资源。充分利用可用资源已成为现代企业的竞争优势。
每个公司的资源都是有限的,因此所有成员对这些资源的使用存在争议,这就是重点,这些资源的争议会导致员工之间的问题,关系的磨损和组织的生产力下降。
这个讨论似乎与技术相去甚远,但是,要解决这些类型的问题,可以使用许多免费软件,在这篇文章中,我写了一个能够帮助以公平有效的方式组织资源使用的公司工具.软件概述
Booked 是用 PHP 和 MySQL 编写的开源软件,可帮助组织和团体有效地管理、记录和跟踪任何类型的资源。它允许您创建计划,以便用户可以找到可用于资源使用的计划。
Booked 允许通过使用配额公平分配资源。它还允许您通过储备批准来控制资源的使用。还可以配置资源保留之间的自动范围。
Booked 包括强大的企业功能,例如支持多种语言、基于 Web、移动优先、报告系统、提醒、LDAP、Active Directory、与电子邮件客户端集成的 ical 文件等。
环境
本文介绍了预定的安装和基本配置。本文基于以下环境编写:带有 CENTOS 7 Minimal、2GB RAM、8GB HD 和 2 个网络接口(仅主机和 NAT)的 Virtual Box VM。
安全
本文并不完全涵盖这个复杂而广泛的主题。它把重点放在简单的 S.O.配置和预定的系统配置。
准备
假设您使用全新安装的 Centos 7 Minimal,在安装 Booked 之前,请运行以下命令来更新系统并安装其他软件包:
yum updateTransaction Summary ================================================================================ Install 1 Package Upgrade 39 Packages Total download size: 91 M Is this ok [y/d/N]: y安装您最喜欢的文本编辑器或使用 VI。在本文中我使用 VIM,要安装它,请运行以下命令:
yum install vim安装 WGET 包,运行以下命令:
yum install wget安装解压包,运行以下命令:
yum install unzip要配置网络,请运行以下命令打开 NMTUI(网络管理器文本用户界面)工具并根据需要编辑网络接口和主机名:
nmtui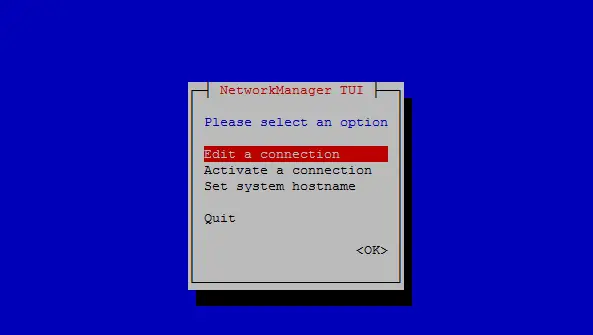
在 CentOS 7 上设置网络设置和主机名后,运行以下命令以应用更改:
service networks restart要验证网络信息,请运行以下命令:
ip addr输出如下所示:
1: lo: <LOOPBACK,UP,LOWER_UP> mtu 65536 qdisc noqueue state UNKNOWN qlen 1
link/loopback 00:00:00:00:00:00 brd 00:00:00:00:00:00
inet 127.0.0.1/8 scope host lo
valid_lft forever preferred_lft forever
inet6 ::1/128 scope host
valid_lft forever preferred_lft forever
2: enp0s3: <BROADCAST,MULTICAST,UP,LOWER_UP> mtu 1500 qdisc pfifo_fast state UP qlen 1000
link/ether 08:00:27:67:bc:73 brd ff:ff:ff:ff:ff:ff
inet 10.0.2.15/24 brd 10.0.2.255 scope global dynamic enp0s3
valid_lft 84631sec preferred_lft 84631sec
inet6 fe80::9e25:c982:1091:90eb/64 scope link
valid_lft forever preferred_lft forever
3: enp0s8: <BROADCAST,MULTICAST,UP,LOWER_UP> mtu 1500 qdisc pfifo_fast state UP qlen 1000
link/ether 08:00:27:68:88:f3 brd ff:ff:ff:ff:ff:ff
inet 192.168.56.101/24 brd 192.168.56.255 scope global dynamic enp0s8
valid_lft 1044sec preferred_lft 1044sec
inet6 fe80::a00:27ff:fe68:88f3/64 scope link
valid_lft forever preferred_lft forever
在 Centos 7 上禁用 SELINUX(安全增强型 Linux),编辑以下配置文件:
vim /etc/selinux/config"/etc/selinux/config" 14L, 547C# This file controls the state of SELinux on the system. # SELINUX= can take one of these three values: # enforcing - SELinux security policy is enforced. # permissive - SELinux prints warnings instead of enforcing. # disabled - No SELinux policy is loaded. SELINUX=enforcing # SELINUXTYPE= can take one of three two values: # targeted - Targeted processes are protected, # minimum - Modification of targeted policy. Only selected processes are prootected. # mls - Multi Level Security protection. SELINUXTYPE=targeted将指令 SELINUX 的值 enforcing 更改为禁用,保存文件并重新启动服务器。
要检查 Centos 7 上 SELinux 的状态,请运行以下命令:
getenforce输出必须是:
Disabled要在 Centos 7 上禁用 FirewallD,请运行以下命令:
systemctl disable firewalldsystemctl stop firewalld要检查 Centos 7 上的防火墙状态,请运行以下命令:
systemctl status firewalld在 Centos 7 上安装 MariaDB、Apache 和 PHP
要在 Centos 7 上安装 MariaDB,请运行以下命令:
yum -y install mariadb-server要启动 MariaDB,请运行以下命令:
systemctl start mariadb要提高 MariaDB 的安全性,请运行以下命令:
/usr/bin/mysql_secure_installation根据以下输出设置选项或使用您自己的偏好:
NOTE: RUNNING ALL PARTS OF THIS SCRIPT IS RECOMMENDED FOR ALL MariaDB
      SERVERS IN PRODUCTION USE!  PLEASE READ EACH STEP CAREFULLY!

In order to log into MariaDB to secure it, we'll need the current
password for the root user.  If you've just installed MariaDB, and
you haven't set the root password yet, the password will be blank,
so you should just press enter here.

Enter current password for root (enter for none):<Press Enter>

OK, successfully used password, moving on...

Setting the root password ensures that nobody can log into the MariaDB
root user without the proper authorisation.

Set root password? [Y/n] <Press Y>
设置根密码:
New password: *******
Re-enter new password: *******
Password updated successfully!
Reloading privilege tables..
 ... Success!

By default, a MariaDB installation has an anonymous user, allowing anyone
to log into MariaDB without having to have a user account created for
them.  This is intended only for testing, and to make the installation
go a bit smoother.  You should remove them before moving into a
production environment.

Remove anonymous users? [Y/n] <Press Y>

... Success!

Normally, root should only be allowed to connect from 'localhost'. This
ensures that someone cannot guess at the root password from the network.

Disallow root login remotely? [Y/n] <Choose acording your needs>

... Success!

By default, MariaDB comes with a database named 'test' that anyone can
access. This is also intended only for testing, and should be removed
before moving into a production environment.

Remove test database and access to it? [Y/n] <Press Y>


- Dropping test database...
 ... Success!
 - Removing privileges on test database...
 ... Success!

Reloading the privilege tables will ensure that all changes made so far
will take effect immediately.

Reload privilege tables now? [Y/n] <Press Y>

... Success!

Cleaning up...

All done! If you've completed all of the above steps, your MariaDB
installation should now be secure.

Thanks for using MariaDB!
将 MariaDB 设置为在 Centos 7 上自动启动:
systemctl enable mariadb.service要安装 Apache,请运行以下命令:
yum install httpd要启动 Apache,请运行以下命令:
systemctl start httpd.service将 Apache 设置为随 Centos 7 自动启动:
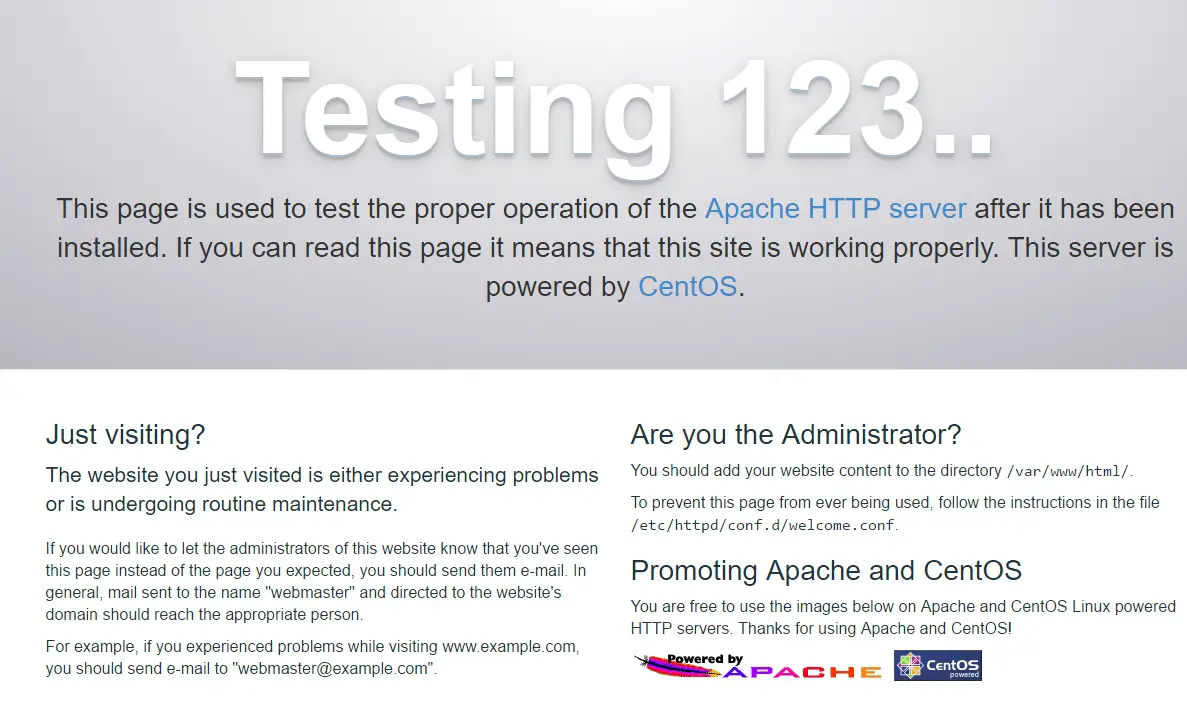
systemctl enable httpd.service要测试 Apache,请在 Web 浏览器中键入服务器的 IP 地址。如果一切正常你可以看到一个测试页面:
要安装 PHP,请运行以下命令:
yum install php php-mysql重新启动 Apache,运行以下命令:
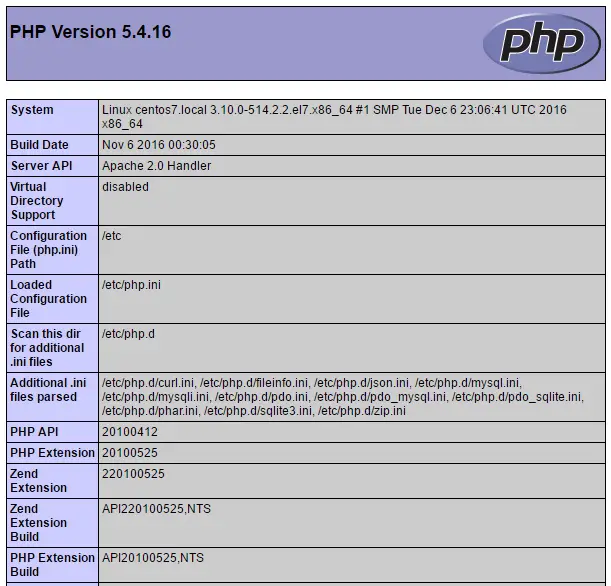
systemctl restart httpd.service要测试 PHP,请在 /var/www/html 目录中创建一个文件 phpinfo.php,内容如下:
<?php phpinfo(); ?>现在您可以使用以下 URL 通过浏览器访问 phpinfo.php:http://[your-ip-addres]/phpinfo.php。如果一切正常,可以看到如下页面:
通过终端设置数据库
通过终端访问 MariaDB 并创建数据库 bookedscheduler 和拥有足够权限管理该数据库的用户 booked_user。通过终端运行以下命令:
mysql -u root -p创建 bookedscheduler 数据库:
MariaDB [(none)]> create database bookedscheduler;在 MariaDb 上创建 booked_user:
CREATE USER 'booked_user'@'localhost' IDENTIFIED BY 'your_password';授予用户 booked_user 到 bookedscheduler 数据库的权限:
GRANT ALL PRIVILEGES ON database.bookedscheduler TO 'booked_user'@'localhost';从 /var/www/html/booked/database_schema/ 目录导入 Booked 数据库架构和数据,必须导入以下 sql 文件,create_schema.sql 和 create-data.sql:
mysql -u root -p bookedscheduler < create-schema.sqlmysql -u root -p bookedscheduler < create-data.sql通过 PHPMyAdmin 设置数据库
在 Centos 7 上安装 PHPMyAdmin(可选)
PHPMyAdmin 是一个通过浏览器以友好的方式管理 mysql (mariaDB) 数据库的工具。要自动安装 phpmyadmin,您需要安装 Epel 存储库,运行以下命令:
yum install epel-release现在您可以运行以下命令:
yum install phpmyadmin安装 PHPMyAdmin 后,我们需要对其进行配置。首先,复制配置文件并编辑 /etc/httpd/conf.d/ 中的 phpMyAdmin.conf 文件:
cp /etc/httpd/conf.d/phpMyAdmin.conf /etc/httpd/conf.d/phpMyAdmin.conf.oldvim /etc/httpd/conf.d/phpMyAdmin.conf根据您的网络环境更改值,在我的例子中,我更改了以下行(17、25、34、42)。我的配置文件如下所示:
# phpMyAdmin - Web based MySQL browser written in php
#
# Allows only localhost by default
#
# But allowing phpMyAdmin to anyone other than localhost should be considered
# dangerous unless properly secured by SSL
Alias /phpMyAdmin /usr/share/phpMyAdmin
Alias /phpmyadmin /usr/share/phpMyAdmin

<IfModule mod_authz_core.c>
# Apache 2.4
<RequireAny>
Require ip 127.0.0.1
Require ip 192.168.56.1
Require ip ::1
</RequireAny>
</IfModule>
 <IfModule !mod_authz_core.c>
 # Apache 2.2
 Order Deny,Allow
 Deny from All
 Allow from 192.168.56.1
 Allow from ::1
 </IfModule>
<Directory /usr/share/phpMyAdmin/setup/>
 <IfModule mod_authz_core.c>
 # Apache 2.4
 <RequireAny>
 Require ip 127.0.0.1
 Require ip ::1
 </RequireAny>
 </IfModule>
<IfModule !mod_authz_core.c>
 # Apache 2.2
 Order Deny,Allow
 Deny from All
 Allow from 192.168.56.1
 Allow from ::1
 </IfModule>
</Directory>
# These directories do not require access over HTTP - taken from the original
# phpMyAdmin upstream tarball
#
<Directory /usr/share/phpMyAdmin/libraries/>
 Order Deny,Allow
 Deny from All
 Allow from None
</Directory>
<Directory /usr/share/phpMyAdmin/setup/lib/>
 Order Deny,Allow
 Deny from All
 Allow from None
</Directory>
<Directory /usr/share/phpMyAdmin/setup/frames/>
 Order Deny,Allow
 Deny from All
 Allow from None
</Directory>
# This configuration prevents mod_security at phpMyAdmin directories from
# filtering SQL etc. This may break your mod_security implementation.
#
#<IfModule mod_security.c>
# <Directory /usr/share/phpMyAdmin/>
# SecRuleInheritance Off
# </Directory>
#</IfModule>
重新启动 Apache,运行以下命令:
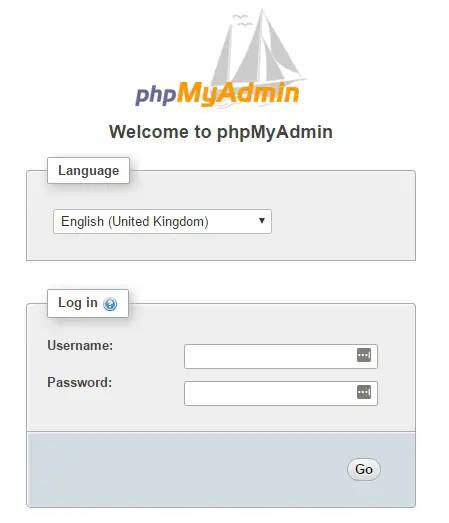
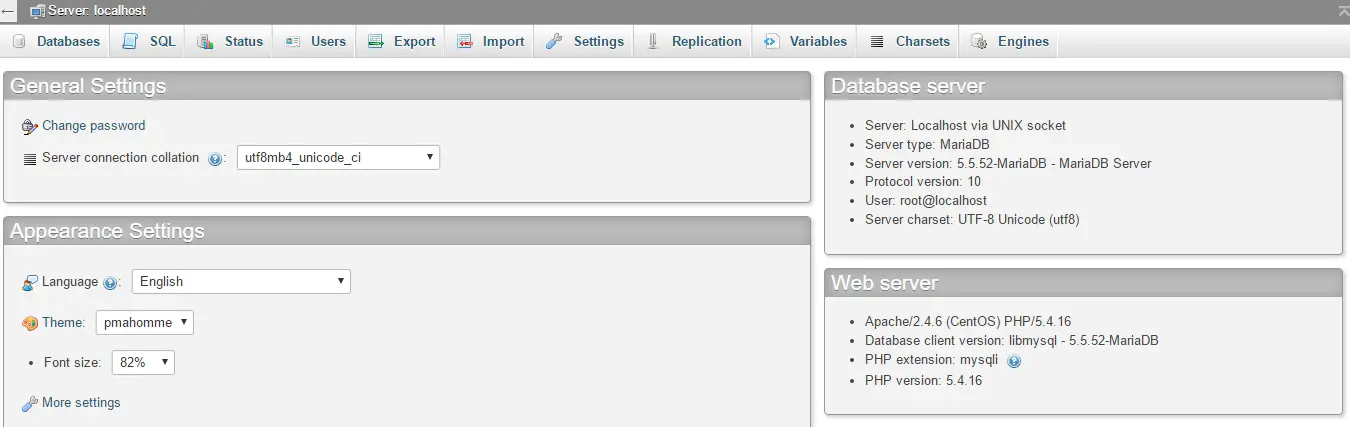
systemctl restart httpd.service现在您可以使用以下 URL 通过浏览器访问 PHPMyAdmin:http://[your-ip-addres]/phpMyAdmin/
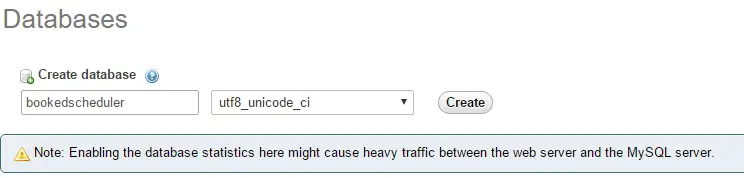
使用您的根帐户和之前在 MariaDB 安装中定义的密码来创建数据库和用户。在仪表板上,选择数据库选项以创建新数据库:
使用数据库名称填写表单并选择创建。
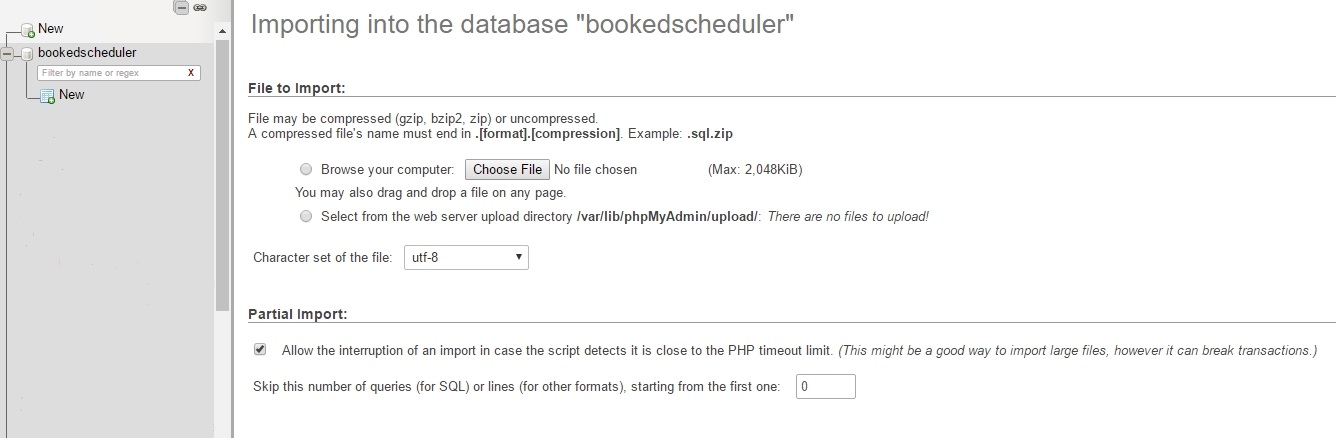
要导入数据库数据,请在左侧菜单中选择 bookedscheduler 数据库,然后从 PHPMyAdmin 仪表板导入,从安装文件中选择以下文件,create-schema.sql (1) 和 create-data.sql (2)导入它。
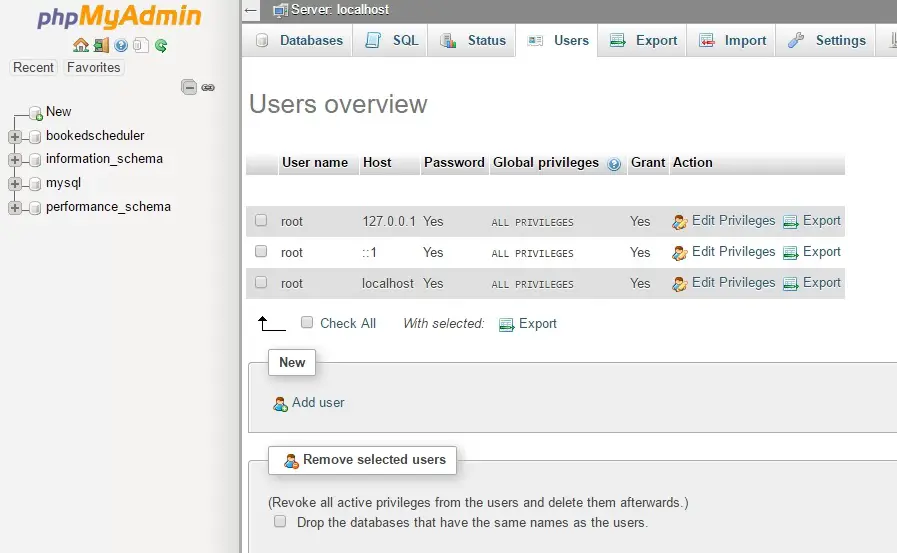
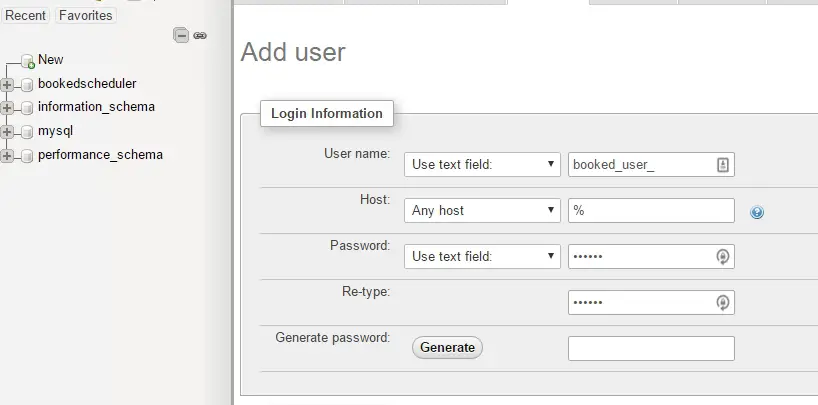
创建具有管理 bookedscheduler 数据库权限的用户 booked_user。在 PHPMyAdmin 仪表板上,选择用户并添加:
在用户创建屏幕上,使用用户数据库 (booked_user) 填写字段,设置密码并在页面末尾选择 GO:
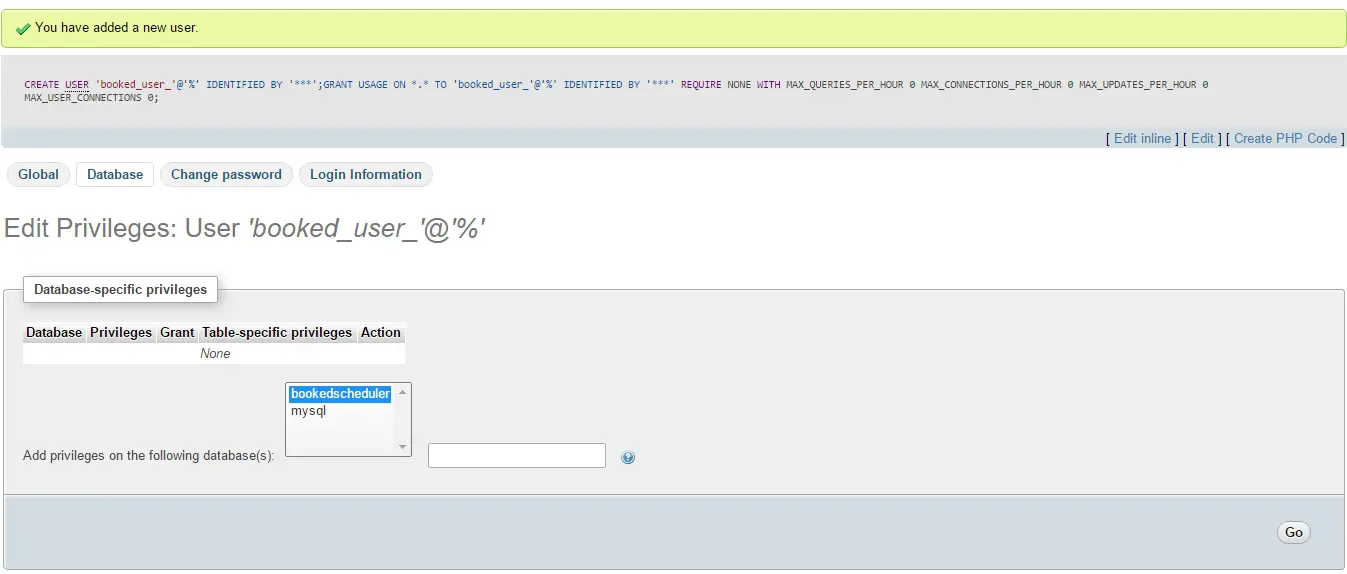
要在 bookedscheduler 数据库上设置 booked_user 的权限,请从数据库列表中选择 bookedscheduler,然后选择 Go:
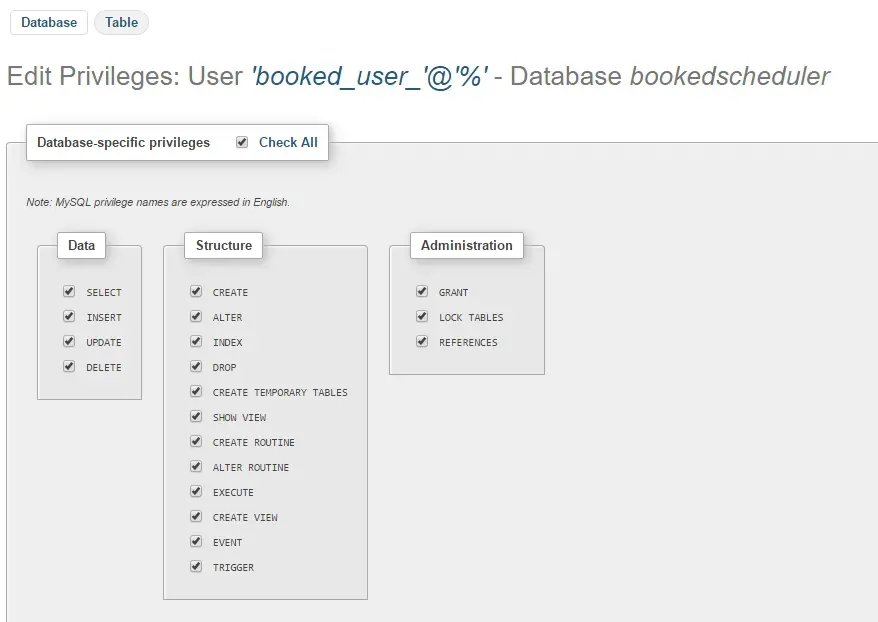
在权限屏幕上,选择选项 Check All and Go:
安装 Booked Scheduler Centos 7
我们有两种方法来安装 Booked Scheduler,手动或自动。本文仅涵盖手动安装。要在 Centos 7 上安装 Booked Scheduler,请进入 /tmp 目录并下载源代码:
wget https://ufpr.dl.sourceforge.net/project/phpscheduleit/Booked/2.6/booked-2.6.5.zip将文件解压到/var/www/html目录下,运行以下命令:
unzip booked-2.6.5.zip -d /var/www/html/更改解压缩文件的权限。
cd /var/www/html/chown -R apache:apache /booked在 /var/www/html/booked/config 中设置配置文件。将 config.dist.php 文件复制到 config.php 并编辑配置文件的块(这是我的配置文件):
cp config.dist.php config.php根据我们的环境更改值,这里我介绍要更改的主要设置,并告知,电子邮件地址将是第一次注册后的系统管理员:
<?php
/**
Copyright 2011-2016 Nick Korbel

This file is part of Booked Scheduler.

Booked Scheduler is free software: you can redistribute it and/or modify
it under the terms of the GNU General Public License as published by
the Free Software Foundation, either version 3 of the License, or
(at your option) any later version.

Booked Scheduler is distributed in the hope that it will be useful,
but WITHOUT ANY WARRANTY; without even the implied warranty of
MERCHANTABILITY or FITNESS FOR A PARTICULAR PURPOSE. See the
GNU General Public License for more details.

You should have received a copy of the GNU General Public License
along with Booked Scheduler. If not, see <http://www.gnu.org/licenses/>.
*/

error_reporting(E_ALL & ~E_NOTICE & ~E_STRICT);
//ini_set('display_errors', 1);
//ini_set('display_startup_errors', 1);

/**
 * Application configuration
 */
$conf['settings']['app.title'] = 'Booked Scheduler'; // application title
$conf['settings']['default.timezone'] = 'America/Chicago'; // Change your time zone - look up here http://php.net/manual/en/timezones.php
$conf['settings']['allow.self.registration'] = 'true'; // if users can register themselves
$conf['settings']['admin.email'] = '';
$conf['settings']['phpmailer']['smtp.password'] = 'your-password';
$conf['settings']['phpmailer']['sendmail.path'] = '/usr/sbin/sendmail';
$conf['settings']['phpmailer']['smtp.debug'] = 'false';
/**
 * Plugin configuration. For more on plugins, see readme_installation.html
 */
$conf['settings']['plugins']['Authentication'] = '';
$conf['settings']['plugins']['Authorization'] = '';
$conf['settings']['plugins']['Permission'] = '';
$conf['settings']['plugins']['PostRegistration'] = '';
$conf['settings']['plugins']['PreReservation'] = '';
$conf['settings']['plugins']['PostReservation'] = '';
/**
 * Installation settings
 */
$conf['settings']['install.password'] = ''; //just to automated instalation
/**
 * Pages
 */
$conf['settings']['pages']['enable.configuration'] = 'true';
/**
 * API
 */
$conf['settings']['api']['enabled'] = 'false';
/**
 * ReCaptcha
 */
$conf['settings']['recaptcha']['enabled'] = 'false';
$conf['settings']['recaptcha']['public.key'] = '';
$conf['settings']['recaptcha']['private.key'] = '';
/**
 * Email
 */
$conf['settings']['email']['default.from.address'] = 'your-email-address';
$conf['settings']['email']['default.from.name'] = 'your-system-name';
/**
 * Reports
 */
$conf['settings']['reports']['allow.all.users'] = 'false';
/**
 * Account Password Rules
 */
$conf['settings']['password']['minimum.letters'] = '6';
$conf['settings']['password']['minimum.numbers'] = '0';
$conf['settings']['password']['upper.and.lower'] = 'false';
/**
 * Label display settings
 */
$conf['settings']['reservation.labels']['ics.summary'] = '{title}';
$conf['settings']['reservation.labels']['ics.my.summary'] = '{title}';
$conf['settings']['reservation.labels']['rss.description'] = '<div><span>Start</span> {startdate}</div><div><span>End</span> {enddate}</div><div><span>Organizer</span> {name}</div><div><span>Description</span> {description}</div>';
$conf['settings']['reservation.labels']['my.calendar'] = '{resourcename} {title}';
$conf['settings']['reservation.labels']['resource.calendar'] = '{name}';
$conf['settings']['reservation.labels']['reservation.popup'] = ''; // Format for what to display in reservation popups. Possible values: {name} {dates} {title} {resources} {participants} {accessories} {description} {attributes}. Custom attributes can be added using att with the attribute id. For example {att1}
/**
 * Security header settings
 */
$conf['settings']['security']['security.headers'] = 'false'; // Enable the following options
$conf['settings']['security']['security.strict-transport'] = 'true';
$conf['settings']['security']['security.x-frame'] = 'deny';
$conf['settings']['security']['security.x-xss'] = '1; mode=block';
$conf['settings']['security']['security.x-content-type'] = 'nosniff';
$conf['settings']['security']['security.content-security-policy'] = "default-src 'self'"; // Requires careful tuning (know what your doing)
/**
 * Google Analytics settings
 */
$conf['settings']['google.analytics']['tracking.id'] = ''; // if set, Google Analytics tracking code will be added to every page in Booked

$conf['settings']['authentication']['allow.facebook.login'] = 'true';
$conf['settings']['authentication']['allow.google.login'] = 'true';
$conf['settings']['authentication']['required.email.domains'] = '';
/**
 * Credits functionality
 */
$conf['settings']['credits']['enabled'] = 'false';
配置 Booked Scheduler Web 界面
访问以下地址 http://your-ipaddress/Web/index.php,如果一切正常,您将看到以下屏幕:

选择选项注册以创建管理员帐户,记住,使用之前在文件 config.php 中配置的电子邮件地址。

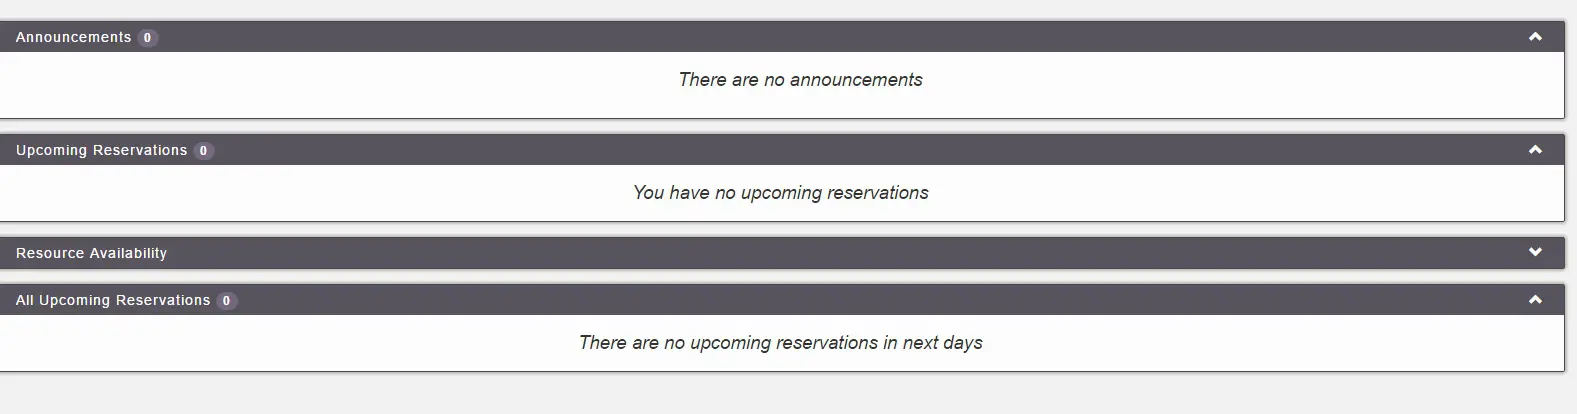
创建帐户后,转到登录屏幕并进行身份验证。将加载仪表板,如下图所示:
在主菜单上,您可以配置所有系统,选择应用程序管理:

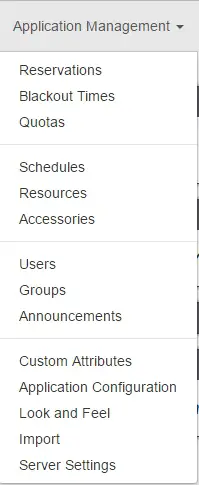
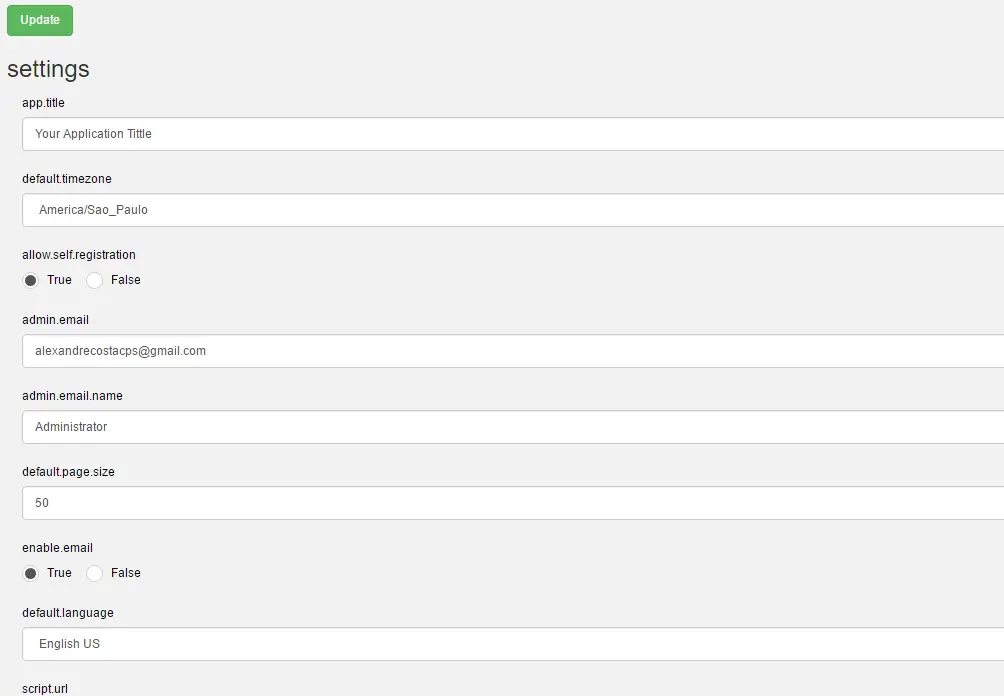
通过这个菜单,可以配置Booked Scheduler的所有资源,更改config.php,选择Application Configuration:
这篇文章是关于 Booked Scheduler 的一个小概述,这个软件有很多令人惊叹的功能,可以帮助任何环境提供资源的合理使用。
希望这篇文章能给大家介绍一下这个软件,如果大家在安装过程中遇到什么问题,欢迎随时提问。如果您想获得有关 Booked Scheduler 的更多信息,请访问 http://www.bookedscheduler.com/。