如何在 Rocky Linux 8 上安装 UVdesk Helpdesk 系统
在此页
- 先决条件
- 第 1 步 - 配置防火墙
- 第 2 步 - 安装 Nginx
- 第 3 步 - 安装 PHP 和扩展
- 第 4 步 - 安装和配置 MySQL 服务器
- 第 5 步 - 下载 UVdesk
- 第 6 步 - 配置 SELinux 权限
- 第 7 步 - 安装和配置 SSL
- 第 8 步 - 配置 Nginx 和 PHP
- 配置PHP-FPM
- 配置 Nginx
UVdesk 是一个基于 SaaS 的开源帮助台系统,供公司与客户互动并提供全天候支持。其功能包括工单管理、知识库支持、预设回复和基于电子邮件的自动工单生成。可以使用外部模块扩展 Uvdesks 功能。您可以根据特定触发器自动执行某些操作,以改进您的工作流程。
在本教程中,您将学习如何使用 Nginx、MySQL 和 PHP 在基于 Rocky Linux 8 的服务器上安装 Uvdesk。
先决条件
-
A server running Rocky Linux 8.
-
A domain name for the helpdesk pointing to the server. For our tutorial, we will use the
uvdesk.example.comdomain. -
A non-root based user with sudo privileges.
-
Make sure everything is updated.
$ sudo dnf update -
Install basic utility packages. Some of them may already be installed.
$ sudo dnf install wget curl nano unzip yum-utils -y
第 1 步 - 配置防火墙
第一步是配置防火墙。 Rocky Linux 使用 Firewalld 防火墙。检查防火墙状态。
$ sudo firewall-cmd --state
running
防火墙适用于不同的区域,公共区域是我们将使用的默认区域。列出防火墙上所有活动的服务和端口。
$ sudo firewall-cmd --permanent --list-services它应该显示以下输出。
cockpit dhcpv6-client ssh允许 HTTP 和 HTTPS 端口。
$ sudo firewall-cmd --permanent --add-service=http
$ sudo firewall-cmd --permanent --add-service=https
重新检查防火墙的状态。
$ sudo firewall-cmd --permanent --list-services您应该会看到类似的输出。
cockpit dhcpv6-client http https ssh重新加载防火墙以启用更改。
$ sudo firewall-cmd --reload第 2 步 - 安装 Nginx
Rocky Linux 附带旧版本的 Nginx。您需要下载官方 Nginx 存储库以安装最新版本。
创建并打开
/etc/yum.repos.d/nginx.repo文件以创建官方 Nginx 存储库。$ sudo nano /etc/yum.repos.d/nginx.repo将以下代码粘贴到其中。
[nginx-stable]
name=nginx stable repo
baseurl=http://nginx.org/packages/centos/$releasever/$basearch/
gpgcheck=1
enabled=1
gpgkey=https://nginx.org/keys/nginx_signing.key
module_hotfixes=true

[nginx-mainline]
name=nginx mainline repo
baseurl=http://nginx.org/packages/mainline/centos/$releasever/$basearch/
gpgcheck=1
enabled=0
gpgkey=https://nginx.org/keys/nginx_signing.key
module_hotfixes=true
通过按 Ctrl + X 并在出现提示时输入 Y 来保存文件。
安装 Nginx。
$ sudo dnf install nginx验证安装。
$ nginx -v
nginx version: nginx/1.20.2
启用 Nginx 服务。
$ sudo systemctl enable nginx第 3 步 - 安装 PHP 和扩展
对于我们的教程,我们需要使用 Remis 存储库安装最新版本的 PHP。第一步是获取 Epel 存储库。
$ sudo dnf install epel-release接下来,安装 Remi 存储库。
$ sudo dnf install https://rpms.remirepo.net/enterprise/remi-release-8.rpm检查可用的 PHP 流。
$ dnf module list php -y
Last metadata expiration check: 0:00:12 ago on Fri 03 Dec 2021 09:39:32 AM UTC.
Rocky Linux 8 - AppStream
Name                Stream                 Profiles                                 Summary
php                 7.2 [d]                common [d], devel, minimal               PHP scripting language
php                 7.3                    common [d], devel, minimal               PHP scripting language
php                 7.4                    common [d], devel, minimal               PHP scripting language

Remi's Modular repository for Enterprise Linux 8 - x86_64
Name                Stream                 Profiles                                 Summary
php                 remi-7.2               common [d], devel, minimal               PHP scripting language
php                 remi-7.3               common [d], devel, minimal               PHP scripting language
php                 remi-7.4               common [d], devel, minimal               PHP scripting language
php                 remi-8.0               common [d], devel, minimal               PHP scripting language
php                 remi-8.1               common [d], devel, minimal               PHP scripting language

Hint: [d]efault, [e]nabled, [x]disabled, [i]nstalled
默认版本为 7.2。启用 Remis PHP 8.0 存储库。
$ sudo dnf module reset php
$ sudo dnf module enable php:remi-8.0
接下来,安装 PHP 及其 UVDesk 所需的扩展。
$ sudo dnf install php-fpm php-mbstring php-xml php-curl php-mysqlnd php-zip php-cli php-intl php-bcmath php-gd php-tokenizer php-imap php-pear php-mailparse验证安装。
$ php --version
PHP 8.0.16 (cli) (built: Feb 15 2022 21:34:32) ( NTS gcc x86_64 )
Copyright (c) The PHP Group
Zend Engine v4.0.16, Copyright (c) Zend Technologies
第 4 步 - 安装和配置 MySQL 服务器
我们将使用 MySQL 数据库来存储数据。 Rocky Linuxs Appstream 存储库附带最新版本的 MySQL。
安装 MySQL。
$ sudo dnf install mysql-server启用并启动 MySQL 服务。
$ sudo systemctl enable mysqld --now安全的 MySQL 安装。
$ sudo mysql_secure_installation第一步,系统会询问您是否要设置验证密码插件,您可以使用它来测试 MySQL 密码的强度。选择
Y继续。下一步将要求您选择密码验证级别。选择最强等级的2,要求您的密码长度至少为八个字符,并且包括大写、小写、数字和特殊字符的组合。Securing the MySQL server deployment. Connecting to MySQL using a blank password. VALIDATE PASSWORD COMPONENT can be used to test passwords and improve security. It checks the strength of password and allows the users to set only those passwords which are secure enough. Would you like to setup VALIDATE PASSWORD component? Press y|Y for Yes, any other key for No: Y There are three levels of password validation policy: LOW Length >= 8 MEDIUM Length >= 8, numeric, mixed case, and special characters STRONG Length >= 8, numeric, mixed case, special characters and dictionary file Please enter 0 = LOW, 1 = MEDIUM and 2 = STRONG: 2下一步将要求您选择根密码。选择一个满足密码验证插件要求的强密码。在下一步中,系统将询问您是否继续使用所选密码。按
y继续。Please set the password for root here. New password: Re-enter new password: Estimated strength of the password: 100 Do you wish to continue with the password provided?(Press y|Y for Yes, any other key for No) : Y按
Y然后按ENTER键以获取以下所有提示以删除匿名用户和测试数据库,禁用 root 登录并加载新设置的规则。... Remove anonymous users? (Press y|Y for Yes, any other key for No) : Y Success. ... Disallow root login remotely? (Press y|Y for Yes, any other key for No) : Y Success. ... Remove test database and access to it? (Press y|Y for Yes, any other key for No) : Y - Dropping test database... Success. - Removing privileges on test database... Success. Reloading the privilege tables will ensure that all changes made so far will take effect immediately. ... Reload privilege tables now? (Press y|Y for Yes, any other key for No) : Y Success. All done!进入 MySQL 外壳。输入您的根密码以继续。
$ mysql -u root -p创建
uvdesk用户。确保密码符合之前设置的要求。mysql> CREATE USER 'uvdesk'@'localhost' IDENTIFIED BY 'Your_password2';创建
uvdeskdb数据库。mysql> CREATE DATABASE uvdeskdb;授予用户对
uvdeskdb数据库的权限。mysql> GRANT ALL PRIVILEGES ON uvdeskdb.* TO 'uvdesk'@'localhost';退出外壳。
mysql> exit第 5 步 - 下载 UVdesk
下载最新的稳定版 UVdesk。
$ wget https://cdn.uvdesk.com/uvdesk/downloads/opensource/uvdesk-community-current-stable.zip解压缩下载的文件。
$ unzip uvdesk-*.zip将提取的目录移动到
/var/www/uvdesk位置。$ sudo mv uvdesk-community-v1.0.18 /var/www/uvdesk切换到 UVdesks 目录。
$ cd /var/www/uvdesk打开环境文件 (
.env) 进行编辑。$ sudo nano .env找到行
APP_ENV=dev并将其更改为以下内容。APP_ENV=prod通过按 Ctrl + X 并在出现提示时输入 Y 来保存文件。
将根目录的所有权更改为 Nginx 用户。
$ sudo chown -R nginx:nginx /var/www/uvdesk第 6 步 - 配置 SELinux 权限
使用 SELinux 的
chcon命令更改从/var/www/uvdesk目录提供的 Web 内容的文件安全上下文。$ sudo chcon -t httpd_sys_content_t /var/www/uvdesk -R $ sudo chcon -t httpd_sys_rw_content_t /var/www/uvdesk -R配置 SELinux 以允许 UVDesk 的网络连接。
$ sudo setsebool -P httpd_can_network_connect on第 7 步 - 安装和配置 SSL
要使用 Lets Encrypt 安装 SSL 证书,我们需要下载 Certbot 工具。我们需要 Epel 存储库来安装 Certbot,但我们可以跳过这一步,因为我们在本教程的前面部分安装了它。
安装 Certbot。
$ sudo dnf install certbot生成 SSL 证书。
$ sudo certbot certonly --standalone --agree-tos --no-eff-email --staple-ocsp --preferred-challenges http -m -d uvdesk.example.com上述命令会将证书下载到服务器上的
/etc/letsencrypt/live/uvdesk.example.com目录。生成 Diffie-Hellman 组证书。
$ sudo openssl dhparam -out /etc/ssl/certs/dhparam.pem 2048为 Lets Encrypt 自动更新创建一个挑战网站根目录。
$ sudo mkdir -p /var/lib/letsencrypt创建 Cron 作业以更新 SSL。它将每天运行以检查证书并在需要时更新。为此,首先,创建文件
/etc/cron.daily/certbot-renew并打开它进行编辑。$ sudo nano /etc/cron.daily/certbot-renew粘贴以下代码。
#!/bin/sh
certbot renew --cert-name uvdesk.example.com --webroot -w /var/lib/letsencrypt/ --post-hook "systemctl reload nginx"
通过按 Ctrl + X 并在出现提示时输入 Y 来保存文件。
更改任务文件的权限以使其可执行。
$ sudo chmod +x /etc/cron.daily/certbot-renew第 8 步 - 配置 Nginx 和 PHP
配置 PHP-FPM
打开文件
/etc/php-fpm.d/www.conf。$ sudo nano /etc/php-fpm.d/www.conf我们需要将 PHP 进程的 Unix 用户/组设置为 nginx。找到文件中的
user=www-data和group=www-data行并将它们更改为nginx。... ; Unix user/group of processes ; Note: The user is mandatory. If the group is not set, the default user's group ; will be used. ; RPM: apache user chosen to provide access to the same directories as httpd user = nginx ; RPM: Keep a group allowed to write in log dir. group = nginx ...通过按 Ctrl + X 并在出现提示时输入 Y 来保存文件。
启用并启动 PHP 服务。
$ sudo systemctl enable php-fpm --now将 PHP 会话目录的组更改为 Nginx。
$ sudo chgrp -R nginx /var/lib/php/session配置 Nginx
创建并打开文件
/etc/nginx/conf.d/uvdesk.conf进行编辑。$ sudo nano /etc/nginx/conf.d/uvdesk.conf将以下代码粘贴到其中。
server {
    listen       443 ssl http2;
    listen       [::]:443 ssl http2;
    server_name  uvdesk.example.com;

    access_log  /var/log/nginx/uvdesk.access.log;
    error_log   /var/log/nginx/uvdesk.error.log;

	# SSL
    ssl_certificate      /etc/letsencrypt/live/uvdesk.example.com/fullchain.pem;
    ssl_certificate_key  /etc/letsencrypt/live/uvdesk.example.com/privkey.pem;
    ssl_trusted_certificate /etc/letsencrypt/live/uvdesk.example.com/chain.pem;
    ssl_session_timeout  5m;
    ssl_session_cache shared:MozSSL:10m;
    ssl_session_tickets off;
    ssl_protocols TLSv1.2 TLSv1.3;
    ssl_prefer_server_ciphers on;
    ssl_ciphers ECDHE-ECDSA-AES128-GCM-SHA256:ECDHE-RSA-AES128-GCM-SHA256:ECDHE-ECDSA-AES256-GCM-SHA384:ECDHE-RSA-AES256-GCM-SHA384:ECDHE-ECDSA-CHACHA20-POLY1305:ECDHE-RSA-CHACHA20-POLY1305:DHE-RSA-AES128-GCM-SHA256:DHE-RSA-AES256-GCM-SHA384;
    ssl_ecdh_curve X25519:prime256v1:secp384r1:secp521r1;
    ssl_stapling on;
    ssl_stapling_verify on;
    ssl_dhparam /etc/ssl/certs/dhparam.pem;
    resolver 8.8.8.8;

    root /var/www/uvdesk/public;
    index index.php;

    location / {
        try_files $uri $uri/ /index.php?$args;
    }

    # Pass PHP Scripts To FastCGI Server
    location ~ \.php$ {
        fastcgi_split_path_info ^(.+\.php)(.*)$;
        fastcgi_pass unix:/run/php-fpm/www.sock; # Depends On The PHP Version
        fastcgi_index index.php;
        fastcgi_param SCRIPT_FILENAME $document_root$fastcgi_script_name;
        fastcgi_param PATH_INFO $fastcgi_path_info;
        include fastcgi_params;
        try_files $uri =404;
    }
}

# enforce HTTPS
server {
    listen       80;
    listen       [::]:80;
    server_name  uvdesk.example.com;
    return 301   https://$host$request_uri;
}
注意 Nginx 配置中使用的根目录是
/var/www/uvdesk/public/而不是/var/www/uvdesk/.完成后按 Ctrl + X 并在出现提示时输入 Y 来保存文件。
打开文件
/etc/nginx/nginx.conf进行编辑。$ sudo nano /etc/nginx/nginx.conf在行
include /etc/nginx/conf.d/*.conf;之前添加以下行。server_names_hash_bucket_size 64;通过按 Ctrl + X 并在出现提示时输入 Y 来保存文件。
验证 Nginx 配置文件语法。
$ sudo nginx -t
nginx: the configuration file /etc/nginx/nginx.conf syntax is ok
nginx: configuration file /etc/nginx/nginx.conf test is successful
启动 Nginx 服务。
$ sudo systemctl start nginx第 9 步 - 安装 UVdesk
在浏览器中启动 URL
https://uvdesk.example.com,您将看到以下屏幕。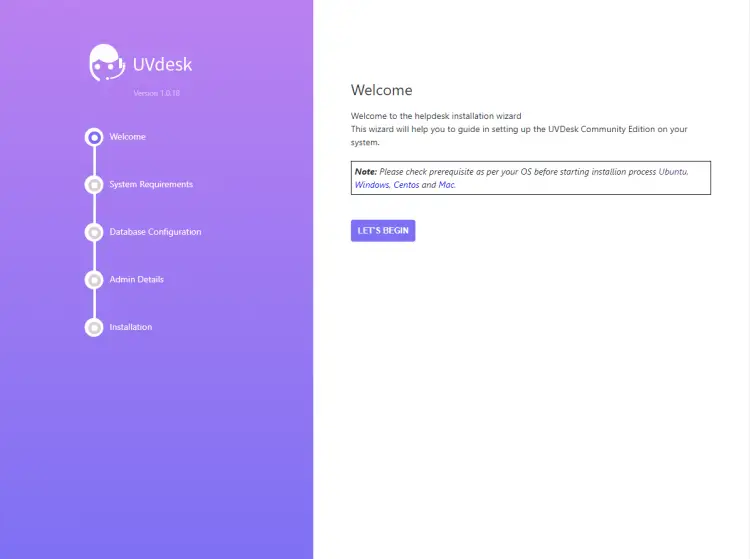
单击“让我们开始”按钮开始安装过程。安装程序将在下一页检查 PHP 设置和文件权限。
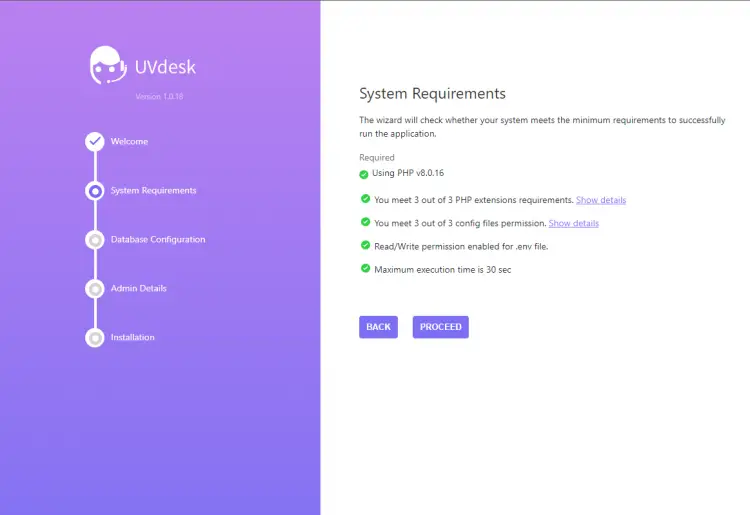
单击继续以继续。系统将要求您在下一页填写数据库详细信息。输入在步骤 4 中配置的数据。
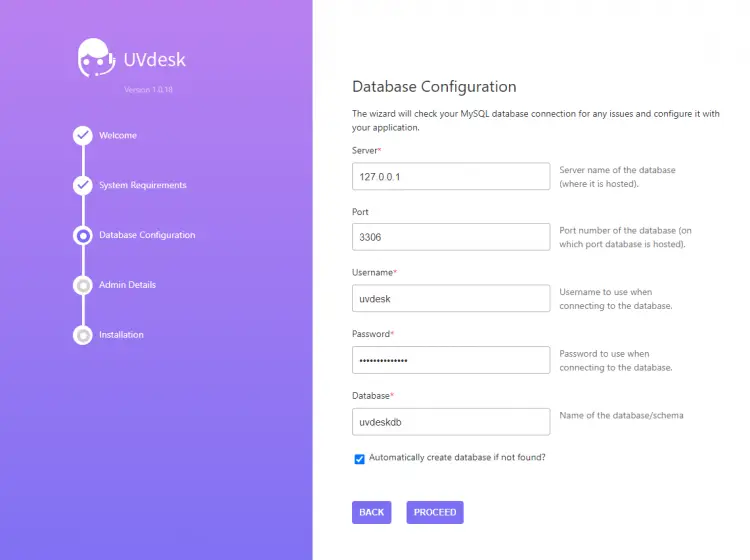
单击继续以继续。接下来,系统会要求您创建一个超级管理员帐户。填写您的详细信息。
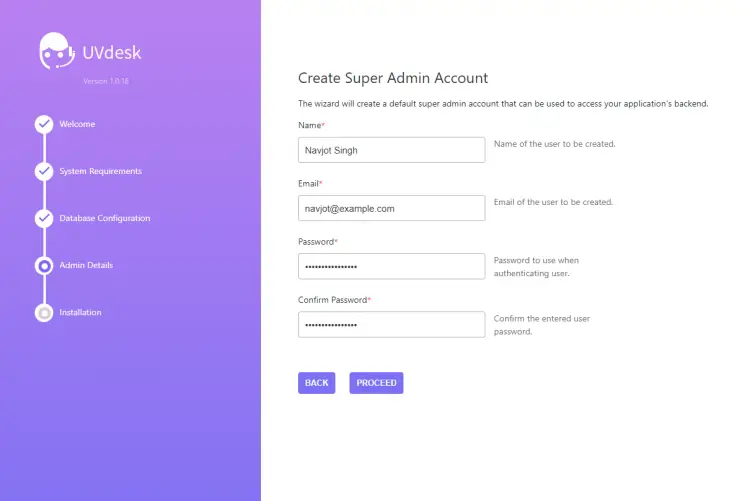
单击继续以继续。接下来,系统将要求您通过为成员和客户面板前缀命名来配置网站。这些前缀用于网站 URL。
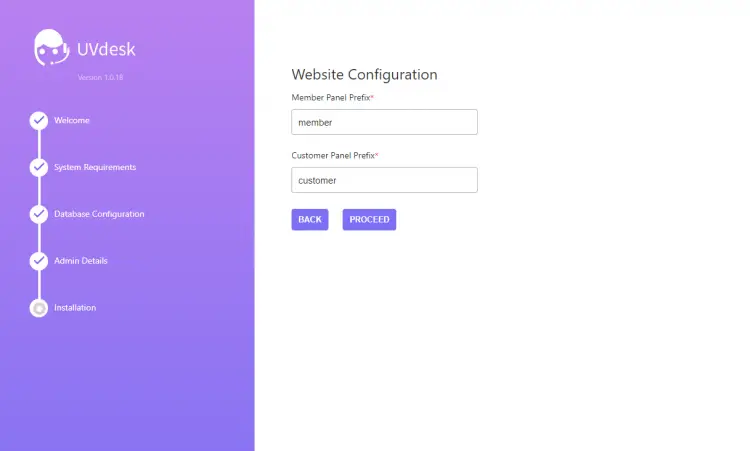
单击继续以继续。您将到达最终安装页面。
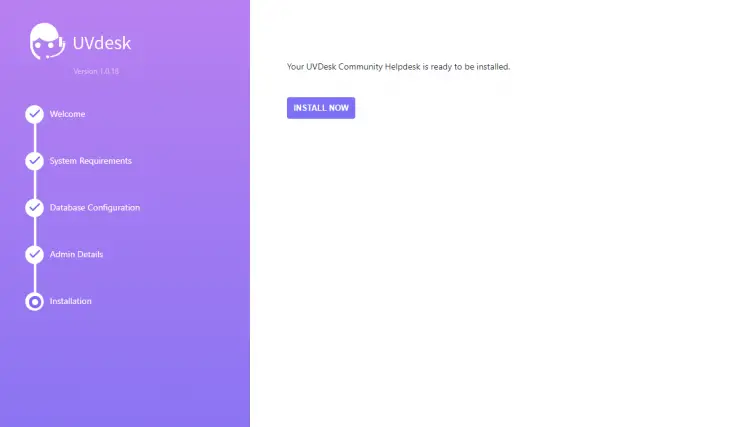
单击立即安装开始安装。完成后,您将看到以下屏幕。
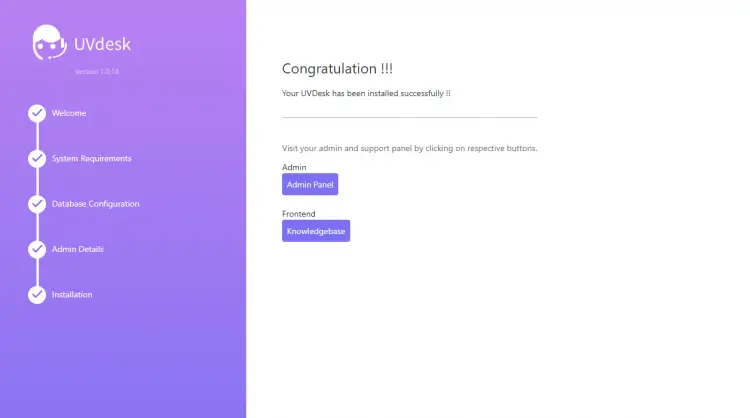
您可以通过给定的链接访问管理面板和前端网站。您的 UVDesk 安装已准备就绪,可以使用了。
结论
您已经使用 Nginx、MySQL 和 PHP 在基于 Rocky Linux 8 的服务器上安装了 UVdesk Helpdesk 系统。如果您有任何问题,请在下面的评论中发表。