如何保护 CentOS 或 RHEL 上的 LAMP 服务器
LAMP 是一个软件堆栈,由 Linux(作为基础层的操作系统)、Apache(“位于操作系统之上”的 Web 服务器)、MySQL(或 MariaDB,作为关系数据库管理系统)以及 PHP(一种服务器端脚本语言,用于处理和显示存储在数据库中的信息)组成。
在本文中,我们将假设 LAMP 堆栈的每个组件都已启动并正在运行,并将专门关注保护 LAMP 服务器的安全。 但是,我们必须注意,服务器端安全性是一个庞大的主题,因此无法在一篇文章中充分且完整地解决。
在这篇文章中,我们将介绍保护堆栈每个部分的基本必须要做的事情。
保护 Linux 的安全
由于您可能希望通过 SSH 管理 CentOS 服务器,因此您需要考虑以下提示,通过编辑 /etc/ssh/sshd_config 文件来保护对服务器的远程访问。
1) 尽可能使用基于密钥的身份验证,而不是基本身份验证(用户名+密码)来远程登录到您的服务器。我们假设您已经在客户端计算机上使用您的用户名创建了密钥对并将其复制到您的服务器(请参阅教程)。
PasswordAuthentication no
RSAAuthentication yes
PubkeyAuthentication yes
2) 更改 sshd 监听的端口。端口的一个好主意是大于 1024 的数字:
Port XXXX
3)仅允许协议2:
Protocol 2
4) 配置身份验证超时,不允许 root 登录,并限制哪些用户可以通过 SSH 登录:
LoginGraceTime 2m
PermitRootLogin no
AllowUsers gacanepa
5) 仅允许特定主机(和/或网络)通过 SSH 登录:
在 /etc/hosts.deny 文件中:
sshd: ALL
在 /etc/hosts.allow 文件中:
sshd: XXX.YYY.ZZZ. AAA.BBB.CCC.DDD
其中 XXX.YYY.ZZZ. 表示 IPv4 网络地址的前 3 个八位字节,AAA.BBB.CCC.DDD 是 IPv4 地址。通过该设置,仅允许来自网络 XXX.YYY.ZZZ.0/24 的主机和主机 AAA.BBB.CCC.DDD 通过 SSH 进行连接。所有其他主机在到达登录提示之前都将断开连接,并会收到如下错误:

(不要忘记重新启动 sshd 守护进程以应用这些更改:
# service sshd restart (CentOS 6 or earlier)
# systemd restart sshd (CentOS 7 or later)
我们必须注意,这种方法是一种阻止传入服务器连接的快速且简单(但有些初级)的方法。为了进一步定制、可扩展性和灵活性,您应该考虑使用普通的 iptables 和/或 fail2ban。
保护阿帕奇
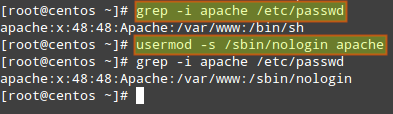
1) 确保运行 Apache Web 服务器的系统用户无权访问 shell:
# grep -i apache /etc/passwd
如果用户apache有默认的shell(例如/bin/sh),我们必须将其更改为/bin/false或/sbin/nologin:
# usermod -s /sbin/nologin apache
以下建议(2 到 5)参考 /etc/httpd/conf/httpd.conf 文件:
2) 禁用目录列表:如果该目录中不存在index.html,这将阻止浏览器显示该目录的内容。
删除 Options 指令中的单词 Indexes:
# The Options directive is both complicated and important.  Please see
# http://httpd.apache.org/docs/2.2/mod/core.html#options
# for more information.
#
Options Indexes FollowSymLinks
应该读:
Options None
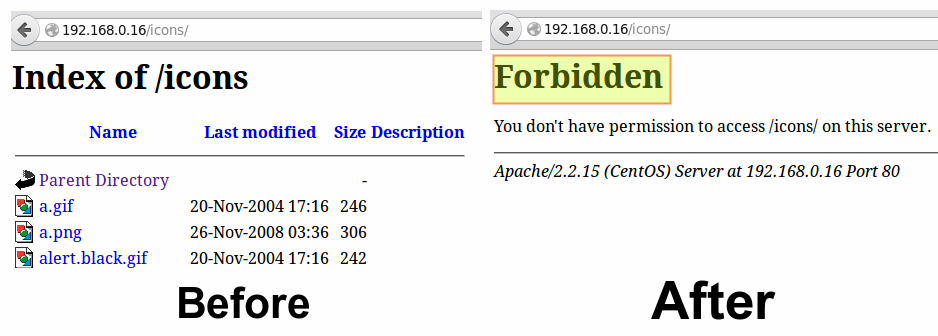
此外,您需要确保目录和虚拟主机的设置不会覆盖此全局配置。
按照上面的示例,如果我们检查 /var/www/icons 目录的设置,我们会发现 Indexes MultiViews FollowSymLinks 应更改为 None。
|
|
| Before | After |
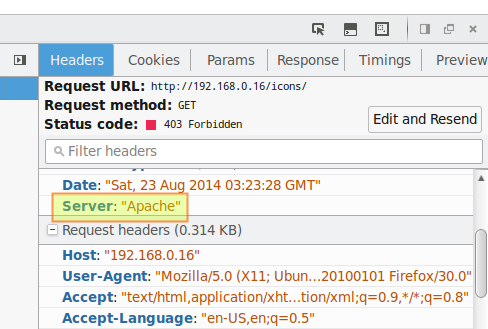
3) 隐藏 Apache 版本,以及错误页面中的模块/操作系统信息(例如 Not Found 和 Forbidden)。
ServerTokens Prod # This means that the http response header will return just "Apache" but not its version number
ServerSignature Off # The OS information is hidden
4) 通过注释掉声明这些模块的行来禁用不需要的模块:
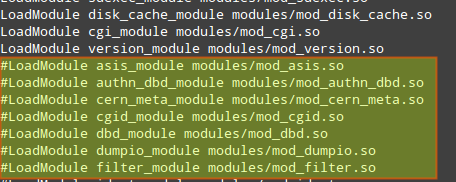
提示:禁用 autoindex_module 是在目录列表中没有 index.html 文件时隐藏目录列表的另一种方法。
5)限制HTTP请求大小(主体和标头)并设置连接超时:
| Directive | Context | Example and meaning |
| LimitRequestBody | server config, virtual host, directory, .htaccess |
Limit file upload to 100 KiB max. for the uploads directory:
This directive specifies the number of bytes from |
| LimitRequestFieldSize | server config, virtual host |
Change the allowed HTTP request header size to 4KiB (default is 8KiB), server wide:
This directive specifies the number of bytes that will be allowed in an HTTP request header and gives the server administrator greater control over abnormal client request behavior, which may be useful for avoiding some forms of denial-of-service attacks. |
| TimeOut | server config, virtual host |
Change the timeout from 300 (default if no value is used) to 120:
Amount of time, in seconds, the server will wait for certain events before failing a request. |
有关如何设置它们的更多指令和说明,请参阅 Apache 文档。
保护 MySQL 服务器的安全
我们将首先运行 mysql-server 包附带的 mysql_secure_installation 脚本。
1)如果我们在安装过程中没有为MySQL服务器设置root密码,现在是时候这样做了,记住:这在生产环境中是必不可少的。
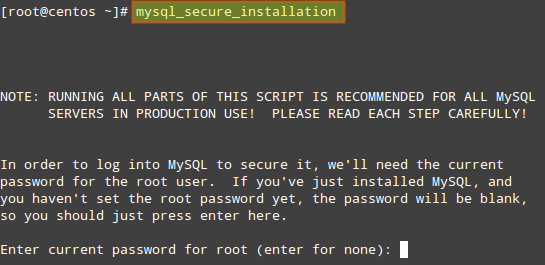
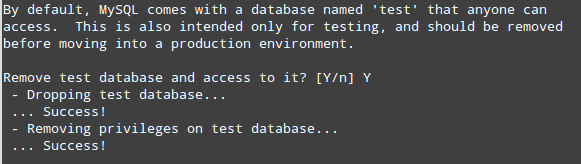
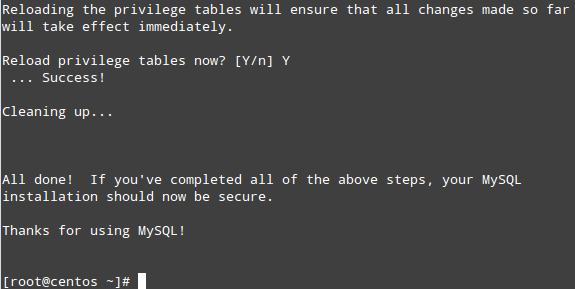
该过程将继续:

2)删除匿名用户:

3) 只允许root从本地主机连接:

4) 删除名为 test 的默认数据库:
5)应用更改:
6) 接下来,我们将编辑 /etc/my.cnf 文件中的一些变量:
[mysqld]
bind-address=127.0.0.1 # MySQL will only accept connections from localhost
local-infile=0 # Disable direct filesystem access
log=/var/log/mysqld.log # Enable log file to watch out for malicious activities
不要忘记使用以下命令重新启动 MySQL 服务器:
# service mysqld restart (on CentOS 6 or earlier)
# systemctl restart mysqld (on CentOS 7 or later)
现在,当涉及日常数据库管理时,您会发现以下建议很有用:
如果由于某种原因我们需要远程管理数据库,我们可以首先通过 ssh 连接到我们的服务器,在本地执行必要的查询和管理任务。
例如,如果我们需要将文件批量导入到数据库中,我们可能希望稍后能够直接访问文件系统。
保留日志并不像前面提到的两件事那么重要,但可能会派上用场来排除我们的数据库故障和/或了解不熟悉的活动。
永远不要以纯文本格式存储敏感信息(例如密码、信用卡号、银行 PIN 码等)。考虑使用哈希函数来混淆此信息。
确保应用程序特定的数据库只能由应用程序为此目的创建的相应用户访问:
要调整 MySQL 用户的访问权限,请使用这些说明。
首先,从用户表中检索用户列表:
[email :~$ mysql -u root -p
Enter password: [Your root password here]
mysql> SELECT User,Host FROM mysql.user;
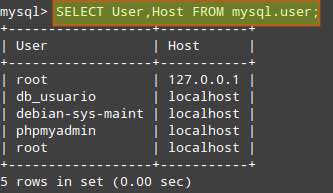
确保每个用户仅有权访问(以及最低权限)其所需的数据库。在下面的示例中,我们将检查用户db_usuario的权限:
mysql> SHOW GRANTS FOR 'db_usuario'@'localhost';

然后,您可以根据需要撤销权限和访问权限。
保护 PHP
由于本文旨在保护 LAMP 堆栈组件的安全,因此我们不会详细讨论编程方面的内容。 我们假设我们的 Web 应用程序是安全的,因为开发人员已竭尽全力确保不存在可能导致 XSS 或 SQL 注入等常见攻击的漏洞。
1)禁用不必要的模块:
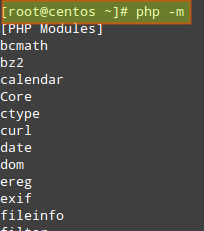
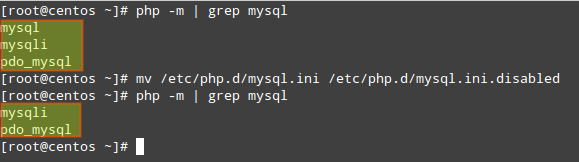
我们可以使用以下命令显示当前编译的模块列表:php -m
并通过删除或重命名 /etc/php.d 目录中的相应文件来禁用不需要的文件。
例如,由于 mysql 扩展自 PHP v5.5.0 起已被弃用(并且将来将被删除),我们可能想要禁用它:
# php -m | grep mysql
# mv /etc/php.d/mysql.ini /etc/php.d/mysql.ini.disabled
2)隐藏PHP版本信息:
# echo "expose_php=off" >> /etc/php.d/security.ini [or modify the security.ini file if it already exists]

3) 将 open_basedir 设置为一些特定目录(在 php.ini 中),以限制对底层文件系统的访问:

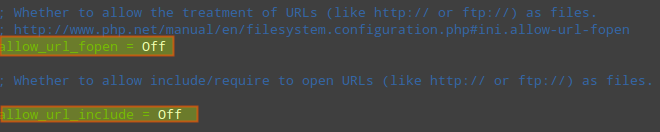
4) 禁用远程代码/命令执行以及易于利用的函数,例如 exec()、system()、passthru()、eval() 等(在 php.ini 中):
allow_url_fopen = Off
allow_url_include = Off
disable_functions = "exec, system, passthru, eval"

加起来
1) 将软件包更新到最新版本(将以下命令的输出与 yum info [package] 的输出进行比较):
以下命令返回 Apache、MySQL 和 PHP 的当前版本:
# httpd -v
# mysql -V (capital V)
# php -v
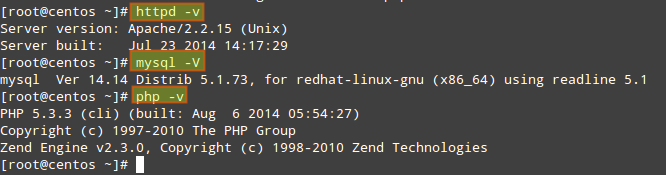
然后可以使用yum update [package]来更新软件包以获得最新的安全补丁。
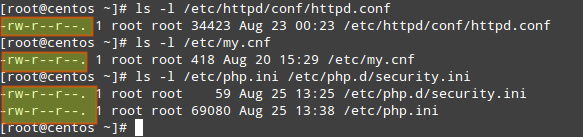
2)确保配置文件只能由root账户写入:
# ls -l /etc/httpd/conf/httpd.conf
# ls -l /etc/my.cnf
# ls -l /etc/php.ini /etc/php.d/security.ini
3) 最后,如果有机会,请在单独的物理或虚拟机中运行这些服务(Web 服务器、数据库服务器和应用程序服务器)(并通过防火墙保护它们之间的通信),这样,一旦其中一个服务受到威胁,攻击者将无法立即访问其他服务。如果是这种情况,您可能需要调整本文中讨论的一些配置。 请注意,这只是可用于提高 LAMP 服务器安全性的设置之一。