如何在 Debian 11 上使用 Nginx 安装 osTicket
在此页
- 先决条件
- 开始
- 安装 Nginx 和 PHP
- 安装和配置 MariaDB
- 安装osTicket
- 为 osTicket 配置 Nginx
- 访问 osTicket 网络界面
- 在 osTicket 上启用 SSL
- 结论
osTicket 是一个免费的开源支持票系统,用于扩展和简化您的客户服务并改善您的客户体验。它提供了一个基于 Web 的界面来管理、组织和跟踪所有支持工单。它是用 PHP 编写的,支持 MySQL 和 PostgreSQL 等各种数据库。
特征
- 仪表板报告
- 可配置的帮助主题
- 服务水平协议
- 工单过滤器
- 客户支持门户
- 自动回复
本教程将向您展示如何在 Debian 11 上安装 osTicket。
先决条件
- 运行 Debian 11 的服务器。
- 使用您的服务器 IP 指向一个有效的域名。
- 在服务器上配置了根密码。
入门
首先,使用以下命令将所有系统包更新并升级到最新版本。
apt update -y
apt upgrade -y
更新所有包后,您可以使用以下命令安装其他所需的包:
apt install ca-certificates apt-transport-https software-properties-common wget curl安装所有必需的软件包后,您可以继续下一步。
安装 Nginx 和 PHP
首先,使用以下命令安装 Nginx Web 服务器包。
apt install nginx -y接下来,使用以下命令添加 PHP 存储库。
curl -sSL https://packages.sury.org/php/README.txt | bash -x接下来,使用以下命令安装最新版本的 PHP 和其他所需的 PHP 依赖项。
apt install php8.1 php8.1-mysql php8.1-cgi php8.1-fpm php8.1-cli php8.1-curl php8.1-gd php8.1-imap php8.1-mbstring php8.1-intl php8.1-apcu php8.1-common php8.1-gettext php8.1-bcmath php8.1-xml php8.1-dom -y安装后,编辑 PHP 配置文件。
nano /etc/php/8.1/fpm/php.ini更改以下行。
cgi.fix_pathinfo=0
保存并关闭文件,然后重新启动 PHP-FPM 服务以应用更改。
systemctl restart php8.1-fpm安装和配置 MariaDB
首先,使用以下命令安装 MariaDB 数据库服务器。
apt install mariadb-server -y接下来,使用以下命令保护 MariaDB 安装。
mysql_secure_installation回答以下所有问题:
Set root password? [Y/n] Y
New password:
Re-enter new password:
Remove anonymous users? [Y/n] Y
Disallow root login remotely? [Y/n] Y
Remove test database and access to it? [Y/n] Y
Reload privilege tables now? [Y/n] Y
接下来,以 root 用户身份登录到 MariaDB shell。
mysql -u root -p接下来,为 osTicket 创建数据库和用户。
MariaDB [(none)]> create database osticketdb;
MariaDB [(none)]> grant all privileges on osticketdb.* to osticketuser identified by 'secure-password';
接下来,使用以下命令刷新权限并退出 MariaDB shell。
MariaDB [(none)]> flush privileges;
MariaDB [(none)]> exit;
安装osTicket
首先,从 GitHub 下载页面下载最新版本的 osTicket。
wget https://github.com/osTicket/osTicket/releases/download/v1.17.2/osTicket-v1.17.2.zip下载完成后,为 osTicket 创建一个目录,并将下载的文件解压缩到该目录中。
mkdir /var/www/html/osticket
unzip osTicket-v1.17.2.zip -d /var/www/html/osticket
接下来,设置 osticket 目录的所有权和权限。
chown -R www-data:www-data /var/www/html/osticket
chmod -R 755 /var/www/html/osticket
接下来,重命名 osTicket 样本配置文件。
mv /var/www/html/osticket/upload/include/ost-sampleconfig.php /var/www/html/osticket/upload/include/ost-config.php完成后,您可以继续下一步。
为 osTicket 配置 Nginx
接下来,您需要为 osTicket 创建一个 Nginx 虚拟主机配置文件。您可以使用以下命令创建它。
nano /etc/nginx/conf.d/osticket.conf添加以下配置。
server {
listen 80;
server_name osticket.example.com;
root /var/www/html/osticket/upload;
index index.php index.html index.htm;
access_log /var/log/nginx/access.log;
error_log /var/log/nginx/error.log;


# Enable gzip
gzip on;
gzip_min_length 1000;
gzip_types text/plain application/x-javascript text/xml text/css application/xml;

set $path_info "";

location ~ /include {
deny all;
return 403;
}

if ($request_uri ~ "^/api(/[^\?]+)") {
set $path_info $1;
}

location ~ ^/api/(?:tickets|tasks).*$ {
try_files $uri $uri/ /api/http.php?$query_string;
}

if ($request_uri ~ "^/scp/.*\.php(/[^\?]+)") {
set $path_info $1;
}

location ~ ^/scp/ajax.php/.*$ {
try_files $uri $uri/ /scp/ajax.php?$query_string;
}

location / {
try_files $uri $uri/ index.php;
}

location ~ \.php$ {
fastcgi_param SCRIPT_FILENAME $document_root$fastcgi_script_name;
include fastcgi_params;
include snippets/fastcgi-php.conf;
fastcgi_pass unix:/run/php/php8.1-fpm.sock;
}
}
保存并关闭文件,然后使用以下命令验证 Nginx 配置。
nginx -t您将获得以下输出。
nginx: the configuration file /etc/nginx/nginx.conf syntax is ok
nginx: configuration file /etc/nginx/nginx.conf test is successful
接下来,重新启动 Nginx 服务以应用更改。
systemctl restart nginx您还可以使用以下命令检查 Nginx 状态。
systemctl status nginx您应该在以下输出中看到 Nginx 状态。
? nginx.service - A high performance web server and a reverse proxy server
     Loaded: loaded (/lib/systemd/system/nginx.service; enabled; vendor preset: enabled)
     Active: active (running) since Wed 2022-12-21 08:15:10 UTC; 4s ago
       Docs: man:nginx(8)
    Process: 24700 ExecStartPre=/usr/sbin/nginx -t -q -g daemon on; master_process on; (code=exited, status=0/SUCCESS)
    Process: 24701 ExecStart=/usr/sbin/nginx -g daemon on; master_process on; (code=exited, status=0/SUCCESS)
   Main PID: 24702 (nginx)
      Tasks: 2 (limit: 2339)
     Memory: 3.1M
        CPU: 25ms
     CGroup: /system.slice/nginx.service
             ??24702 nginx: master process /usr/sbin/nginx -g daemon on; master_process on;
             ??24703 nginx: worker process

Dec 21 08:15:10 debian11 systemd[1]: nginx.service: Succeeded.
Dec 21 08:15:10 debian11 systemd[1]: Stopped A high performance web server and a reverse proxy server.
Dec 21 08:15:10 debian11 systemd[1]: Starting A high performance web server and a reverse proxy server...
Dec 21 08:15:10 debian11 systemd[1]: nginx.service: Failed to parse PID from file /run/nginx.pid: Invalid argument
Dec 21 08:15:10 debian11 systemd[1]: Started A high performance web server and a reverse proxy server.
此时,已为 osTicket 安装并配置 Nginx。您现在可以继续访问 osTicket。
访问 osTicket Web 界面
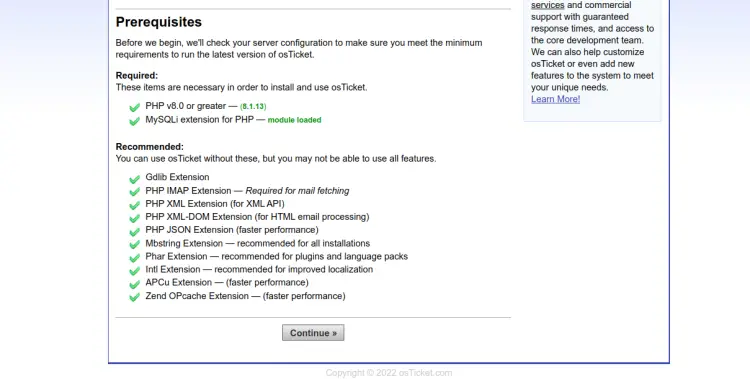
打开 Web 浏览器并使用 URL http://osticket.example.com 访问 osTicket 安装页面。您应该看到先决条件页面。
单击继续。您应该会看到基本安装页面。
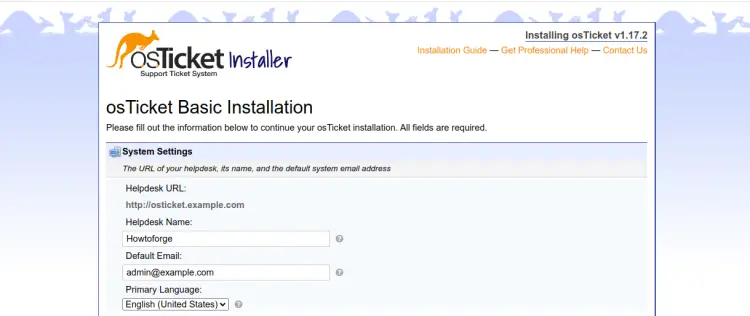

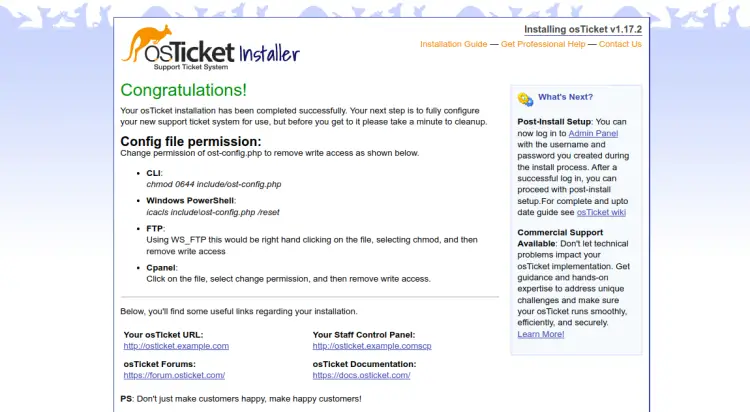
定义您的帮助台 URL、姓名、电子邮件、数据库名称、用户名、密码,然后单击立即安装按钮开始安装。安装 osTicket 后,您应该会看到以下页面。
要访问 osTicket 控制面板,请在 Web 浏览器中键入 URL http://osticket.example.com/scp。您应该会看到 osTicket 登录页面。
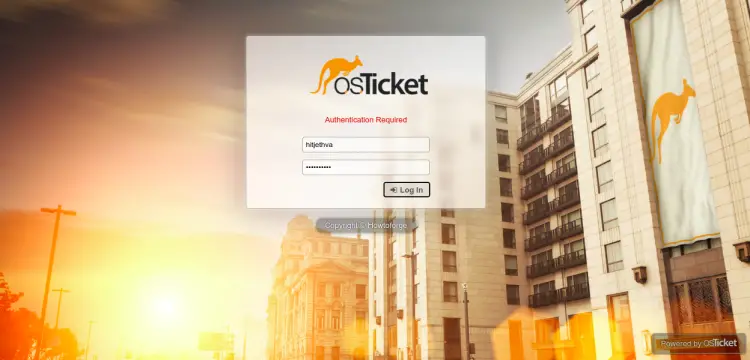
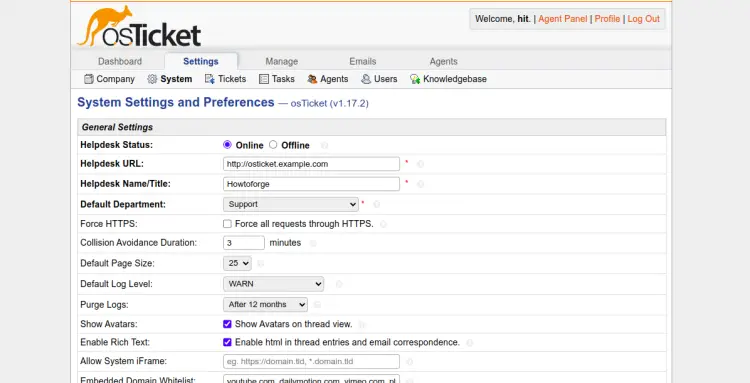
提供您的管理员用户名和密码,然后单击“登录”按钮。您应该在以下屏幕上看到 osTicket 仪表板。
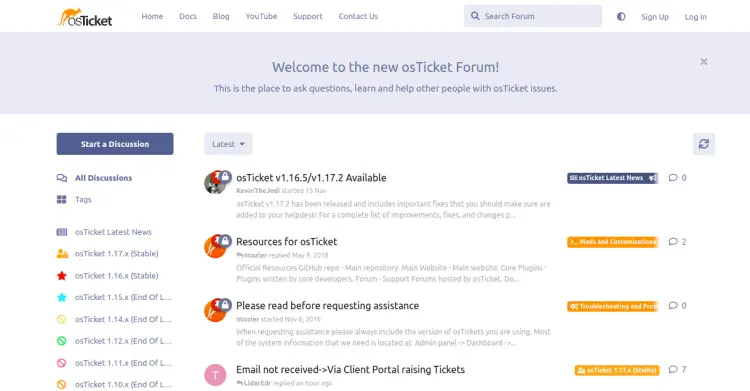
您还可以使用 URL https://forum.osticket.com 访问 osTicket 论坛页面。
在 osTicket 上启用 SSL
要在 osTicket 网站上安装 Lets Encrypt SSL,您需要在服务器上安装 certbot 包。
首先,使用以下命令安装 Snap 包管理器:
apt install snapd接下来,将 Snap 包更新到最新版本:
snap install core
snap refresh core
接下来,使用以下命令安装 certbot 包:
snap install --classic certbot接下来,为 Certbot 二进制文件创建指向系统位置的符号链接:
ln -s /snap/bin/certbot /usr/bin/certbot接下来,运行以下命令下载并安装 Lets Encrypt SSL 证书:
certbot --nginx -d osticket.example.com您将被要求提供您的电子邮件地址并接受服务条款:
Saving debug log to /var/log/letsencrypt/letsencrypt.log
Enter email address (used for urgent renewal and security notices)
 (Enter 'c' to cancel):

- - - - - - - - - - - - - - - - - - - - - - - - - - - - - - - - - - - - - - - -
Please read the Terms of Service at
https://letsencrypt.org/documents/LE-SA-v1.3-September-21-2022.pdf. You must
agree in order to register with the ACME server. Do you agree?
- - - - - - - - - - - - - - - - - - - - - - - - - - - - - - - - - - - - - - - -
(Y)es/(N)o: Y

- - - - - - - - - - - - - - - - - - - - - - - - - - - - - - - - - - - - - - - -
Would you be willing, once your first certificate is successfully issued, to
share your email address with the Electronic Frontier Foundation, a founding
partner of the Let's Encrypt project and the non-profit organization that
develops Certbot? We'd like to send you email about our work encrypting the web,
EFF news, campaigns, and ways to support digital freedom.
- - - - - - - - - - - - - - - - - - - - - - - - - - - - - - - - - - - - - - - -
(Y)es/(N)o: Y
键入 Y 并按 Enter 键为您的域下载并安装 SSL 证书:
Account registered.
Requesting a certificate for osticket.example.com

Successfully received certificate.
Certificate is saved at: /etc/letsencrypt/live/osticket.example.com/fullchain.pem
Key is saved at:         /etc/letsencrypt/live/osticket.example.com/privkey.pem
This certificate expires on 2023-03-22.
These files will be updated when the certificate renews.
Certbot has set up a scheduled task to automatically renew this certificate in the background.

Deploying certificate
Successfully deployed certificate for osticket.example.com to /etc/nginx/conf.d/osticket.conf
Congratulations! You have successfully enabled HTTPS on https://osticket.example.com

- - - - - - - - - - - - - - - - - - - - - - - - - - - - - - - - - - - - - - - -
If you like Certbot, please consider supporting our work by:
 * Donating to ISRG / Let's Encrypt:   https://letsencrypt.org/donate
 * Donating to EFF:                    https://eff.org/donate-le
- - - - - - - - - - - - - - - - - - - - - - - - - - - - - - - - - - - - - - - -
结论
恭喜!您已在 Debian 11 上成功安装带有 Nginx 的 osTicket。您现在可以在您的公司中实施 osTicket 并将其用作帮助台管理系统。如果您有任何问题,请随时问我。