如何在 Ubuntu 22.04 上安装 Strapi CMS
在此页
- 先决条件
- 第 1 步 - 配置防火墙
- 第 2 步 - 安装和配置 PostgreSQL
- 第 3 步 - 安装 Node.js
- 第 4 步 - 安装 Strapi
- 第 5 步 - 安装和配置 PM2
- 第 6 步 - 安装 Nginx
- 第 7 步 - 安装 SSL
- 第 8 步 - 配置 Nginx
- 第 9 步 - 升级 Strapi
- 结论
Strapi 是一个使用 JavaScript 构建的开源无头内容管理系统 (CMS)。与其他无头 CMS 一样,Strapi 没有开箱即用的前端。它的前端使用 API,允许您使用 React 和 Next.js 等流行框架构建网站。 Strapi 基于插件系统,是一个灵活的 CMS,其管理面板和 API 是可扩展的 - 并且其每个部分都可以定制以匹配任何用例。 Strapi 还有一个内置的用户系统来详细管理管理员和最终用户可以访问的内容。
在本教程中,您将学习如何在 Ubuntu 22.04 服务器上安装社区版 Strapi CMS,以及作为反向代理服务器的 Nginx。
先决条件
-
A server running Ubuntu 22.04.
-
A non-root user with sudo privileges.
-
A fully qualified domain name (FQDN) like
strapi.example.com. -
Make sure everything is updated.
$ sudo apt update $ sudo apt upgrade -
Few packages that your system needs.
$ sudo apt install wget curl nano software-properties-common dirmngr apt-transport-https gnupg2 ca-certificates lsb-release ubuntu-keyring unzip -ySome of these packages may already be installed on your system.
第 1 步 - 配置防火墙
第一步是配置防火墙。 Ubuntu 默认带有 ufw (Uncomplicated Firewall)。
检查防火墙是否正在运行。
$ sudo ufw status
您应该得到以下输出。
Status: inactive
允许 SSH 端口,以便防火墙在启用时不会中断当前连接。
$ sudo ufw allow OpenSSH
也允许 HTTP 和 HTTPS 端口。
$ sudo ufw allow http
$ sudo ufw allow https
启用防火墙
$ sudo ufw enable
Command may disrupt existing ssh connections. Proceed with operation (y|n)? y
Firewall is active and enabled on system startup
再次检查防火墙的状态。
$ sudo ufw status
您应该会看到类似的输出。
Status: active

To                         Action      From
--                         ------      ----
OpenSSH                    ALLOW       Anywhere
80/tcp                     ALLOW       Anywhere
443                        ALLOW       Anywhere
OpenSSH (v6)               ALLOW       Anywhere (v6)
80/tcp (v6)                ALLOW       Anywhere (v6)
443 (v6)                   ALLOW       Anywhere (v6)
第 2 步 - 安装和配置 PostgreSQL
Strapi 适用于 PostgreSQL 11 及更高版本。 Ubuntu 22.04 默认附带 PostgreSQL 14。我们将在教程中使用 PostgreSQL 15。
运行以下命令以添加 PostgreSQL GPG 密钥。
$ curl https://www.postgresql.org/media/keys/ACCC4CF8.asc | gpg --dearmor | sudo tee /usr/share/keyrings/postgresql-key.gpg >/dev/null
将 APT 存储库添加到您的源列表中。
$ sudo sh -c 'echo "deb [signed-by=/usr/share/keyrings/postgresql-key.gpg arch=amd64] http://apt.postgresql.org/pub/repos/apt $(lsb_release -cs)-pgdg main" > /etc/apt/sources.list.d/pgdg.list'
更新系统存储库。
$ sudo apt update
现在,您可以使用以下命令安装 PostgreSQL。
$ sudo apt install postgresql postgresql-contrib
postgresql-contrib 包包含一些额外的实用程序。
检查 PostgreSQL 服务的状态。
$ sudo systemctl status postgresql
? postgresql.service - PostgreSQL RDBMS
     Loaded: loaded (/lib/systemd/system/postgresql.service; enabled; vendor preset: enabled)
     Active: active (exited) since Wed 2022-12-28 18:03:03 UTC; 17s ago
   Main PID: 4119 (code=exited, status=0/SUCCESS)
        CPU: 2ms

Dec 28 18:03:03 strapi systemd[1]: Starting PostgreSQL RDBMS...
Dec 28 18:03:03 strapi systemd[1]: Finished PostgreSQL RDBMS.
您可以看到该服务已默认启用并运行。
启动 PostgreSQL 外壳。
$ sudo -i -u postgres psql
创建 Strapi 数据库。
postgres=# CREATE DATABASE strapidb;
创建 Strapi 用户并选择一个强密码。
postgres-# CREATE USER strapiuser WITH PASSWORD 'Your_Password';
将数据库所有者更改为 Strapi 用户。
postgres-# ALTER DATABASE strapidb OWNER TO strapiuser;
退出外壳。
postgres-# \q
验证您的凭据是否有效。
$ psql --username strapiuser --password --host localhost strapidb
Password:
psql (15.1 (Ubuntu 15.1-1.pgdg22.04+1))
SSL connection (protocol: TLSv1.3, cipher: TLS_AES_256_GCM_SHA384, bits: 256, compression: off)
Type "help" for help.

strapidb=>
通过键入 \q 退出 shell。
第 3 步 - 安装 Node.js
Ubuntu 22.04 附带已过时的 Node v12。在编写本教程时,我们将安装最新的 LTS 版本的 Node,即 v18。
从 Nodesource 获取 Node v18 安装程序。
$ curl -sL https://deb.nodesource.com/setup_18.x -o nodesource_setup.sh
运行安装程序脚本。
$ sudo bash nodesource_setup.sh
安装 Node.js。
$ sudo apt install nodejs
验证 Node.js 版本。
$ node -v
v18.12.1
删除安装程序文件。
$ rm nodesource_setup.sh
第 4 步 - 安装 Strapi
运行以下命令来安装 Strapi。
$ npx  howtoforge-project
Need to install the following packages:

Ok to proceed? (y) y
输入 y 继续安装。接下来,系统会要求您选择安装类型。选择自定义继续并回答以下问题。
? Choose your installation type Custom (manual settings)
? Choose your preferred language JavaScript
? Choose your default database client postgres
? Database name: strapidb
? Host: 127.0.0.1
? Port: 5432
? Username: strapiuser
? Password: Your_Password
? Enable SSL connection: No
根据您的要求,您可以选择 Typescript 或 JavaScript 作为 Strapi 的语言。
安装完成后,您就可以构建 Strapi 项目了。
切换到项目目录。
$ cd howtoforge-project
运行以下命令来构建项目,包括 Strapi Admin UI。
$ NODE_ENV=production npm run build
使用以下命令启动 Strapi 服务器。
$ node ~/howtoforge-project/node_modules/.bin/strapi start
您的应用程序应该在 URL http:// 上可见。但首先,在防火墙中打开端口。
$ sudo ufw allow 1337
打开 URL 后,您应该会看到以下屏幕。
在终端中按 Ctrl + C 停止服务器。您应该删除防火墙规则,因为我们不需要它。
$ sudo ufw delete allow 1337
第 5 步 - 安装和配置 PM2
我们可以使用 PM2 (Process Manager 2) 来管理进程并为其创建 systemd 服务,而不是手动启动服务器。
切换到主目录。
$ cd ~
安装 PM2。
$ sudo npm install -g
创建并打开 PM2 配置文件进行编辑。
$ sudo nano ecosystem.config.js
将以下内容粘贴到文件中。确保输入正确的目录名称以及 Postgres 凭据。
module.exports = {
  apps: [
    {
      name: 'strapi',
      cwd: '/home/navjot/my-project',
      script: 'npm',
      args: 'start',
      env: {
        NODE_ENV: 'production',
        DATABASE_HOST: 'localhost',
        DATABASE_PORT: '5432',
        DATABASE_NAME: 'strapidb',
        DATABASE_USERNAME: 'strapiuser',
        DATABASE_PASSWORD: 'Your_Password',
      },
    },
  ],
};
完成后按 Ctrl + X 并在出现提示时输入 Y 来保存文件。
使用 PM2 在后台运行你的 Strapi 实例。
$ pm2 start ecosystem.config.js
您将获得以下输出。
                        -------------

__/""""\____/"\____________/"\____/"""_____
 _\/"/////////"_\/""________/""__/"///////"___
  _\/"_______\/"_\/"//"____/"//"_\///______\//"__
   _\/""""\/__\/"\///"/"/_\/"___________/"/___
    _\/"/////////____\/"__\///"/___\/"________/"//_____
     _\/"_____________\/"____\///_____\/"_____/"//________
      _\/"_____________\/"_____________\/"___/"/___________
       _\/"_____________\/"_____________\/"__/"""""_
        _\///______________\///______________\///__\///////////////__


                          Runtime Edition

        PM2 is a Production Process Manager for Node.js applications
                     with a built-in Load Balancer.

                Start and Daemonize any application:
                $ pm2 start app.js

                Load Balance 4 instances of api.js:
                $ pm2 start api.js -i 4

                Monitor in production:
                $ pm2 monitor

                Make pm2 auto-boot at server restart:
                $ pm2 startup

                To go further checkout:
                http://pm2.io/


                        -------------

[PM2] Spawning PM2 daemon with pm2_home=/home/navjot/.pm2
[PM2] PM2 Successfully daemonized
[PM2][WARN] Applications strapi not running, starting...
[PM2] App [strapi] launched (1 instances)
????????????????????????????????????????????????????????????????????????????????????????????????????????????????????????????????????????
? id  ? name      ? namespace   ? version ? mode    ? pid      ? uptime ? ?    ? status    ? cpu      ? mem      ? user
    ? watching ?
????????????????????????????????????????????????????????????????????????????????????????????????????????????????????????????????????????
? 0   ? strapi    ? default     ? N/A     ? fork    ? 4824     ? 0s     ? 0    ? online    ? 0%       ? 31.9mb   ? navjot   ? disabled ?
????????????????????????????????????????????????????????????????????????????????????????????????????????????????????????????????????????
在 PM2 下运行的应用程序在崩溃或被杀死时会自动重启。
使用以下命令创建启动 systemd 脚本。
$ pm2 startup
您将获得以下输出。
[PM2] Init System found: systemd
[PM2] To setup the Startup Script, copy/paste the following command:
sudo env PATH=$PATH:/usr/bin /usr/lib/node_modules/pm2/bin/pm2 startup systemd -u navjot --hp /home/navjot
从上面的输出中复制命令并运行它。
$ sudo env PATH=$PATH:/usr/bin /usr/lib/node_modules/pm2/bin/pm2 startup systemd -u navjot --hp /home/navjot
保存 PM2 进程列表。
$ pm2 save
您的 Strapi 服务现在以生产模式在后台运行。
第 6 步 - 安装 Nginx
Ubuntu 22.04 附带旧版本的 Nginx。要安装最新版本,您需要下载官方 Nginx 存储库。
导入 Nginx 签名密钥。
$ curl https://nginx.org/keys/nginx_signing.key | gpg --dearmor \
	| sudo tee /usr/share/keyrings/nginx-archive-keyring.gpg >/dev/null
添加 Nginx 稳定版本的存储库。
$ echo "deb [signed-by=/usr/share/keyrings/nginx-archive-keyring.gpg arch=amd64] \
http://nginx.org/packages/ubuntu `lsb_release -cs` nginx" \
    | sudo tee /etc/apt/sources.list.d/nginx.list
更新系统存储库。
$ sudo apt update
安装 Nginx。
$ sudo apt install nginx
验证安装。
$ nginx -v
nginx version: nginx/1.22.1
启动 Nginx 服务器。
$ sudo systemctl start nginx
第 7 步 - 安装 SSL
我们需要安装 Certbot 来生成 SSL 证书。您可以使用 Ubuntu 存储库安装 Certbot,也可以使用 Snapd 工具获取最新版本。我们将使用 Snapd 版本。
Ubuntu 22.04 默认安装了 Snapd。运行以下命令以确保您的 Snapd 版本是最新的。确保您的 Snapd 版本是最新的。
$ sudo snap install core
$ sudo snap refresh core
安装 Certbot。
$ sudo snap install --classic certbot
使用以下命令通过创建指向 /usr/bin 目录的符号链接来确保 Certbot 命令运行。
$ sudo ln -s /snap/bin/certbot /usr/bin/certbot
运行以下命令生成 SSL 证书。
$ sudo certbot certonly --nginx --agree-tos --no-eff-email --staple-ocsp --preferred-challenges http -m -d strapi.example.com
上面的命令会将证书下载到服务器上的 /etc/letsencrypt/live/strapi.example.com 目录。
生成 Diffie-Hellman 组证书。
$ sudo openssl dhparam -dsaparam -out /etc/ssl/certs/dhparam.pem 4096
试运行该过程以检查 SSL 续订是否正常工作。
$ sudo certbot renew --dry-run
如果您没有看到任何错误,则一切就绪。您的证书将自动更新。
第 8 步 - 配置 Nginx
打开文件 /etc/nginx/nginx.conf 进行编辑。
$ sudo nano /etc/nginx/nginx.conf
在行 include /etc/nginx/conf.d/*.conf; 之前添加以下行。
server_names_hash_bucket_size 64;
通过按 Ctrl + X 并在出现提示时输入 Y 来保存文件。
创建并打开文件 /etc/nginx/conf.d/strapi.conf 进行编辑。
$ sudo nano /etc/nginx/conf.d/strapi.conf
将以下代码粘贴到其中。
server {
  # Redirect any http requests to https
  listen         80;
  listen         [::]:80;
  server_name    strapi.example.com;
  return 301     https://$host$request_uri;
}

server {
  listen                    443 ssl http2;
  listen                    [::]:443 ssl http2;
  server_name               strapi.example.com;

  access_log                /var/log/nginx/strapi.access.log;
  error_log                 /var/log/nginx/strapi.error.log;

  # TLS configuration
  ssl_certificate           /etc/letsencrypt/live/strapi.example.com/fullchain.pem;
  ssl_certificate_key       /etc/letsencrypt/live/strapi.example.com/privkey.pem;
  ssl_trusted_certificate   /etc/letsencrypt/live/strapi.example.com/chain.pem;
  ssl_protocols             TLSv1.2 TLSv1.3;

  ssl_ciphers 'ECDHE-ECDSA-AES256-GCM-SHA384:ECDHE-RSA-AES256-GCM-SHA384:ECDHE-ECDSA-CHACHA20-POLY1305:ECDHE-RSA-CHACHA20-POLY1305:ECDHE-ECDSA-AES256-SHA384:ECDHE-RSA-AES256-SHA384';
  ssl_prefer_server_ciphers on;
  ssl_session_cache         shared:SSL:50m;
  ssl_session_timeout       1d;

  # OCSP Stapling ---
  # fetch OCSP records from URL in ssl_certificate and cache them
  ssl_stapling on;
  ssl_stapling_verify on;
  ssl_dhparam /etc/ssl/certs/dhparam.pem;

  location / {
    proxy_set_header        X-Real-IP $remote_addr;
    proxy_set_header        X-Forwarded-Proto $scheme;
    proxy_set_header	    X-Forwarded-Host $http_host;
    proxy_set_header        X-Forwarded-For $proxy_add_x_forwarded_for;
    proxy_pass              http://127.0.0.1:1337;
  }
}
完成后按 Ctrl + X 并在出现提示时输入 Y 来保存文件。
验证 Nginx 配置文件语法。
$ sudo nginx -t
nginx: the configuration file /etc/nginx/nginx.conf syntax is ok
nginx: configuration file /etc/nginx/nginx.conf test is successful
重启 Nginx 服务。
$ sudo systemctl restart nginx
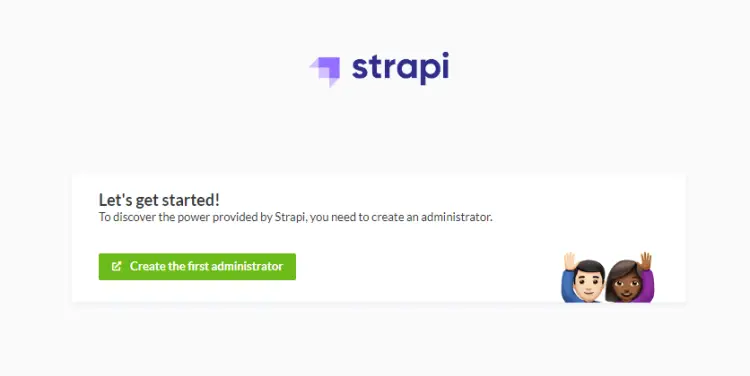
您现在可以通过 URL https://strapi.example.com 访问 Strapi CMS。您将看到以下页面,其中显示 Strapi 正在生产模式下运行。

访问 https://strapi.example.com/admin URL 创建管理员用户。
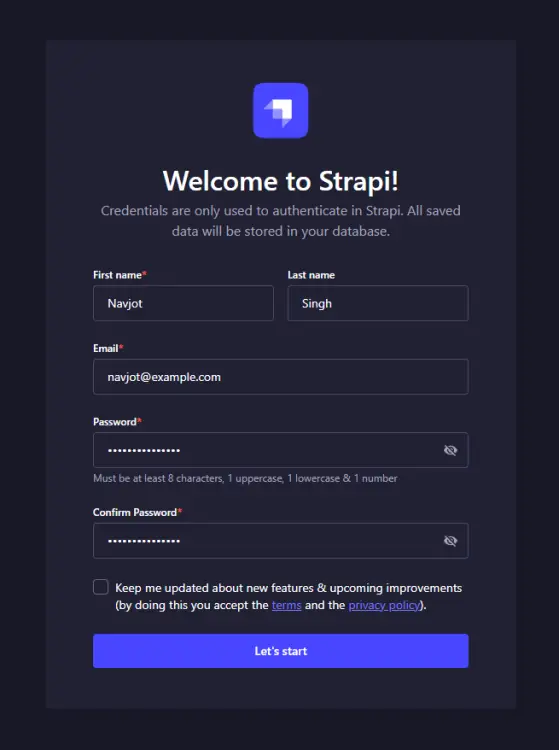
填写您的管理员详细信息,然后单击开始按钮以进入管理员仪表板屏幕。

从这里开始,您可以开始在 Strapi 上创建内容。
第 9 步 - 升级 Strapi
升级 Strapi 的第一步是停止服务器。
$ cd ~
$ pm2 stop ecosystem.config.js
切换到项目目录,打开package.json文件进行编辑。
$ cd howtoforge-project
$ nano package.json
将所有 Strapi 软件包版本号升级到最新的稳定 Strapi 版本。您可以从 Strapis GitHub 发布页面获取最新的可用版本。
"devDependencies": {},
  "dependencies": {
    "@strapi/strapi": "4.5.5",
    "@strapi/plugin-users-permissions": "4.5.5",
    "@strapi/plugin-i18n": "4.5.5",
    "pg": "8.6.0"
  },
这里需要将4.5.5修改为最新的稳定版。完成后按 Ctrl + X 并在出现提示时输入 Y 来保存文件。
安装升级版本。
$ npm install
重建管理面板。
$ NODE_ENV=production npm run build
再次启动服务器。
$ cd ~
$ pm2 start ecosystem.config.js
您的 Strapi 安装现已升级并正在运行。
结论
我们关于在 Ubuntu 22.04 服务器上安装 Strapi CMS 和 Nginx 作为反向代理服务器的教程到此结束。如果您有任何问题,请在下面的评论中发表。