如何在 Ubuntu 22.04 上安装 ERPNext
本教程适用于这些操作系统版本
- Ubuntu 22.04(果酱水母)
- Ubuntu 18.04(仿生海狸)
在此页
- 先决条件
- 开始
- 安装和配置 MariaDB 数据库
- 在 Ubuntu 22.04 上安装 ERPNext
- 为生产环境配置 ERPNext
- 访问 ERPNext 网络用户界面
- 使用 Lets Encrypt SSL 保护 ERPNext
- 结论
ERPNext 是一种免费的开源 ERP 软件,供制造商、分销商和服务商使用。它是用 Python、JavaScript 和 Frappe 框架构建的。它是现代的、易于使用的、免费的,专为中小型企业设计,可帮助公司管理其业务运营的各个方面。全球数以千计的企业使用它来管理他们的 ERP 流程。它是支持制造、分销、零售、贸易、服务、教育、非营利组织等的最佳 ERP 系统之一。
在本教程中,我们将向您展示如何在 Ubuntu 22.04 服务器上安装 ERPNext 软件。
先决条件
- 一台运行 Ubuntu 22.04 的服务器。
- 您的服务器指向一个有效域。
- 在您的服务器上配置了根密码。
入门
首先,您需要在系统上安装一些 Python 依赖项。您可以使用以下命令安装所有这些:
apt-get install python3-dev libffi-dev git python3-pip python3-testresources libssl-dev wkhtmltopdf gcc g++ make python3.10-venv -y安装完所有 Python 依赖项后,您需要在服务器上安装 Node.js。
首先,使用以下命令添加 Node.js 存储库:
curl -sL https://deb.nodesource.com/setup_16.x | bash -接下来,使用以下命令安装 Node.js 和 Redis 服务器:
apt-get install nodejs redis-server -y安装完这两个包后,通过运行以下命令安装 Yarn 包:
npm install -g yarn完成后,您可以继续下一步。
安装和配置 MariaDB 数据库
默认情况下,MariaDB 在 Ubuntu 22.04 默认存储库中可用。您可以使用以下命令安装它:
apt-get install mariadb-server -y安装后,保护 MariaDB 并使用以下命令设置 MariaDB root 密码:
mysql_secure_installation回答如下所示的所有问题以设置 MariaDB root 密码并确保安装安全:
Enter current password for root (enter for none):
Set root password? [Y/n] Y
New password:
Re-enter new password:
Remove anonymous users? [Y/n] Y
Disallow root login remotely? [Y/n] Y
Remove test database and access to it? [Y/n] Y
Reload privilege tables now? [Y/n] Y
MariaDB 安全后,使用以下命令登录到 MariaDB 控制台:
mysql -u root -p接下来,您需要将 MariaDB Innodb 文件格式更改为 Barracuda。您可以通过编辑文件 /etc/mysql/mariadb.conf.d/50-server.cnf 来完成:
nano /etc/mysql/mariadb.conf.d/50-server.cnf添加/修改以下行:
[mysqld]
innodb-file-format=barracuda
innodb-file-per-table=1
innodb-large-prefix=1
character-set-client-handshake = FALSE
character-set-server = utf8mb4
collation-server = utf8mb4_unicode_ci
保存并关闭文件,然后重新启动 MariaDB 服务以实施更改:
systemctl restart mariadb在 Ubuntu 22.04 上安装 ERPNext
首先,使用以下命令创建一个新用户来运行 ERPNext:
useradd -m -s /bin/bash erpnext接下来,使用以下命令设置 ERPNext 的密码:
passwd erpnext接下来,使用以下命令将 ERPNext 用户添加到 sudo 组:
usermod -aG sudo erpnext接下来,登录 ERPNext 用户并使用以下命令设置环境变量:
su - erpnext
nano ~/.bashrc
添加以下行:
PATH=$PATH:~/.local/bin/
保存文件然后使用以下命令激活环境变量:
source ~/.bashrc接下来,使用以下命令为 ERPNext 创建一个目录:
sudo mkdir /opt/bench接下来,将所有权设置为 erpnext 用户:
sudo chown -R erpnext:erpnext /opt/bench接下来,将目录更改为 /opt/bench 并从 Git Hub 克隆 bench 存储库:
cd /opt/bench
git clone https://github.com/frappe/bench bench-repo
接下来,使用 pip3 命令安装 bench repo:
pip3 install -e bench-repo安装后,使用以下命令使用 frappe 框架初始化 bench 目录:
bench init erpnext您应该得到以下输出:
? Built js/checkout.min.js
? Built js/dialog.min.js
? Built js/social.min.js
? Built js/web_form.min.js
? Built js/list.min.js
? Built js/chat.js
Browserslist: caniuse-lite is outdated. Please run next command `yarn upgrade caniuse-lite browserslist`
? Built css/frappe-rtl.css
? Built css/printview.css
? Built js/bootstrap-4-web.min.js
? Built js/barcode_scanner.min.js
? Built css/list.min.css
? Built css/report.min.css
? Built frappe/css/email.css
? Built js/frappe-recorder.min.js
? Built js/desk.min.js
? Built css/frappe-chat-web.css
? Built js/frappe-web.min.js
? Built css/form.min.css
? Built css/web_form.css
? Built css/desk.min.css
? Built css/frappe-web-b4.css
? Built js/control.min.js
? Built js/form.min.js
? Built js/data_import_tools.min.js
? Built js/report.min.js
?  Done in 111.35s
Done in 113.33s.
SUCCESS: Bench erpnext initialized
接下来,将目录更改为 erpnext 并使用以下命令创建一个新的 ERPNext 站点:
cd /opt/bench/erpnext
bench new-site erp.example.com
您将被要求提供您的 MariaDB root 密码和管理员密码,如下所示:
MySQL root password:

Installing frappe...
Updating DocTypes for frappe        : [========================================] 100%
Updating country info               : [========================================] 100%
Set Administrator password:
Re-enter Administrator password:
*** Scheduler is disabled ***
Current Site set to erp.example.com
此时,ERPNext 已安装在您的系统中。
为生产环境配置 ERPNext
接下来,您需要安装 Supervisor 来管理 ERPNext 进程,并将 Nginx 配置为反向代理。
首先,将用户切换到 ERPNext,然后使用以下命令安装 Supervisor 和 Nginx:
su - erpnext
sudo apt-get install supervisor nginx -y
接下来,使用以下命令安装 frappe-bench:
sudo pip3 install frappe-bench接下来,将目录更改为 /opt/bench/erpnext 并使用以下命令为生产环境设置 ERPNext:
cd /opt/bench/erpnext
sudo /home/erpnext/.local/bin/bench setup production erpnext
配置 ERPNext 后,您应该会看到以下输出:
PLAY RECAP ************************************************************************************************************************************
localhost                  : ok=8    changed=4    unreachable=0    failed=0    skipped=1    rescued=0    ignored=0

$ sudo systemctl restart supervisor
Port configuration list:

Site erp.example.com assigned port: 80
$ /usr/bin/supervisorctl reread
No config updates to processes
$ /usr/bin/supervisorctl update
$ sudo /usr/sbin/nginx -t
nginx: the configuration file /etc/nginx/nginx.conf syntax is ok
nginx: configuration file /etc/nginx/nginx.conf test is successful
$ sudo systemctl reload nginx
至此,ERPNext为生产环境配置了Nginx。
访问 ERPNext 网络用户界面
现在,打开您的 Web 浏览器并输入 URL http://erp.example.com。您将被重定向到 ERPNext 登录页面:
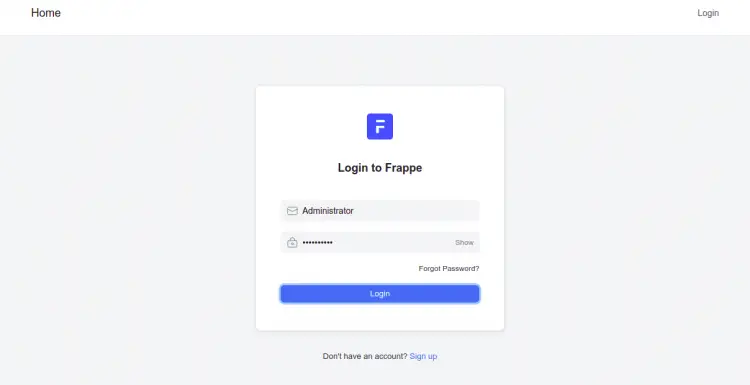
提供您之前设置的管理员用户名和密码,然后单击“登录”按钮。您应该会看到以下页面:
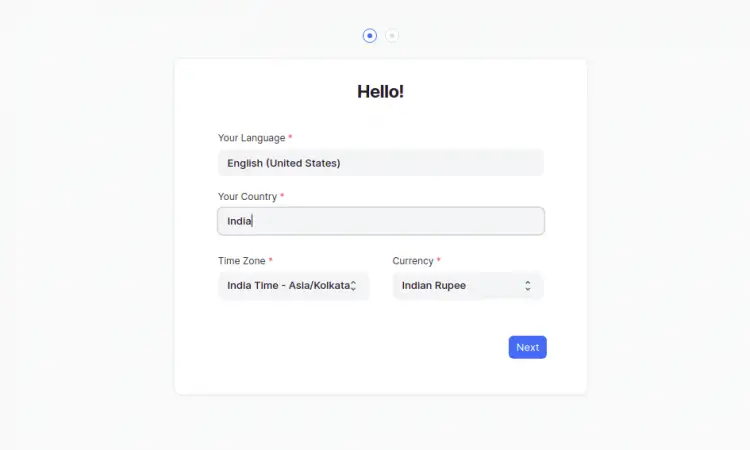
选择所需的语言、国家/地区、时区和货币,然后单击下一步按钮。您应该会看到以下页面:
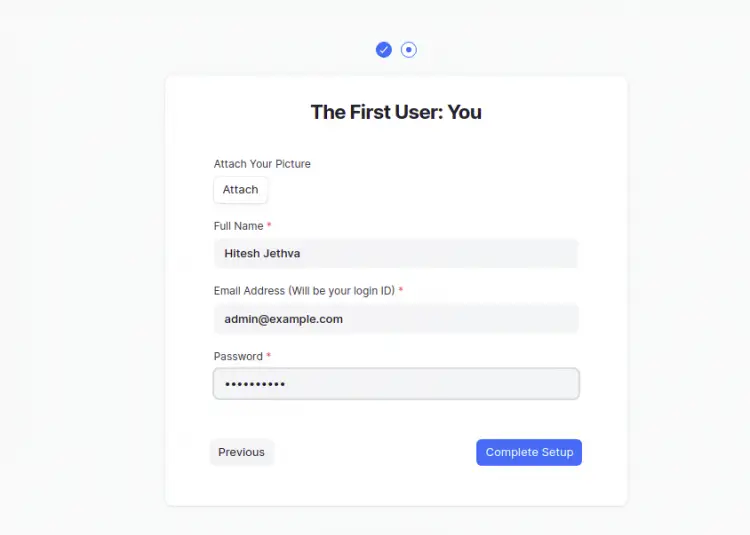
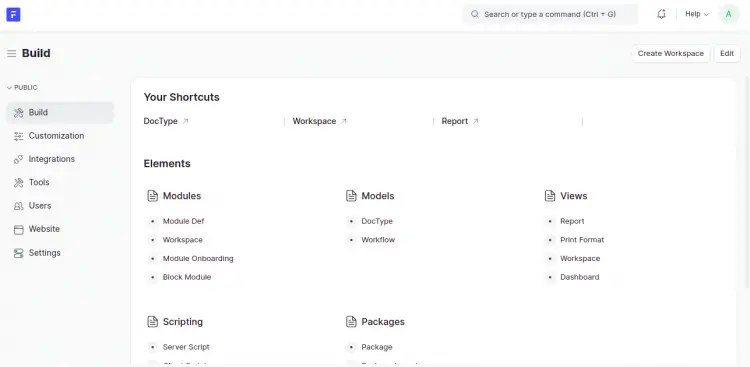
提供您的姓名、电子邮件、密码,然后单击“完成设置”按钮。您应该在以下页面上看到 ERPNext 仪表板:
使用 Lets Encrypt SSL 保护 ERPNext
首先,您需要安装 Certbot 客户端来安装和管理 Lets Encrypt SSL。您可以使用以下命令安装它:
sudo apt-get install certbot python3-certbot-nginx -y安装后,运行以下命令为您的域安装和配置 Lets Encrypt SSL:
sudo certbot --nginx -d erp.example.com您将被要求提供您的电子邮件并接受服务条款,如下所示:
Saving debug log to /var/log/letsencrypt/letsencrypt.log
Plugins selected: Authenticator nginx, Installer nginx
Enter email address (used for urgent renewal and security notices) (Enter 'c' to
cancel):

- - - - - - - - - - - - - - - - - - - - - - - - - - - - - - - - - - - - - - - -
Please read the Terms of Service at
https://letsencrypt.org/documents/LE-SA-v1.2-November-15-2017.pdf. You must
agree in order to register with the ACME server at
https://acme-v02.api.letsencrypt.org/directory
- - - - - - - - - - - - - - - - - - - - - - - - - - - - - - - - - - - - - - - -
(A)gree/(C)ancel: A

- - - - - - - - - - - - - - - - - - - - - - - - - - - - - - - - - - - - - - - -
Would you be willing to share your email address with the Electronic Frontier
Foundation, a founding partner of the Let's Encrypt project and the non-profit
organization that develops Certbot? We'd like to send you email about our work
encrypting the web, EFF news, campaigns, and ways to support digital freedom.
- - - - - - - - - - - - - - - - - - - - - - - - - - - - - - - - - - - - - - - -
(Y)es/(N)o: Y
Obtaining a new certificate
Performing the following challenges:
http-01 challenge for erp.example.com
Waiting for verification...
Cleaning up challenges
Deploying Certificate to VirtualHost /etc/nginx/conf.d/erpnext.conf
接下来,选择是否将 HTTP 流量重定向到 HTTPS,如下所示:
- - - - - - - - - - - - - - - - - - - - - - - - - - - - - - - - - - - - - - - -
1: No redirect - Make no further changes to the webserver configuration.
2: Redirect - Make all requests redirect to secure HTTPS access. Choose this for
new sites, or if you're confident your site works on HTTPS. You can undo this
change by editing your web server's configuration.
- - - - - - - - - - - - - - - - - - - - - - - - - - - - - - - - - - - - - - - -
Select the appropriate number [1-2] then [enter] (press 'c' to cancel): 2
键入 2 并按 Enter 键以完成该过程。您应该看到以下输出:
Redirecting all traffic on port 80 to ssl in /etc/nginx/conf.d/erpnext.conf

- - - - - - - - - - - - - - - - - - - - - - - - - - - - - - - - - - - - - - - -
Congratulations! You have successfully enabled https://erp.example.com

You should test your configuration at:
https://www.ssllabs.com/ssltest/analyze.html?d=erp.example.com
- - - - - - - - - - - - - - - - - - - - - - - - - - - - - - - - - - - - - - - -

IMPORTANT NOTES:
 - Congratulations! Your certificate and chain have been saved at:
   /etc/letsencrypt/live/erp.example.com/fullchain.pem
   Your key file has been saved at:
   /etc/letsencrypt/live/erp.example.com/privkey.pem
   Your cert will expire on 2022-09-11. To obtain a new or tweaked
   version of this certificate in the future, simply run certbot again
   with the "certonly" option. To non-interactively renew *all* of
   your certificates, run "certbot renew"
 - Your account credentials have been saved in your Certbot
   configuration directory at /etc/letsencrypt. You should make a
   secure backup of this folder now. This configuration directory will
   also contain certificates and private keys obtained by Certbot so
   making regular backups of this folder is ideal.
 - If you like Certbot, please consider supporting our work by:

   Donating to ISRG / Let's Encrypt:   https://letsencrypt.org/donate
   Donating to EFF:                    https://eff.org/donate-le

 - We were unable to subscribe you the EFF mailing list because your
   e-mail address appears to be invalid. You can try again later by
   visiting https://act.eff.org.
此时,您的 ERPNext 网站已使用 Lets Encrypt SSL 进行保护。您现在可以使用 HTTPS 协议安全地访问您的网站。
结论
恭喜!您已经在 Ubuntu 22.04 上成功安装了带有 Nginx 和 Lets Encrypt SSL 的 ERPNext。如果您有任何问题,请随时问我。您可以访问 ERPNext 文档页面了解更多信息。