如何在 Ubuntu 24.04 服务器上安装 Pydio Cells
本教程适用于这些操作系统版本
- Ubuntu 24.04(高贵食蚁兽)
- Ubuntu 22.04(果酱水母)
- Ubuntu 18.04(仿生海狸)
在此页面上
- 先决条件
- 安装依赖项
- 设置 MariaDB 服务器
- 安装 Pydio 电池
- 配置 Pydio 单元
- 将 Pydio Cells 作为 systemd 服务运行
- 将 Apache 设置为反向代理
- 使用 HTTPS 保护 Pydio Cell 的安全
- 结论
Pydio Cells 是一个自托管的文档共享和协作平台。它还使您可以完全控制文档共享环境。 Pydio Cells 具有快速的性能,可以处理巨大的文件传输大小,并提供先进的工作流程自动化。
在本指南中,我们将引导您完成在 Ubuntu 24.04 服务器上安装 Pydio Cells 的过程,并使用 MariaDB 数据库和 Apache 作为反向代理。
先决条件
在开始之前,请确保您具备以下条件:
- Ubuntu 24.04 服务器。
- 具有管理员权限的非 root 用户。
- 域名指向服务器IP地址。
安装依赖项
在安装 Pydio Cells 之前,您必须在 Ubuntu 系统上安装依赖项。这包括 MariaDB 数据库服务器和 Apache Web 服务器。
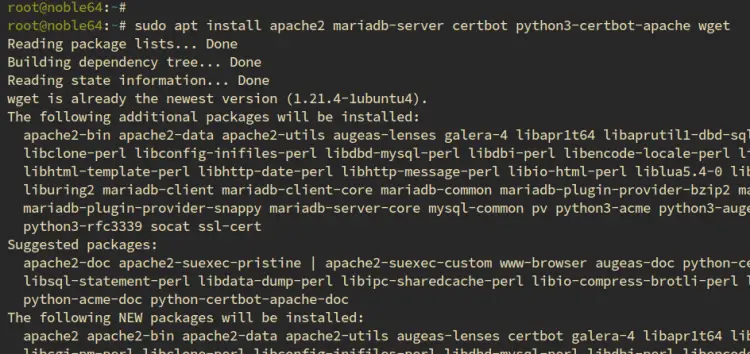
首先,运行以下 apt 命令来更新 Ubuntu 软件包索引并安装 Pydio Cells 的依赖项。使用此命令,您将安装 Apache Web 服务器、MariaDB 数据库服务器和用于生成 SSL/TLS 证书的 Certbot。
sudo apt update sudo apt install apache2 mariadb-server certbot python3-certbot-apache wget
输入Y确认安装。
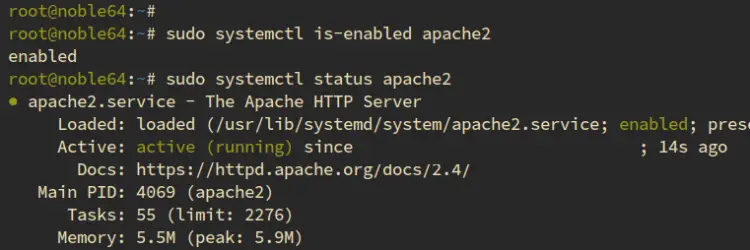
安装完成后,检查Apache服务状态如下:
sudo systemctl 已启用 apache2 sudo
systemctl status apache2
您可以在下面看到 Apache Web 服务器已启用并正在运行。
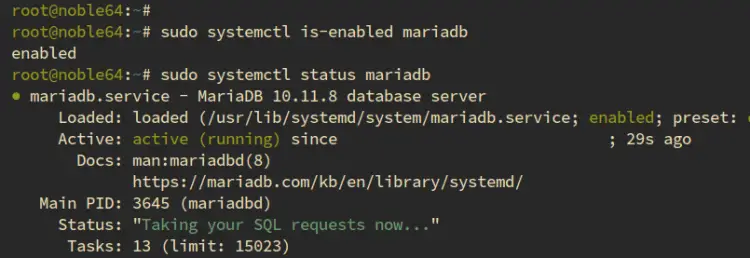
现在使用以下命令检查 MariaDB 服务器状态。
sudo systemctl 已启用 mariadb
sudo systemctl status mariadb
下面 MariaDB 服务器正在运行并启用。
设置 MariaDB 服务器
安装 MariaDB 服务器后,您将使用 mariadb-secure-installation 实用程序保护 MariaDB。然后,您将为 Pydio Cells 创建一个新的数据库和用户。
要保护 MariaDB 服务器安装,请运行下面的 mariadb-secure-installation 命令。
sudo mariadb-安全安装
系统将询问您以下 MariaDB 服务器配置:
- 将本地身份验证切换到 unix_socket?输入n。
- 设置新的 MariaDB root 密码。输入 y 进行确认,然后键入 MariaDB 服务器部署的新密码。
- 删除匿名用户?输入 y 确认。
- 从部署中删除默认数据库测试?。输入 y 确认。
- 禁止从远程连接 MariaDB root 登录?输入 y 确认。
- 重新加载表权限并应用更改?输入 y 并按 ENTER 键。
现在运行下面的 mariadb 客户端命令来登录 MariaDB 服务器。出现提示时输入您的 root 密码。
须藤 mariadb -u root -p
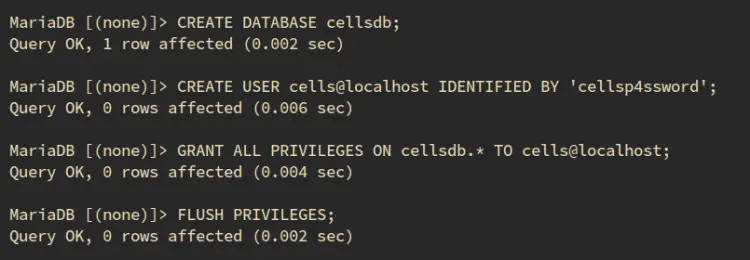
接下来,运行以下查询来创建新数据库 cellsdb、用户 cells 和密码 p4ssword。请务必使用您的信息更改以下详细信息。
创建数据库 cellsdb;
创建由“cellsp4ssword”标识的用户 cells@localhost;
将 cellsdb.* 上的所有权限授予 cells@localhost;
刷新权限;
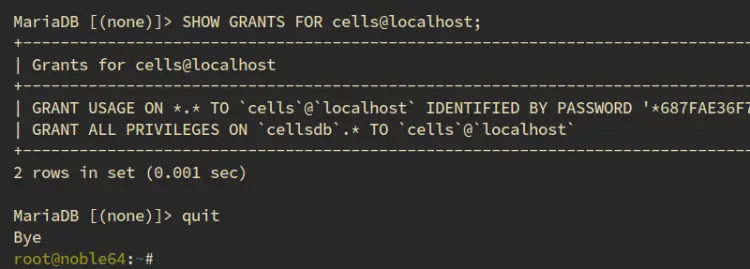
现在运行以下查询以确保用户 cells@localhost 可以访问数据库 cellsdb。
显示 cells@localhost 的补助金;
您应该看到下面类似的输出:
输入 quit 以退出 MariaDB 服务器。
安装 Pydio 电池
在本部分中,您将创建一个新的 pydio 用户,设置环境变量,然后下载并安装 Pydio Cells。
使用以下命令添加新用户 pydio:
sudo useradd -m -s /bin/bash pydio
然后,运行以下命令创建新目录 /opt/pydio/bin 和 /var/cells,并将所有权更改为 pydio > 用户。
sudo mkdir -p /opt/pydio/bin /var/cells
sudo chown -R pydio: /opt/pydio/bin /var/cells
现在运行以下命令来创建 env 文件 /etc/profile.d/cells-env.sh 并使其成为可执行文件。该文件将在用户登录时执行。
sudo tee -a /etc/profile.d/cells-env.sh << EOF
导出 CELLS_WORKING_DIR=/var/cells
导出 CELLS_BIND=127.0.0.1:8080
导出 CELLS_EXTERNAL=https:// cells.howtoforge.local
EOF
sudo chmod 0755 /etc/profile.d/cells-env.sh
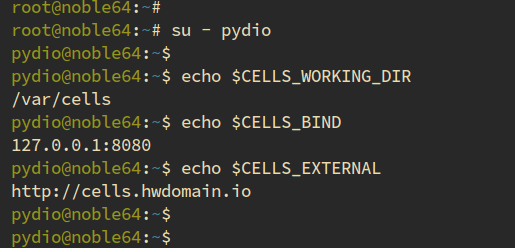
接下来,以用户 pydio 身份登录并检查环境变量 $CELLS_WORKING_DIR、$CELLS_BIND 和 $CELLS_EXTERNAL。确保每个值都指向文件 /etc/profile.d/cells-env.sh 中的正确值。
苏-pydio
回显 $CELLS_WORKING_DIR
回显 $CELLS_BIND
回显 $CELLS_EXTERNAL
现在运行以下命令将 Pydio 二进制文件下载到 /opt/pydio/bin/cells。
导出 distribId=cells
wget -O /opt/pydio/bin/cells https://download.pydio.com/latest/
使 /opt/pydio/bin/cells 文件可执行并退出当前 pydio 用户。
chmod a+x /opt/pydio/bin/cells 退出
之后,运行下面的 setcap 命令以允许 Pydio 使用权限端口 (0-1024) 并创建到 /usr/local/bin/cells 的符号链接。
sudo setcap 'cap_net_bind_service=+ep' /opt/pydio/bin/cells
sudo ln -s /opt/pydio/bin/cells /usr/local/bin/cells
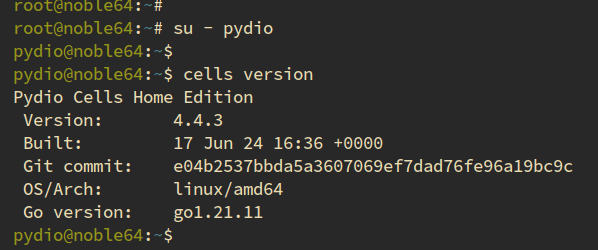
再次以pydio用户身份登录并运行下面的cells命令检查Pydio Cells版本。
su - pydio
细胞版本
如下所示,Pydio Cells 4.4.3 已安装。
配置 Pydio 单元
现在您已经下载了 Pydio Cells,您将配置它并将其与 MariaDB 数据库服务器集成,并为 Pydio Cells 安装创建一个管理员用户。这些可以通过 cells 命令行来完成。
运行下面的 cells 命令来安装和配置 Pydio Cells 安装。
单元配置--cli
- 选择 TCP 作为数据库连接,然后输入您的 MariaDB 数据库、用户和密码。
- 输入
N以获取 MongoDB 支持。在本例中,您将构建并安装单个 Pydio Cell。 - 按ENTER 使用默认存储配置。
- 输入 Pydio Cells 安装的新管理员用户、电子邮件地址和密码。
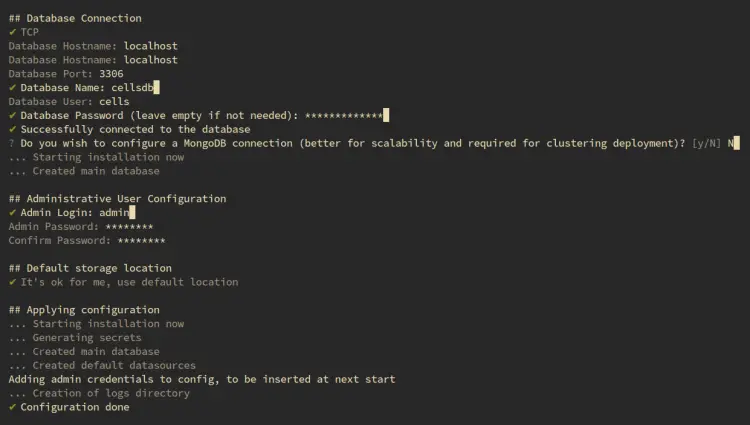
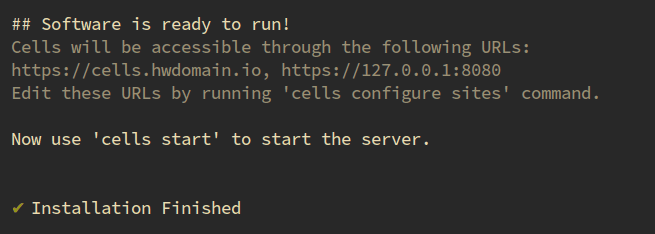
安装完成后,您将看到消息安装完成。
将 Pydio Cells 作为 systemd 服务运行
在本部分中,您将为 Pydio Cells 创建并设置一个 systemd 服务文件。这样,您就可以使用 systemctl 命令轻松管理 Pydio Cells。
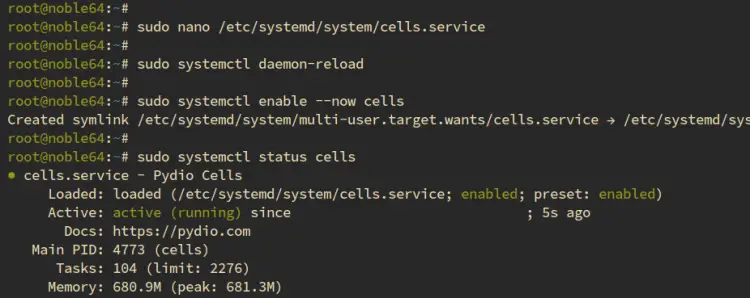
使用 nano 编辑器创建一个新的服务文件 /etc/systemd/system/cells.service。
须藤纳米 /etc/systemd/system/cells.service
将以下配置添加到文件中,并确保使用您的目标域名更改 CELLS_EXTERNAL 环境变量。
[Unit]
Description=Pydio Cells
Documentation=https://pydio.com
Wants=network-online.target
After=network-online.target
AssertFileIsExecutable=/opt/pydio/bin/cells

[Service]
User=pydio
Group=pydio
PermissionsStartOnly=true
AmbientCapabilities=CAP_NET_BIND_SERVICE
ExecStart=/opt/pydio/bin/cells start
Restart=on-failure
StandardOutput=journal
StandardError=inherit
LimitNOFILE=65536
TimeoutStopSec=5
KillSignal=INT
SendSIGKILL=yes
SuccessExitStatus=0
WorkingDirectory=/home/pydio

# Add environment variables
Environment=CELLS_WORKING_DIR=/var/cells
Environment=CELLS_BIND=127.0.0.1:8080
Environment=CELLS_EXTERNAL=https://cells.howtoforge.local

[Install]
WantedBy=multi-user.target
保存文件并退出编辑器。
现在运行下面的 systemctl 命令来重新加载 systemd 管理器并应用您的更改。
sudo systemctl 守护进程重新加载
使用以下命令启动并启用 cells 服务。然后,检查 cells 状态以确保服务正在运行。
sudo systemctl启用--now单元格
sudo systemctl状态单元格
将 Apache 设置为反向代理
Pydio Cells 作为 systemd 服务运行后,您将创建一个新的 Apache 虚拟主机文件作为 Pydio Cells 的反向代理。您还需要使用 a2enmod 命令启用 Apache 模块。
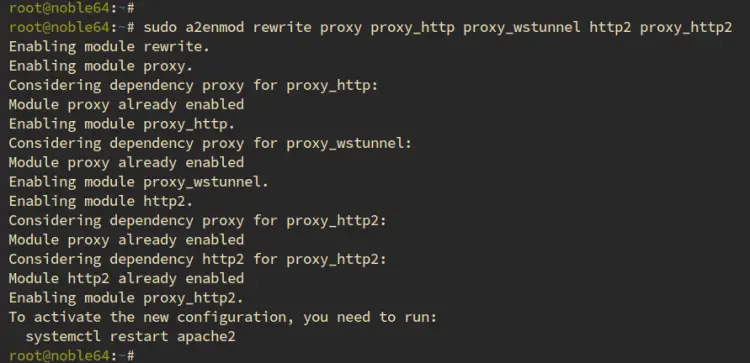
首先,运行下面的 a2enmod 命令来启用 Apache 模块。在这种情况下,您将启用 SSL 和反向代理模块。
sudo a2enmod 重写 ssl 代理 proxy_http proxy_wstunnel http2 proxy_http2
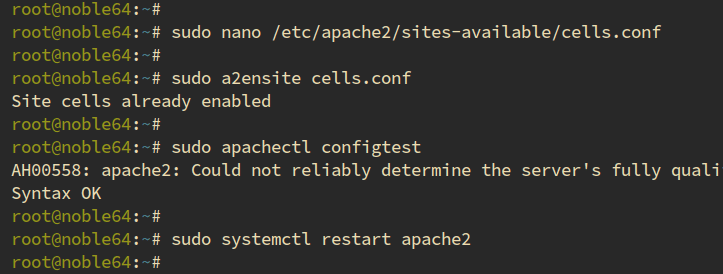
现在使用以下 nano 命令创建一个新的虚拟主机文件 /etc/apache2/sites-available/cells.conf。
sudo nano /etc/apache2/sites-available/cells.conf
插入以下配置,将 Apache 设置为 Pydio Cells 的反向代理。确保将 ServerName 选项更改为您的目标域名。
<VirtualHost *:80>
    ServerName cells.howtoforge.local

    AllowEncodedSlashes On
    RewriteEngine On

    # be aware of this
    # Allow reverse proxy via self-signed certificates
    SSLProxyEngine On
    SSLProxyVerify none
    SSLProxyCheckPeerCN off
    SSLProxyCheckPeerName off
    SSLProxyCheckPeerExpire off

    ## The order of the directives matters.
    # If Cells is not running with https, consider using ws instead of wss
    ProxyPassMatch "/ws/(.*)" wss://localhost:8080/ws/$1 nocanon

    ## This rewrite condition is required if using Cells-Sync
    # RewriteCond %{HTTP:Content-Type} =application/grpc [NC]
    # RewriteRule /(.*) h2://localhost:8080/$1 [P,L]

    ProxyPass "/" "https://127.0.0.1:8080/"
    ProxyPassReverse "/" "https://127.0.0.1:8080/"

    ErrorLog ${APACHE_LOG_DIR}/error.log
    CustomLog ${APACHE_LOG_DIR}/access.log combined

</VirtualHost>
完成后保存并退出文件。
接下来,运行下面的 a2ensite 命令来激活虚拟主机 cells.conf 并验证您的 Apache 配置。如果您的 Apache 配置正确,您将看到输出Syntax is OK。
sudo a2ensite cells.conf
sudo apachectl configtest
最后,运行下面的 systemctl 命令来重新启动 Apache Web 服务器并应用您的更改。
sudo systemctl 重新启动 apache2
使用 HTTPS 保护 Pydio Cell 的安全
Pydio Cells 可通过 HTTPS 访问。因此,您必须在 Apache 虚拟主机文件上启用 HTTPS。在本部分中,您将使用 certbot 生成 SSL/TLS 证书以保护 Pydio Cells 安装。
要使用 HTTPS 保护 Pydio Cells,请运行下面的 certbot 命令。请务必使用您的信息更改下面的域名和电子邮件地址。
sudo certbot --apache --agree-tos --redirect --hsts --staple-ocsp --email [电子邮件受保护] -d cells.howtoforge.local
该过程完成后,您的 SSL/TLS 证书将在 /etc/letsencrypt/live/domain.com 目录中可用。
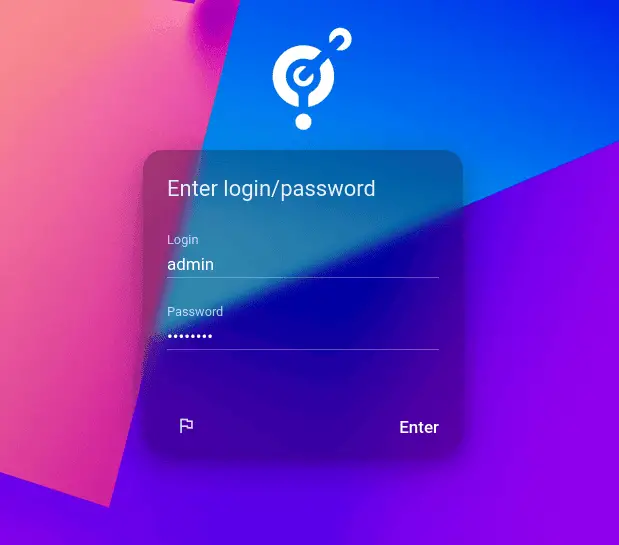
现在打开您的网络浏览器并访问您的域名 https://cells.howtoforge.local/。如果安装成功,系统将提示您显示 Pydio Cells 登录页面。
输入您的管理员用户和密码,然后单击输入。
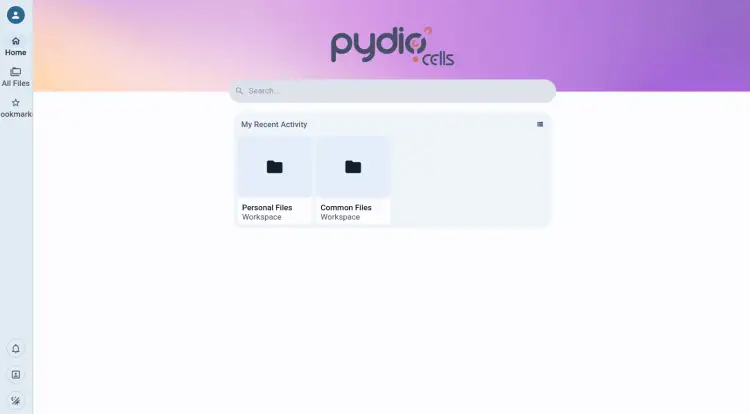
您将看到 Pydio Cells 仪表板,如下所示:
结论
恭喜!您已在 Ubuntu 24.04 服务器上完成 Pydio Cells 的安装。您已启动并运行 Pydio Cell,并使用 MariaDB 数据库服务器和 Apache 作为反向代理。最后,您还通过 Certbot 和 Letsencrypt 使用 HTTPS 保护 Pydio Cells 的安全。