如何在 Rocky Linux/Alma Linux 9 上安装和配置 Squid 代理服务器
在此页
- 先决条件
- 第 1 步 - 安装 Squid
- 第 2 步 - 配置 Squid 代理
- 1。配置鱿鱼访问策略
- 2。网站拦截
- 3。阻止下载特定文件
- 4。使用关键字阻止网站
- 5。屏蔽客户端 IP 地址
- 6。更改鱿鱼代理端口
- 7.配置防火墙/SELinux
- 1。系统范围的代理配置
- 2。浏览器代理设置
- 3。配置 DNF 以使用 Squid 代理
- 4。使用 Squidclient
代理服务器位于两个网络之间,充当最终用户和 Internet 资源之间的网关。通过代理服务器,最终用户能够过滤访问。他们可以出于各种目的控制和监视 Web 流量,包括隐私、安全和缓存。
Squid作为一种分布式缓存机制,通过保存从不同请求中获得的数据,在类似请求完成时提高流量速度。如果缓存服务器没有缓存数据,它会将请求转发给存储数据的 Web 服务器。
在本教程中,您将学习如何在 Rocky/Alma Linux 9 服务器上安装和配置 Squid Proxy。
先决条件
-
A server running Rocky Linux 9 or Alma Linux 9.
-
A non-root user with sudo privileges.
-
Make sure everything is updated.
$ sudo dnf update -
Install basic utility packages. Some of them may already be installed.
$ sudo dnf install wget curl nano unzip yum-utils -y
第 1 步 - 安装鱿鱼
安装 Squid 需要 Epel 存储库。安装 Epel 存储库。
$ sudo dnf install epel-release安装鱿鱼代理。
$ sudo dnf install squid验证安装。
$ squid --version
Squid Cache: Version 5.2
Service Name: squid

This binary uses OpenSSL 3.0.1 14 Dec 2021..........
启用并启动 Squid 服务。
$ sudo systemctl enable squid --now检查服务的状态。
$ sudo systemctl status squid
? squid.service - Squid caching proxy
     Loaded: loaded (/usr/lib/systemd/system/squid.service; enabled; vendor preset: disabled)
     Active: active (running) since Wed 2022-09-28 11:52:24 UTC; 2min ago
       Docs: man:squid(8)
    Process: 94622 ExecStartPre=/usr/libexec/squid/cache_swap.sh (code=exited, status=0/SUCCESS)
   Main PID: 94624 (squid)
      Tasks: 3 (limit: 5915)
     Memory: 16.3M
        CPU: 4.207s
     CGroup: /system.slice/squid.service
             ??94624 /usr/sbin/squid --foreground -f /etc/squid/squid.conf
             ??94626 "(squid-1)" --kid squid-1 --foreground -f /etc/squid/squid.conf
             ??94627 "(logfile-daemon)" /var/log/squid/access.log

Sep 28 11:52:24 squidproxy systemd[1]: Starting Squid caching proxy...
Sep 28 11:52:24 squidproxy squid[94624]: Squid Parent: will start 1 kids
Sep 28 11:52:24 squidproxy squid[94624]: Squid Parent: (squid-1) process 94626 started
Sep 28 11:52:24 squidproxy systemd[1]: Started Squid caching proxy.
第 2 步 - 配置 Squid 代理
Squid 将其配置存储在文件
/etc/squid/squid.conf中。检查没有注释的文件内容。$ sudo grep -vE "^#|^$" /etc/squid/squid.conf上面的命令过滤掉所有以
#开头的代表注释的语句。您将获得以下输出。acl localnet src 0.0.0.1-0.255.255.255 # RFC 1122 "this" network (LAN) acl localnet src 10.0.0.0/8 # RFC 1918 local private network (LAN) acl localnet src 100.64.0.0/10 # RFC 6598 shared address space (CGN) acl localnet src 169.254.0.0/16 # RFC 3927 link-local (directly plugged) machines acl localnet src 172.16.0.0/12 # RFC 1918 local private network (LAN) acl localnet src 192.168.0.0/16 # RFC 1918 local private network (LAN) acl localnet src fc00::/7 # RFC 4193 local private network range acl localnet src fe80::/10 # RFC 4291 link-local (directly plugged) machines acl SSL_ports port 443 acl Safe_ports port 80 # http acl Safe_ports port 21 # ftp acl Safe_ports port 443 # https acl Safe_ports port 70 # gopher acl Safe_ports port 210 # wais acl Safe_ports port 1025-65535 # unregistered ports acl Safe_ports port 280 # http-mgmt acl Safe_ports port 488 # gss-http acl Safe_ports port 591 # filemaker acl Safe_ports port 777 # multiling http http_access deny !Safe_ports http_access deny CONNECT !SSL_ports http_access allow localhost manager http_access deny manager http_access allow localnet http_access allow localhost http_access deny all http_port 3128 coredump_dir /var/spool/squid refresh_pattern ^ftp: 1440 20% 10080 refresh_pattern ^gopher: 1440 0% 1440 refresh_pattern -i (/cgi-bin/|\?) 0 0% 0 refresh_pattern . 0 20% 4320编辑配置的第一步是备份现有配置。
$ sudo cp /etc/squid/squid.conf{,.bak}打开文件进行编辑。
$ sudo nano /etc/squid/squid.conf1.配置Squid访问策略
访问控制列表 (ACL) 定义允许谁使用 Squid 作为您本地网络上的代理。
让我们通过定义如下规则在子网
192.168.204.0/24中添加主机。acl newlocalnet src 192.168.205.0/24这将创建一个名为
newlocalnet的新 ACL,其中包含子网中的主机。要允许访问此 ACL,请在
http_access deny all行下方添加以下行。http_access allow newlocalnetSquid 从上到下读取配置文件。
2. 网站屏蔽
创建一个文件来存储要阻止的域。
$ sudo nano /etc/squid/blocked-sites添加要阻止的网站。例如,
example.com
example.net
example.org
通过按 Ctrl + X 并在出现提示时输入 Y 来保存文件。
打开鱿鱼配置文件。
$ sudo nano /etc/squid/squid.conf添加以下行。
acl blocked_sites dstdomain "/etc/squid/blocked-sites"
http_access deny blocked_sites
3. 阻止下载特定文件
您还可以阻止下载具有特定扩展名的文件。创建一个文件来存储要阻止的扩展名。
$ sudo nano /etc/squid/blocked-filextensions以指定格式粘贴以下文件扩展名。
\.exe(\?.*)?$
\.bat(\?.*)?$
\.tar(\?.*)?$
\.mp3(\?.*)?$
\.mp4(\?.*)?$
通过按 Ctrl + X 并在出现提示时输入 Y 来保存文件。
将以下代码粘贴到 squid 配置文件中。
acl blockfiles urlpath_regex -i "/etc/squid/blocked-filextensions"
http_access deny blockfiles
4. 使用关键词屏蔽网站
为要阻止的关键字创建配置文件。
$ sudo nano /etc/squid/banned-keywords粘贴以下关键字。
porn
gamble
ads
movie
通过按 Ctrl + X 并在出现提示时输入 Y 来保存文件。
在 Squid 配置文件中进行以下更改。
acl keyword-ban url_regex "/etc/squid/banned-keywords"
http_access deny keyword-ban
5.屏蔽客户端IP地址
您可以通过在 Squid 配置文件中添加以下行来不公开客户端 IP 地址来匿名化流量。
# Anonymize Traffic
via off
forwarded_for off
request_header_access Allow allow all
request_header_access Authorization allow all
request_header_access WWW-Authenticate allow all
request_header_access Proxy-Authorization allow all
request_header_access Proxy-Authenticate allow all
request_header_access Cache-Control allow all
request_header_access Content-Encoding allow all
request_header_access Content-Length allow all
request_header_access Content-Type allow all
request_header_access Date allow all
request_header_access Expires allow all
request_header_access Host allow all
request_header_access If-Modified-Since allow all
request_header_access Last-Modified allow all
request_header_access Location allow all
request_header_access Pragma allow all
request_header_access Accept allow all
request_header_access Accept-Charset allow all
request_header_access Accept-Encoding allow all
request_header_access Accept-Language allow all
request_header_access Content-Language allow all
request_header_access Mime-Version allow all
request_header_access Retry-After allow all
request_header_access Title allow all
request_header_access Connection allow all
request_header_access Proxy-Connection allow all
request_header_access User-Agent allow all
request_header_access Cookie allow all
request_header_access All deny all
6.更改鱿鱼代理端口
默认情况下,squid代理服务器监听3128端口,要改变它,需要在squid配置文件中注释
http_port 3128行,修改如下。# Squid normally listens to port 3128 # http_port 3128 http_port 7035通过按 Ctrl + X 并在出现提示时输入 Y 来保存文件。
验证配置。
$ sudo squid -k parse您将获得以下输出。
2022/10/04 12:29:25| Startup: Initializing Authentication Schemes ...
2022/10/04 12:29:25| Startup: Initialized Authentication Scheme 'basic'
2022/10/04 12:29:25| Startup: Initialized Authentication Scheme 'digest'
2022/10/04 12:29:25| Startup: Initialized Authentication Scheme 'negotiate'
2022/10/04 12:29:25| Startup: Initialized Authentication Scheme 'ntlm'
2022/10/04 12:29:25| Startup: Initialized Authentication.
2022/10/04 12:29:25| Processing Configuration File: /etc/squid/squid.conf (depth 0)
2022/10/04 12:29:25| Processing: acl localnet src 0.0.0.1-0.255.255.255 # RFC 1122 "this" network (LAN)
2022/10/04 12:29:25| Processing: acl localnet src 10.0.0.0/8            # RFC 1918 local private network (LAN)
................
2022/10/04 12:29:25| Processing: acl Safe_ports port 777                # multiling http
2022/10/04 12:29:25| Processing: http_access deny !Safe_ports
2022/10/04 12:29:25| Processing: http_access deny CONNECT !SSL_ports
2022/10/04 12:29:25| Processing: http_access allow localhost manager
2022/10/04 12:29:25| Processing: http_access deny manager
2022/10/04 12:29:25| Processing: http_access allow localnet
2022/10/04 12:29:25| Processing: http_access allow localhost
2022/10/04 12:29:25| Processing: http_access deny all
2022/10/04 12:29:25| Processing: http_port 3128
2022/10/04 12:29:25| Processing: coredump_dir /var/spool/squid
2022/10/04 12:29:25| Processing: refresh_pattern ^ftp:          1440    20%     10080
2022/10/04 12:29:25| Processing: refresh_pattern ^gopher:       1440    0%      1440
2022/10/04 12:29:25| Processing: refresh_pattern -i (/cgi-bin/|\?) 0    0%      0
2022/10/04 12:29:25| Processing: refresh_pattern .              0       20%     4320
2022/10/04 12:29:25| Initializing https:// proxy context
2022/10/04 12:29:25| Requiring client certificates.
重新启动鱿鱼服务器。
$ sudo systemctl restart squid验证 squid 是否正在监听设置的端口。
$ sudo ss -altnp | grep 8085
LISTEN 0      4096               *:7035            *:*    users:(("squid",pid=94626,fd=11))
7.配置防火墙/SELinux
如果您使用的是默认端口,请使用以下命令允许它通过防火墙。
$ sudo firewall-cmd --add-service=squid --permanent
$ sudo firewall-cmd --reload
如果您启用了自定义端口,请改用以下命令。将
[port_number]替换为您的自定义端口号。sudo firewall-cmd --permanent --add-port=[port_number]/tcp sudo firewall-cmd --reload您还需要使用 SELinux 启用自定义端口。
sudo semanage port -a -t squid_port_t -p tcp [port_number]第 3 步 - 为 Squid 设置基本身份验证
要配置 squid 接受身份验证,我们需要使用
htpasswd实用程序。安装 Apache 工具包。$ sudo dnf install httpd-tools使用以下命令创建用户名密码对。
$ sudo htpasswd -c /etc/squid/squid_passwd username系统将提示您为用户创建密码。
将文件的所有权更改为 Squid 用户。
$ sudo chown squid /etc/squid/squid_passwdSquid 使用身份验证助手进行身份验证。我们将使用
ncsa_auth助手。检查ncsa_auth文件的位置。$ sudo rpm -ql squid | grep ncsa_auth /usr/lib64/squid/basic_ncsa_auth /usr/share/man/man8/basic_ncsa_auth.8.gz第一个结果是文件的位置。
将以下行粘贴到 Squid 配置中。
auth_param basic program /usr/lib64/squid/basic_ncsa_auth /etc/squid/squid_passwd
acl ncsa_users proxy_auth REQUIRED
http_access allow ncsa_users
重新启动 squid 以启用身份验证。
$ sudo systemctl restart squid第 4 步 - 配置 Squid 代理客户端
您需要客户端连接到 Squid 代理服务器。连接服务器的方式有以下三种:
<开始>
- 系统级代理配置
- 使用 Squid 服务器作为网关
- 使用网络浏览器作为客户端
1.系统范围的代理配置
您可以通过创建定义代理配置的文件 /etc/profile.d/squid.sh 将 Squid 代理配置为在您的系统中工作。
$ sudo nano /etc/profile.d/squid.sh
粘贴以下行。
PROXY_URL="192.168.205.10:7035"
HTTP_PROXY=$PROXY_URL
HTTPS_PROXY=$PROXY_URL
FTP_PROXY=$PROXY_URL
http_proxy=$PROXY_URL
https_proxy=$PROXY_URL
ftp_proxy=$PROXY_URL
export HTTP_PROXY HTTPS_PROXY FTP_PROXY http_proxy https_proxy ftp_proxy
通过按 Ctrl + X 并在出现提示时输入 Y 来保存文件。源文件。
$ source /etc/profile.d/squid.sh
通过运行 wget 命令验证配置。
$ wget google.com
--2022-10-04 12:15:59--  http://google.com/
Connecting to 192.168.205.10:7035... connected.
Proxy request sent, awaiting response... 301 Moved Permanently
Location: http://www.google.com/ [following]
--2022-10-04 12:15:59--  http://www.google.com/
Reusing existing connection to 192.168.205.10:7035.
Proxy request sent, awaiting response... 200 OK
Length: unspecified [text/html]
Saving to: ‘index.html.1’

index.html.1       [ <=>             ]  14.14K  --.-KB/s    in 0s

2022-10-04 12:15:59 (68.1 MB/s) - ‘index.html.1’ saved [14479]
要将它与您的用户名和密码一起使用,请使用以下命令。
$ wget google.com --proxy-user=YOUR-USERNAME-HERE --proxy-password=YOUR-PASSWORD-HERE
您可以检查 Squid 服务器日志。
1664885759.296      0 192.168.205.10 TCP_MEM_HIT/301 750 GET http://google.com/ - HIER_NONE/- text/html
1664885759.351     54 192.168.205.10 TCP_MISS/200 15113 GET http://www.google.com/ - HIER_DIRECT/216.58.208.100 text/html
2.浏览器代理设置
您可以轻松配置 Squid 代理以在 Firefox 或 Chrome 浏览器中工作。但是默认方法不支持用户名和密码。您将需要在您的浏览器中使用第三方扩展来使用带身份验证的 Squid 代理。将 Proxy SwitchOmega 用于 Chrome 和基于 Chrome 的浏览器。
让我们在 Chrome 上使用 FoxyProxy Standard 扩展进行测试。使用上面给出的 URL 安装扩展。打开扩展选项,您将看到以下屏幕。
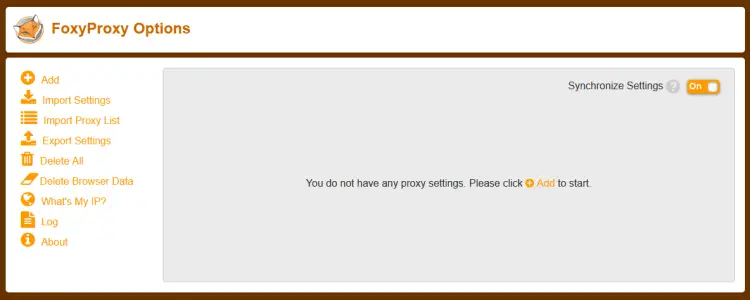
单击添加按钮以添加代理 URL。
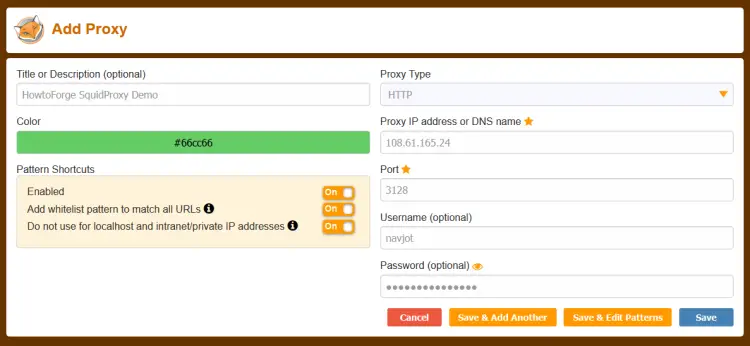
输入代理参数,包括服务名称、IP 地址、端口号、用户名和密码。启用选项不要用于本地主机和内联网/私有 IP 地址。
单击保存按钮继续。从下一页的下拉列表中选择代理的名称以启用它。
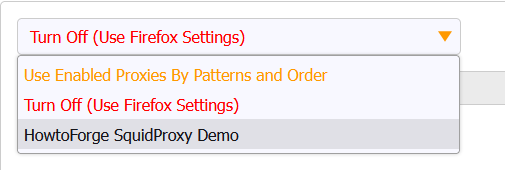
屏幕应如下所示。

访问 https://whatismyip.com URL 检查代理是否有效。
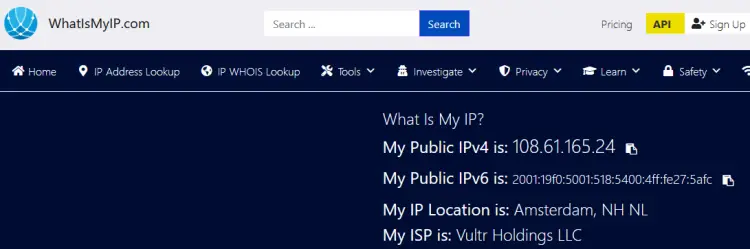
由于我们屏蔽了客户端 IP,您将看到托管 Squid 代理的服务器的 IP 地址。
您还可以通过 Squid 日志进行验证。
$ sudo tail -f /var/log/squid/access.log
您将获得以下输出。
1664909025.814    251 127.0.0.1 TCP_TUNNEL/200 8662 CONNECT mirrors.rockylinux.org:443 - HIER_DIRECT/2a04:4e42:9::644 -
1664909025.819      3 127.0.0.1 TCP_MISS/200 3347 GET http://mirror.nl.stackscale.com/rocky/9.0/extras/x86_64/os/repodata/repomd.xml - HIER_DIRECT/5.57.230.252 text/xml
1664909026.218    395 127.0.0.1 TCP_TUNNEL/200 8446 CONNECT apprepo.vultr.com:443 - HIER_DIRECT/45.63.19.147 -
1664909027.084      0 223.190.89.32 TCP_DENIED/403 3974 CONNECT www.whatismyip.com:443 - HIER_NONE/- text/html
1664909442.461     73 223.190.89.32 TCP_MISS/200 2362 POST http://ocsp.godaddy.com/ - HIER_DIRECT/192.124.249.41 application/ocsp-response
1664909612.229 171207 223.190.89.32 TCP_TUNNEL/200 6174 CONNECT api.whatismyip.com:443 - HIER_DIRECT/34.98.116.180 -
1664909612.245 172627 223.190.89.32 TCP_TUNNEL/200 67818 CONNECT www.whatismyip.com:443 - HIER_DIRECT/104.21.89.158 -
1664909613.231 171384 223.190.89.32 TCP_TUNNEL/200 3712 CONNECT apiv6.whatismyip.com:443 - HIER_DIRECT/2600:1901:0:e01d:: -
1664910098.088   3098 223.190.89.32 TCP_TUNNEL/200 10403 CONNECT profile.accounts.firefox.com:443 - HIER_DIRECT/52.40.171.113 -
1664910103.232    545 223.190.89.32 TCP_TUNNEL/200 6165 CONNECT safebrowsing.googleapis.com:443 - HIER_DIRECT/172.217.168.234 -
3.配置DNF使用Squid Proxy
DNF 存储库可以配置为使用 Squid 代理。打开 DNF 配置文件。
$ sudo nano /etc/dnf/dnf.conf
将以下行粘贴到文件末尾。
proxy=http://192.168.205.12:8085/
proxy_username=username
proxy_password=password
通过按 Ctrl + X 并在出现提示时输入 Y 来保存文件。
通过更新系统或安装任何软件包来验证更改。
$ sudo dnf update
检查日志。
http://mirror.nl.stackscale.com/rocky/9.0/AppStream/x86_64/os/Packages/t/telnet-0.17-85.el9.x86_64.rpm - HIER_DIRECT/5.57.230.252 application/x-redhat-package-manager
1664896976.909      3 192.168.205.12 TCP_MISS/200 24764 GET http://mirror.nl.stackscale.com/rocky/9.0/AppStream/x86_64/os/Packages/p/perl-HTTP-Date-6.05-7.el9.noarch.rpm - HIER_DIRECT/5.57.230.252 application/x-redhat-package-manager
1664896976.920      8 192.168.205.12 TCP_MISS/200 98591 GET http://mirror.nl.stackscale.com/rocky/9.0/AppStream/x86_64/os/Packages/p/perl-HTTP-Message-6.29-3.el9.noarch.rpm - HIER_DIRECT/5.57.230.252 application/x-redhat-package-manager
1664896976.932      9 192.168.205.12 TCP_MISS/200 32361 GET http://mirror.nl.stackscale.com/rocky/9.0/AppStream/x86_64/os/Packages/p/perl-I18N-Langinfo-0.19-479.el9.x86_64.rpm - HIER_DIRECT/5.57.230.252 application/x-redhat-package-manager
1664896977.024    340 192.168.205.12 TCP_MISS/200 44730 GET http://epel.mirror.constant.com/9/Everything/x86_64/Packages/h/hiredis-1.0.2-1.el9.x86_64.rpm - HIER_DIRECT/108.61.5.85 application/x-redhat-package-manager
1664896977.237    555 192.168.205.12 TCP_MISS/200 272291 GET http://epel.mirror.constant.com/9/Everything/x86_64/Packages/c/coturn-4.6.0-1.el9.x86_64.rpm - HIER_DIRECT/108.61.5.85 application/x-redhat-package-manager
4.使用Squidclient
或者,您可以使用捆绑的 squidclient 命令进行测试。它输出对网络请求的响应,类似于 wget 或 curl。但与 wget 和 curl 不同,squidclient 会自动连接到 Squid 的默认代理设置,本地主机:3128。
运行以下命令进行测试。
$ squidclient https://google.com
您将获得以下输出。
HTTP/1.1 301 Moved Permanently
Location: https://www.google.com/
Content-Type: text/html; charset=UTF-8
Date: Tue, 04 Oct 2022 16:35:35 GMT
Expires: Tue, 04 Oct 2022 16:35:35 GMT
Cache-Control: private, max-age=2592000
Server: gws
Content-Length: 220
X-XSS-Protection: 0
X-Frame-Options: SAMEORIGIN
Set-Cookie: CONSENT=PENDING+669; expires=Thu, 03-Oct-2024 16:35:35 GMT; path=/; domain=.google.com; Secure
P3P: CP="This is not a P3P policy! See g.co/p3phelp for more info."
Alt-Svc: h3=":443"; ma=2592000,h3-29=":443"; ma=2592000,h3-Q050=":443"; ma=2592000,h3-Q046=":443"; ma=2592000,h3-Q043=":443"; ma=2592000,quic=":443"; ma=2592000; v="46,43"
X-Cache: MISS from squidproxy
X-Cache-Lookup: MISS from squidproxy:3128
Via: 1.1 squidproxy (squid/5.2)
Connection: close
要使用 IP 地址和身份验证参数运行该命令,请运行以下命令。
$ squidclient -l 192.168.205.12 -p 7035 -u username -w password https://google.com
结论
我们关于在 Rocky Linux/Alma Linux 9 服务器上安装和配置 Squid 代理服务器的教程到此结束。如果您有任何问题,请在下面的评论中发表。