如何在 Ubuntu 22.04 上使用 Nginx 安装 Sails.js 框架
在此页
- 先决条件
- 第 1 步 - 配置防火墙
- 第 2 步 - 安装节点版本管理器 (NVM)
- 第 3 步 - 安装 Node.js
- 第 4 步 - 安装 Sails.js
- 第 5 步 - 创建演示应用程序
- 第 6 步 - 创建 systemd 服务文件
- 第 7 步 - 安装 Nginx
- 第 8 步 - 安装 SSL
- 第 9 步 - 配置 Nginx
- 第 10 步 - 访问 Sails.js 应用程序
- 结论
Sails.js 是一个用于 Node.js 的全栈 MVC JavaScript 框架。它用于开发实时 Web 应用程序。它受到 Ruby on Rails 的启发,但支持数据驱动的 API 和可扩展的面向服务的架构。它使用一个名为 Waterline 的强大对象关系映射 (ORM),允许它与 MySQL、PostgreSQL、MongoDB、Redis 等数据库一起使用。
在本教程中,您将学习如何安装 Sails.js 框架来创建测试应用程序,并使用 Nginx 服务器和 Lets Encrypt SSL 在 Ubuntu 22.04 服务器上部署它。
先决条件
-
A server running Ubuntu 22.04.
-
A non-root user with sudo privileges.
-
The Uncomplicated Firewall(UFW) is enabled and running.
-
A Fully Qualified domain name pointed to the server. For our tutorial, we will be using the domain
sails.example.com. -
Everything is updated.
$ sudo apt update && sudo apt upgrade
第 1 步 - 配置防火墙
安装任何包之前的第一步是配置防火墙以允许 HTTP 和 HTTPS 连接。
检查防火墙的状态。
$ sudo ufw status
您应该会看到如下内容。
Status: active

To                         Action      From
--                         ------      ----
OpenSSH                    ALLOW       Anywhere
OpenSSH (v6)               ALLOW       Anywhere (v6)
允许 HTTP 和 HTTPs 端口。
$ sudo ufw allow http
$ sudo ufw allow https
再次检查状态以确认。
$ sudo ufw status
Status: active

To                         Action      From
--                         ------      ----
OpenSSH                    ALLOW       Anywhere
80/tcp                     ALLOW       Anywhere
443                        ALLOW       Anywhere
OpenSSH (v6)               ALLOW       Anywhere (v6)
80/tcp (v6)                ALLOW       Anywhere (v6)
443 (v6)                   ALLOW       Anywhere (v6)
第 2 步 - 安装节点版本管理器 (NVM)
我们将使用 Node Version Manager (nvm) 应用程序安装 Node。您可以使用 NVM 安装多个版本的 Node 并在它们之间轻松切换。运行以下命令下载并安装 NVM。
从 Github 发布页面检查最新版本的 NVM。在编写本教程时,v0.39.1 是最新的可用版本。
$ NVMVERSION=0.39.1
$ curl -o- https://raw.githubusercontent.com/nvm-sh/nvm/$NVMVERSION/install.sh | bash
刷新终端。
$ source ~/.bashrc
验证是否安装了 NVM。
$ command -v nvm
安装成功后,您应该会看到以下输出。
nvm
第 3 步 - 安装 Node.js
我们将安装最新版本的 Node.js LTS(长期支持)版本。运行以下命令来执行此操作。
$ nvm install --lts
验证是否安装了 Node.js。
$ node --version
v16.17.0
第 4 步 - 安装 Sails.js
现在安装了 Node.js,是时候安装 Sails.js 框架了。运行以下命令以全局安装它。
$ npm -g install sails
验证是否安装了 Sails.js 框架。
$ sails --version
1.5.3
您可以使用 --help 标志检查 sails 命令行应用程序可用的其他命令。
$ sails --help
您将收到以下输出。
Usage: sails [command]

  Options:

    -v, --version  output the version number
    -h, --help     output usage information

  Commands:

    version
    lift|l [options]
    new [options] [path_to_new_app]
    generate
    upgrade
    migrate
    console|c [options]
    www
    debug                            (for Node v5 and below)
    inspect                          (for Node v6 and above)
    run
    test
    lint
    deploy
    debug-console|dc
    help [command]
第 5 步 - 创建演示应用程序
运行以下命令生成演示应用程序。
$ sails new howtoforge-app
您将获得以下两个选项。
Choose a template for your new Sails app:
 1. Web App  ·  Extensible project with auth, login, & password recovery
 2. Empty    ·  An empty Sails app, yours to configure
 (type "?" for help, or <CTRL+C> to cancel)
您可以键入 1 以使用预定义模板,以获得具有身份验证、登录页面和密码恢复功能的成熟应用程序。如果您想从零开始,请选择选项 2。
我们将选择选项 1。您需要等待几分钟才能完成该过程。
? 1
 info: Installing dependencies...
Press CTRL+C to cancel.
(to skip this step in the future, use --fast)
 info: Created a new Sails app `howtoforge-app`!
切换到新创建的应用程序的工作目录。目录名称与您的应用程序相同。
$ cd howtoforge-app
检查文件夹列表。该文件夹将安装所有必要的文件和包,以帮助您开始使用该应用程序。
$ ls
total 944
drwxrwxr-x   9 navjot navjot   4096 Aug 23 07:14 .
drwxr-x---   8 navjot navjot   4096 Aug 23 07:13 ..
drwxrwxr-x   8 navjot navjot   4096 Aug 23 07:13 api
-rw-rw-r--   1 navjot navjot   1841 Aug 23 07:13 app.js
drwxrwxr-x   8 navjot navjot   4096 Aug 23 07:13 assets
drwxrwxr-x   4 navjot navjot   4096 Aug 23 07:13 config
-rw-rw-r--   1 navjot navjot   1046 Aug 23 07:13 .editorconfig
-rw-rw-r--   1 navjot navjot     44 Aug 23 07:13 .eslintignore
-rw-rw-r--   1 navjot navjot   4228 Aug 23 07:13 .eslintrc
-rw-rw-r--   1 navjot navjot   3531 Aug 23 07:13 .gitignore
-rw-rw-r--   1 navjot navjot    669 Aug 23 07:13 Gruntfile.js
-rw-rw-r--   1 navjot navjot    709 Aug 23 07:13 .htmlhintrc
-rw-rw-r--   1 navjot navjot   2162 Aug 23 07:13 .lesshintrc
drwxrwxr-x 510 navjot navjot  20480 Aug 23 07:14 node_modules
-rw-rw-r--   1 navjot navjot    369 Aug 23 07:13 .npmrc
-rw-rw-r--   1 navjot navjot   6151 Aug 23 07:13 package.json
-rw-rw-r--   1 navjot navjot 854958 Aug 23 07:14 package-lock.json
-rw-rw-r--   1 navjot navjot   1732 Aug 23 07:13 README.md
-rw-rw-r--   1 navjot navjot    123 Aug 23 07:13 .sailsrc
drwxrwxr-x   2 navjot navjot   4096 Aug 23 07:13 scripts
drwxrwxr-x   4 navjot navjot   4096 Aug 23 07:13 tasks
drwxrwxr-x   5 navjot navjot   4096 Aug 23 07:13 views
运行 Sails 应用程序。以下命令将以开发模式启动应用程序。 Sails.js 使用 Grunt 工具监控 /assets 文件夹。如果您更改该文件夹中的任何内容,它将自动反映在浏览器中。您还可以在不重新启动 Sails 的情况下更改视图文件,因为模板未缓存在内存中。
$ sails lift
成功启动应用程序后,您将获得以下输出。
 info: Starting app...

 info: Initializing project hook... (`api/hooks/custom/`)
 info: Initializing `apianalytics` hook...  (requests to monitored routes will be logged!)
 info: ·• Auto-migrating...  (alter)
 info:    Hold tight, this could take a moment.
 info:  ? Auto-migration complete.

debug: Running v0 bootstrap script...  (looks like this is the first time the bootstrap has run on this computer)
 info:
 info:                .-..-.
 info:
 info:    Sails              <|    .-..-.
 info:    v1.5.3              |\
 info:                       /|.\
 info:                      / || \
 info:                    ,'  |'  \
 info:                 .-'.-==|/_--'
 info:                 `--'-------'
 info:    __---___--___---___--___---___--___
 info:  ____---___--___---___--___---___--___-__
 info:
 info: Server lifted in `/home/navjot/howtoforge-app`
 info: To shut down Sails, press <CTRL> + C at any time.
 info: Read more at https://sailsjs.com/support.

debug: -------------------------------------------------------
debug: :: Tue Aug 23 2022 09:01:32 GMT+0000 (Coordinated Universal Time)

debug: Environment : development
debug: Port        : 1337
debug: -------------------------------------------------------
Sails.js 将您的应用程序公开到端口 1337。您需要打开该端口才能访问该应用程序。启动另一个终端到您的服务器并运行以下命令以打开端口。
$ sudo ufw allow 1337
在浏览器中启动 URL http://。您将获得以下页面。
在终端上按 Ctrl + C 关闭 Sails 应用程序。
第 6 步 - 创建 systemd 服务文件
目前,Sails 应用程序仅在终端处于活动状态时才能运行。为了在重启后保持它的持久性,我们需要为 Sails 创建一个 systemd 服务文件。
创建并打开 howtoforge-app.service 文件进行编辑。
$ sudo nano /etc/systemd/system/howtoforge-app.service
将以下代码粘贴到其中。
[Unit]
After=network.target

[Service]
Type=simple
User=navjot
WorkingDirectory=/home/navjot/howtoforge-app
ExecStart=/home/navjot/.nvm/versions/node/v16.17.0/bin/node app.js
Restart=on-failure

[Install]
WantedBy=multi-user.target
用您的系统用户名、应用程序路径和节点应用程序的路径。要定位到 Node.js 的路径,您可以使用以下命令。
$ which node
/home/navjot/.nvm/versions/node/v16.17.0/bin/node
我们使用 Node.js 而不是 Sails CLI 应用程序,因为通过系统脚本配置和运行它更容易。通过按 Ctrl + X 并在出现提示时输入 Y 来保存文件。
重新加载系统守护进程以应用更改。
$ sudo systemctl daemon-reload
启动 Sails.js 服务并使其在系统启动时启动。
$ sudo systemctl enable howtoforge-app --now
检查服务的状态。
$ sudo systemctl status howtoforge-app
? howtoforge-app.service - Sails.js Howtoforge App
     Loaded: loaded (/etc/systemd/system/howtoforge-app.service; enabled; vendor preset: enabled)
     Active: active (running) since Tue 2022-08-23 11:52:58 UTC; 5s ago
   Main PID: 15385 (node)
      Tasks: 22 (limit: 2237)
     Memory: 123.8M
        CPU: 3.894s
     CGroup: /system.slice/howtoforge-app.service
             ??15385 /home/navjot/.nvm/versions/node/v16.17.0/bin/node app.js
             ??15392 grunt "" "" "" "" "" "" "" "" "" "" "" "" "" "" "" "" "" "" "" "" "" "" "" "" "" "" "" "" "" "" "" "" "" "" "" "" "" "" "" "" "" "" "" "" "" "" "" "" "" "" "" "" "" "" "" "" "" "" "" "" ">

Aug 23 11:53:01 sails node[15385]:  info:  ____---___--___---___--___---___--___-__
Aug 23 11:53:01 sails node[15385]:  info:
Aug 23 11:53:01 sails node[15385]:  info: Server lifted in `/home/navjot/howtoforge-app`
Aug 23 11:53:01 sails node[15385]:  info: To shut down Sails, press <CTRL> + C at any time.
Aug 23 11:53:01 sails node[15385]:  info: Read more at https://sailsjs.com/support.
Aug 23 11:53:01 sails node[15385]: debug: -------------------------------------------------------
Aug 23 11:53:01 sails node[15385]: debug: :: Tue Aug 23 2022 11:53:01 GMT+0000 (Coordinated Universal Time)
Aug 23 11:53:01 sails node[15385]: debug: Environment : development
Aug 23 11:53:01 sails node[15385]: debug: Port        : 1337
Aug 23 11:53:01 sails node[15385]: debug: -------------------------------------------------------
您可以通过在浏览器中打开 URL http:// 来验证服务。
第 7 步 - 安装 Nginx
Ubuntu 22.04 附带旧版本的 Nginx。要安装最新版本,您需要下载官方 Nginx 存储库。
导入 Nginx 签名密钥。
$ curl https://nginx.org/keys/nginx_signing.key | gpg --dearmor \
| sudo tee /usr/share/keyrings/nginx-archive-keyring.gpg >/dev/null
添加 Nginx 稳定版本的存储库。
$ echo "deb [signed-by=/usr/share/keyrings/nginx-archive-keyring.gpg arch=amd64] \
http://nginx.org/packages/ubuntu `lsb_release -cs` nginx" \
| sudo tee /etc/apt/sources.list.d/nginx.list
更新系统存储库。
$ sudo apt update
安装 Nginx。
$ sudo apt install nginx
验证安装。
$ nginx -v
nginx version: nginx/1.22.0
第 8 步 - 安装 SSL
我们需要安装 Certbot 来生成 SSL 证书。您可以使用 Ubuntu 存储库安装 Certbot,也可以使用 Snapd 工具获取最新版本。我们将使用 Snapd 版本。
Ubuntu 22.04 默认安装了 Snapd。运行以下命令以确保您的 Snapd 版本是最新的。
$ sudo snap install core
$ sudo snap refresh core
安装 Certbot。
$ sudo snap install --classic certbot
使用以下命令通过创建指向 /usr/bin 目录的符号链接来确保可以运行 Certbot 命令。
$ sudo ln -s /snap/bin/certbot /usr/bin/certbot
运行以下命令生成 SSL 证书。
$ sudo certbot certonly --standalone --agree-tos --no-eff-email --staple-ocsp --preferred-challenges http -m -d sails.example.com
上面的命令会将证书下载到服务器上的 /etc/letsencrypt/live/sails.example.com 目录。
生成 Diffie-Hellman 组证书。
$ sudo openssl dhparam -dsaparam -out /etc/ssl/certs/dhparam.pem 4096
打开文件 /etc/letsencrypt/renewal/sails.example.com.conf 进行编辑。
$ sudo nano /etc/letsencrypt/renewal/sails.example.com.conf
在底部粘贴以下代码。
pre_hook = systemctl stop nginx
post_hook = systemctl start nginx
通过按 Ctrl + X 并在出现提示时输入 Y 来保存文件。
我们使用 Certbot 的独立选项生成了 SSL 证书。它运行其 Web 服务器来创建证书,这意味着 Nginx 应该在续订期间关闭。 pre_hook 和 post_hook 命令在续费前后运行,自动关闭和重启 Nginx 服务器,无需人工干预。
要检查 SSL 续订是否正常工作,请试运行该过程。
$ sudo certbot renew --dry-run
如果您没有看到任何错误,则一切就绪。您的证书将自动更新。
第 9 步 - 配置 Nginx
打开文件 /etc/nginx/nginx.conf 进行编辑。
$ sudo nano /etc/nginx/nginx.conf
在行 include /etc/nginx/conf.d/*.conf; 之前添加以下行。
server_names_hash_bucket_size 64;
通过按 Ctrl + X 并在出现提示时输入 Y 来保存文件。
创建并打开文件 /etc/nginx/conf.d/sails.conf 进行编辑。
$ sudo nano /etc/nginx/conf.d/sails.conf
将以下代码粘贴到其中。将 sails.example.com 替换为您的域名。确保 client_max_body_size 的值设置为 10MB。根据您的要求更改它。
upstream backend {
   server 127.0.0.1:1337;
   keepalive 32;
}

server {
  listen 80 default_server;
  server_name sails.example.com;
  return 301 https://$server_name$request_uri;
}

server {
   listen 443 ssl http2;
   server_name sails.example.com;

   http2_push_preload on; # Enable HTTP/2 Server Push

   ssl_certificate /etc/letsencrypt/live/sails.example.com/fullchain.pem;
   ssl_certificate_key /etc/letsencrypt/live/sails.example.com/privkey.pem;
   ssl_trusted_certificate /etc/letsencrypt/live/sails.example.com/chain.pem;
   ssl_session_timeout 1d;

   # Enable TLS versions (TLSv1.3 is required upcoming HTTP/3 QUIC).
   ssl_protocols TLSv1.2 TLSv1.3;

   # Enable TLSv1.3's 0-RTT. Use $ssl_early_data when reverse proxying to
   # prevent replay attacks.
   #
   # @see: https://nginx.org/en/docs/http/ngx_http_ssl_module.html#ssl_early_data
   ssl_early_data on;

   ssl_ciphers 'ECDHE-ECDSA-AES256-GCM-SHA384:ECDHE-RSA-AES256-GCM-SHA384:ECDHE-ECDSA-CHACHA20-POLY1305:ECDHE-RSA-CHACHA20-POLY1305:ECDHE-ECDSA-AES256-SHA384:ECDHE-RSA-AES256-SHA384';
   ssl_prefer_server_ciphers on;
   ssl_session_cache shared:SSL:50m;
   # OCSP Stapling ---
   # fetch OCSP records from URL in ssl_certificate and cache them
   ssl_stapling on;
   ssl_stapling_verify on;
   ssl_dhparam /etc/ssl/certs/dhparam.pem;

   add_header X-Early-Data $tls1_3_early_data;

   access_log /var/log/nginx/sails.access.log main;
   error_log  /var/log/nginx/sails.error.log;

   location / {
       client_max_body_size 10M;
       proxy_set_header Host $http_host;
       proxy_set_header Upgrade $http_upgrade;
       proxy_set_header Connection "upgrade";
       proxy_set_header X-Real-IP $remote_addr;
       proxy_set_header X-Forwarded-For $proxy_add_x_forwarded_for;
       proxy_set_header X-Forwarded-Proto $scheme;
       proxy_set_header X-Frame-Options SAMEORIGIN;
       proxy_buffering off;
       proxy_http_version 1.1;
       proxy_pass http://backend;
   }
}

# This block is useful for debugging TLS v1.3. Please feel free to remove this
# and use the `$ssl_early_data` variable exposed by NGINX directly should you
# wish to do so.
map $ssl_early_data $tls1_3_early_data {
  "~." $ssl_early_data;
  default "";
}
通过按 Ctrl + X 并在出现提示时输入 Y 来保存文件。
验证您的 Nginx 配置。
$ sudo nginx -t
重新启动 Nginx 服务器。
$ sudo systemctl restart nginx
第 10 步 - 访问 Sails.js 应用程序
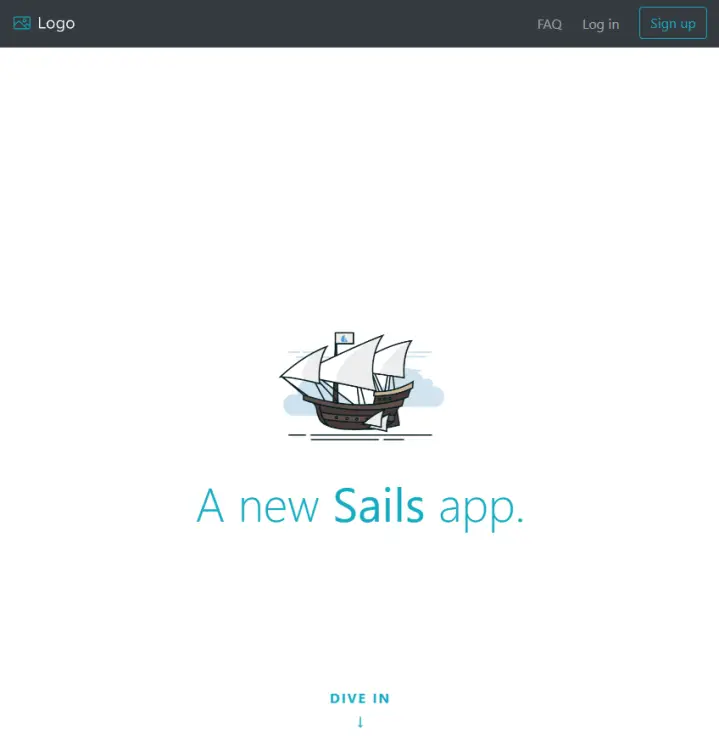
在浏览器中启动 URL https://sails.example.com,您将看到 Sails 主页。
单击右上角的注册按钮创建一个新帐户。
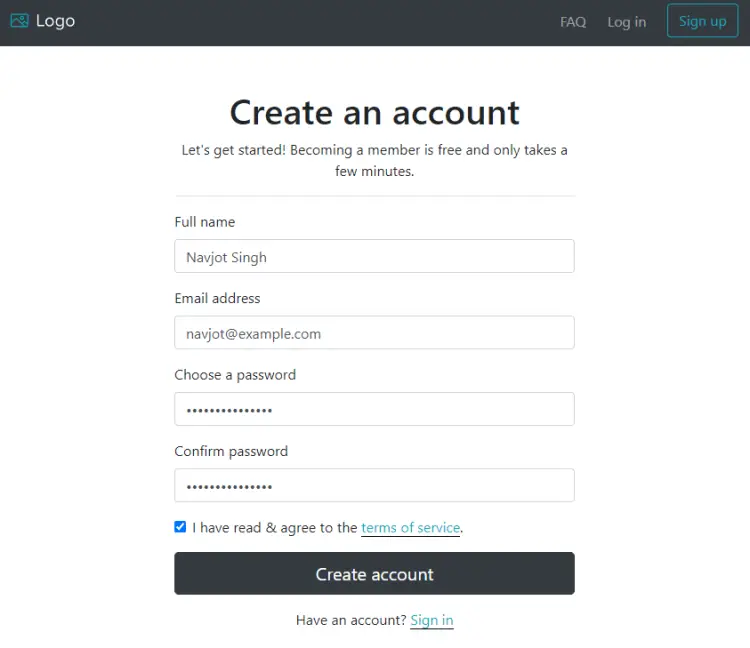
填写您的帐户详细信息,然后单击“创建帐户”按钮以完成。
您将立即被带到欢迎屏幕。
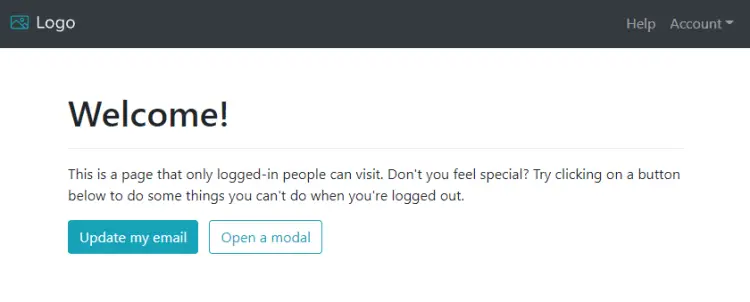
您现在可以开始使用该应用程序来构建具有用户身份验证、数据库支持和由 Stripe 提供支持的内置支付网关的动态应用程序。
结论
本教程到此结束,您在其中学习了如何安装 Sails.js 框架并创建了一个演示应用程序。您还学习了如何为其设置 systemd 服务,以及如何使用带有 Lets Encrypt 的 Nginx 代理服务器来启动安全的 Web 应用程序。如果您有任何问题,请在下面的评论中发表。