如何在 Ubuntu 22.04 上安装 FileRun
本教程适用于这些操作系统版本
- Ubuntu 22.04(Jammy Jellyfish)
- Ubuntu 20.04(Focal Fossa)
在此页
- 先决条件
- 安装 Apache、MariaDB 和 PHP
- 为 FileRun 创建数据库
- 下载 FileRun
- 为 FileRun 创建一个 Apache 虚拟主机
- 访问 FileRun Web 用户界面
- 使用 Lets Encrypt SSL 保护 FileRun
- 结论
FileRun 是基于 Linux 操作系统的开源和基于 Web 的文件共享应用程序。它与 Google Drive、iCloud 和 DrobBox 非常相似,允许用户通过互联网共享和同步文件。它可以通过移动应用程序、WebDAV 和网络浏览器访问。它允许您在云上托管自己的文件共享解决方案,并通过安全的云存储在任何地方访问您的所有文件。
这篇文章将展示如何在 Ubuntu 22.04 上安装 FileRun with Apache 和 Lets Encrypt SSL。
先决条件
- 一台运行 Ubuntu 22.04 的服务器。
- 用您的服务器 IP 指向的有效域名。
- 在服务器上配置了根密码。
安装 Apache、MariaDB 和 PHP
FileRun 是用 PHP 编写的,使用 MariaDB 作为数据库后端。因此,您需要将 Apache、MariaDB、PHP 和其他软件包安装到您的服务器。首先,使用以下命令安装 Apache 和 MariaDB 包:
apt-get install apache2 mariadb-server mariadb-client安装完这两个包后,您需要在您的服务器上安装 PHP 版本 php7.2-php7.4。但是,Ubuntu 22.04 在默认存储库中附带了 PHP 8.1 版本。因此,您需要在服务器上添加 PHP Ondrej 存储库。
首先,使用以下命令安装所有必需的依赖项:
apt install software-properties-common ca-certificates lsb-release apt-transport-https -y接下来,使用以下命令添加 PHP 存储库:
add-apt-repository ppa:ondrej/php接下来,使用以下命令更新存储库缓存并安装带有其他所需扩展的 PHP:
apt update
apt install php7.4 libapache2-mod-php7.4 imagemagick ffmpeg php7.4-imagick php7.4-mysql php7.4-fpm php7.4-common php7.4-gd php7.4-json php7.4-curl php7.4-zip php7.4-xml php7.4-mbstring php7.4-bz2 php7.4-intl unzip -y
安装完所有软件包后,您还需要将 IonCube 加载程序安装到您的系统中。
首先,使用以下命令下载 IonCube 加载器:
wget https://downloads.ioncube.com/loader_downloads/ioncube_loaders_lin_x86-64.tar.gz接下来,使用以下命令解压缩下载的文件:
tar -xzf ioncube_loaders_lin_x86-64.tar.gz -C /usr/lib/php接下来,创建一个 ioncube 配置文件并定义 IonCube 源的路径:
nano /etc/php/7.4/apache2/conf.d/00-ioncube.ini添加以下行:
zend_extension = /usr/lib/php/ioncube/ioncube_loader_lin_7.4.so
保存并关闭文件,然后为 FileRun 创建一个 PHP 配置文件:
nano /etc/php/7.4/apache2/conf.d/filerun.ini添加以下设置:
expose_php = Off
error_reporting = E_ALL & ~E_NOTICE
display_errors = Off
display_startup_errors = Off
log_errors = On
ignore_repeated_errors = Off
allow_url_fopen = On
allow_url_include = Off
variables_order = "GPCS"
allow_webdav_methods = On
memory_limit = 128M
max_execution_time = 300
output_buffering = Off
output_handler = ""
zlib.output_compression = Off
zlib.output_handler = ""
safe_mode = Off
register_globals = Off
magic_quotes_gpc = Off
upload_max_filesize = 20M
post_max_size = 20M
enable_dl = Off
disable_functions = ""
disable_classes = ""
session.save_handler = files
session.use_cookies = 1
session.use_only_cookies = 1
session.auto_start = 0
session.cookie_lifetime = 0
session.cookie_httponly = 1
date.timezone = "UTC"
保存并关闭文件,然后重新启动 Apache 服务以应用更改:
systemctl reload apache2为 FileRun 创建数据库
首先,使用以下命令保护 MariaDB 安装并设置 root 密码:
mysql_secure_installation如下图所示回答所有问题:
Enter current password for root (enter for none):  PRESS ENTER
Set root password? [Y/n] Y
New password:
Re-enter new password:
Remove anonymous users? [Y/n] Y
Disallow root login remotely? [Y/n] Y
Remove test database and access to it? [Y/n]  Y
Reload privilege tables now? [Y/n] Y
接下来,使用以下命令登录到 MariaDB shell:
mysql -u root -p登录后,使用以下命令创建数据库和用户:
MariaDB [(none)]> CREATE DATABASE filerun;
MariaDB [(none)]> CREATE USER 'filerun'@'localhost' IDENTIFIED BY 'password';
接下来,使用以下命令授予 FileRun 数据库的所有权限:
MariaDB [(none)]> GRANT ALL PRIVILEGES ON filerun.* TO 'filerun'@'localhost';接下来,使用以下命令刷新权限并退出 MariaDB:
MariaDB [(none)]> FLUSH PRIVILEGES;
MariaDB [(none)]> EXIT;
完成后,您可以继续下一步。
下载文件运行
首先,使用以下命令从其官方网站下载最新版本的 FileRun:
wget -O FileRun.zip https://filerun.com/download-latest下载 FileRun 后,使用以下命令解压缩下载的文件:
unzip FileRun.zip -d /var/www/html/filerun/接下来,使用以下命令设置适当的权限和所有权:
chown -R www-data:www-data /var/www/html/filerun
chmod -R 755 /var/www/html/filerun
完成后,您可以继续下一步。
为 FileRun 创建 Apache 虚拟主机
接下来,您需要为 FileRun 创建一个 Apache 虚拟主机配置文件。您可以使用以下命令创建它:
nano /etc/apache2/sites-available/filerun.conf添加以下行:
<VirtualHost *:80>
        ServerName filerun.example.com

        DocumentRoot /var/www/html/filerun

        <Directory "/var/www/html/filerun">
                Options Indexes FollowSymLinks
                AllowOverride All
                Require all granted
        </Directory>

        ErrorLog ${APACHE_LOG_DIR}/filerun.error.log
        CustomLog ${APACHE_LOG_DIR}/filerun.access.log combined
</VirtualHost>
保存并关闭文件,然后激活 Apache 虚拟主机并使用以下命令启用 Apache 重写模块:
a2ensite filerun.conf
a2enmod rewrite
接下来,重新启动 Apache 服务以应用更改:
systemctl restart apache2您还可以使用以下命令检查 Apache 状态:
systemctl status apache2您应该看到以下输出:
? apache2.service - The Apache HTTP Server
     Loaded: loaded (/lib/systemd/system/apache2.service; enabled; vendor preset: enabled)
     Active: active (running) since Sat 2022-08-06 09:26:00 UTC; 7s ago
       Docs: https://httpd.apache.org/docs/2.4/
    Process: 21189 ExecStart=/usr/sbin/apachectl start (code=exited, status=0/SUCCESS)
   Main PID: 21193 (apache2)
      Tasks: 6 (limit: 2242)
     Memory: 14.6M
        CPU: 112ms
     CGroup: /system.slice/apache2.service
             ??21193 /usr/sbin/apache2 -k start
             ??21194 /usr/sbin/apache2 -k start
             ??21195 /usr/sbin/apache2 -k start
             ??21196 /usr/sbin/apache2 -k start
             ??21197 /usr/sbin/apache2 -k start
             ??21198 /usr/sbin/apache2 -k start

Aug 06 09:26:00 ubuntu2204 systemd[1]: Starting The Apache HTTP Server...
完成后,您可以继续下一步。
访问 FileRun Web 用户界面
现在,打开 Web 浏览器并使用 URL http://filerun.example.com 访问 FileRun Web UI。您将被重定向到以下页面:

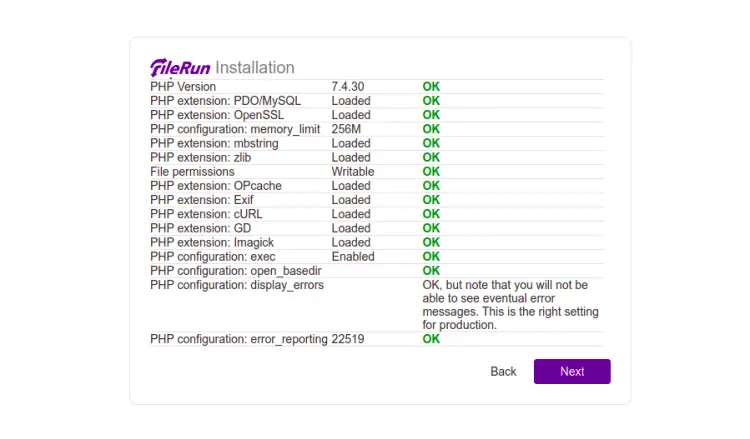
单击下一步按钮。您应该看到服务器要求检查页面:
单击下一步按钮。您应该看到数据库配置页面:

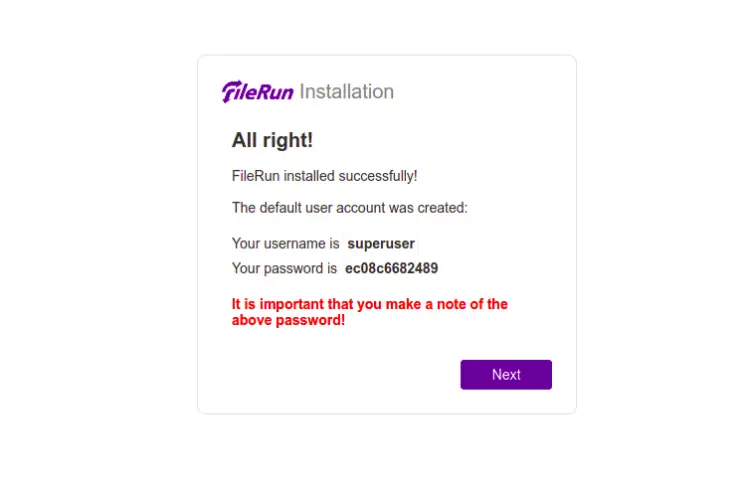
单击下一步按钮。安装完成后,您应该会看到以下页面:
单击下一步按钮。您应该会看到 FileRun 登录页面:
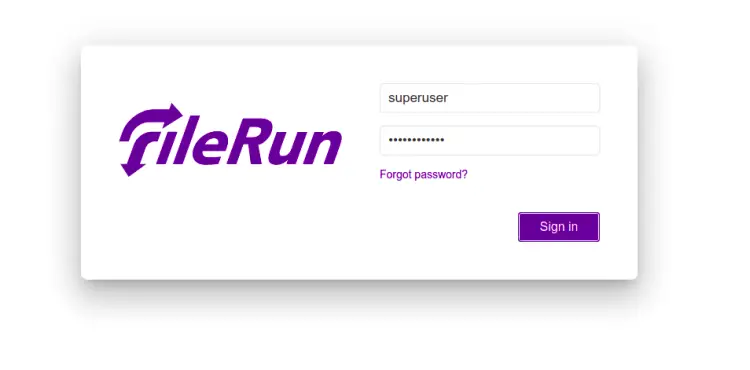
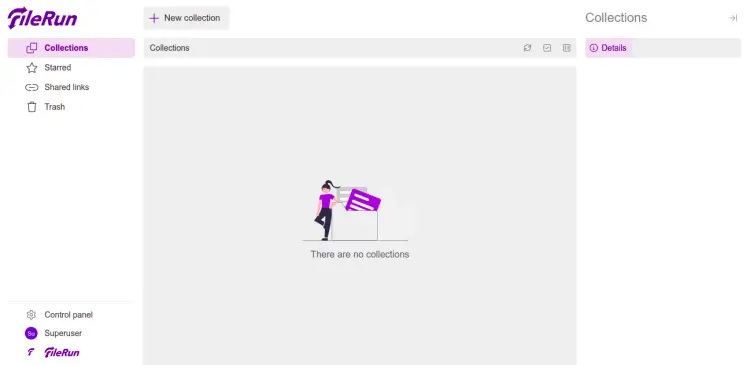
提供您的管理员用户名、密码,然后单击“登录”按钮。您应该在以下页面上看到 FileRun 仪表板:
使用 Lets Encrypt SSL 保护 FileRun
还建议使用 Lets Encrypt SSL 来保护您的网站。首先,您需要在服务器上安装 Certbot 客户端。您可以使用以下命令安装它:
apt-get install python3-certbot-apache -y安装 Certbot 后,运行以下命令以使用 Lets Encrypt SSL 保护您的网站:
certbot --apache -d filerun.example.com您将被要求提供您的电子邮件并接受服务条款,如下所示:
Saving debug log to /var/log/letsencrypt/letsencrypt.log
Plugins selected: Authenticator standalone, Installer None
Enter email address (used for urgent renewal and security notices) (Enter 'c' to
cancel):

- - - - - - - - - - - - - - - - - - - - - - - - - - - - - - - - - - - - - - - -
Please read the Terms of Service at
https://letsencrypt.org/documents/LE-SA-v1.2-November-15-2017.pdf. You must
agree in order to register with the ACME server at
https://acme-v02.api.letsencrypt.org/directory
- - - - - - - - - - - - - - - - - - - - - - - - - - - - - - - - - - - - - - - -
(A)gree/(C)ancel: A

- - - - - - - - - - - - - - - - - - - - - - - - - - - - - - - - - - - - - - - -
Would you be willing to share your email address with the Electronic Frontier
Foundation, a founding partner of the Let's Encrypt project and the non-profit
organization that develops Certbot? We'd like to send you email about our work
encrypting the web, EFF news, campaigns, and ways to support digital freedom.
- - - - - - - - - - - - - - - - - - - - - - - - - - - - - - - - - - - - - - - -
(Y)es/(N)o: Y
Plugins selected: Authenticator apache, Installer apache
Obtaining a new certificate
Performing the following challenges:
http-01 challenge for filerun.example.com
Enabled Apache rewrite module
Waiting for verification...
Cleaning up challenges
Created an SSL vhost at /etc/apache2/sites-available/filerun-le-ssl.conf
Enabled Apache socache_shmcb module
Enabled Apache ssl module
Deploying Certificate to VirtualHost /etc/apache2/sites-available/filerun-le-ssl.conf
Enabling available site: /etc/apache2/sites-available/filerun-le-ssl.conf
Next, select whether or not to redirect HTTP traffic to HTTPS as shown below:
请选择是否将 HTTP 流量重定向到 HTTPS,从而删除 HTTP 访问。
- - - - - - - - - - - - - - - - - - - - - - - - - - - - - - - - - - - - - - - -
1: No redirect - Make no further changes to the webserver configuration.
2: Redirect - Make all requests redirect to secure HTTPS access. Choose this for
new sites, or if you're confident your site works on HTTPS. You can undo this
change by editing your web server's configuration.
- - - - - - - - - - - - - - - - - - - - - - - - - - - - - - - - - - - - - - - -
Select the appropriate number [1-2] then [enter] (press 'c' to cancel): 2
键入 2 并按 Enter 键为您的网站安装 Lets Encrypt SSL:
Enabled Apache rewrite module
Redirecting vhost in /etc/apache2/sites-enabled/filerun.conf to ssl vhost in /etc/apache2/sites-available/filerun-le-ssl.conf

- - - - - - - - - - - - - - - - - - - - - - - - - - - - - - - - - - - - - - - -
Congratulations! You have successfully enabled https://filerun.example.com

You should test your configuration at:
https://www.ssllabs.com/ssltest/analyze.html?d=filerun.example.com
- - - - - - - - - - - - - - - - - - - - - - - - - - - - - - - - - - - - - - - -

IMPORTANT NOTES:
 - Congratulations! Your certificate and chain have been saved at:
   /etc/letsencrypt/live/filerun.example.com/fullchain.pem
   Your key file has been saved at:
   /etc/letsencrypt/live/filerun.example.com/privkey.pem
   Your cert will expire on 2022-4-29. To obtain a new or tweaked
   version of this certificate in the future, simply run certbot again
   with the "certonly" option. To non-interactively renew *all* of
   your certificates, run "certbot renew"
 - If you like Certbot, please consider supporting our work by:

   Donating to ISRG / Let's Encrypt:   https://letsencrypt.org/donate
   Donating to EFF:                    https://eff.org/donate-le
结论
恭喜!您已经在 Ubuntu 22.04 上成功安装了 FileRun with Apache 和 Lets Encrypt SSL。您现在可以在云端托管您自己的 FileRun 服务器,并开始与您的朋友和家人共享和同步您的文件、音乐和照片。