如何在 Ubuntu 22.04 上安装 Lets Chat
在此页
- 先决条件
- 安装 Node.JS
- 安装 MongoDB 数据库
- 安装 Lets Chat
- 为 Lets Chat 创建一个 Systemd 服务文件
- 为 Lets Chat 配置 Nginx
- 访问 Lets Chat Web 界面
- 结论
Lets Chat 是一个在 Node.js 和 MongoDB 上运行的免费、开源和持久的消息传递应用程序。它专为小型、亲密的团队而设计,可提供丰富的功能集,例如 LDAP/Kerberos 身份验证、类似 REST 的 API 和 XMPP 支持。使用 Lets Chat,您可以发送各种消息,还可以找到兴趣小组聊天、语音贴纸和炫酷的表情符号。
在这篇文章中,我们将向您展示如何在 Ubuntu 22.04 上安装 Lets Chat with Nginx 作为反向代理。
先决条件
- 一台运行 Ubuntu 22.04 的服务器。
- 在服务器上配置了根密码。
安装 Node.js
在开始之前,您需要在您的服务器上安装 Node.js。要安装最新版本的 Node.js,您需要将 Node Source 存储库添加到 APT。
首先,使用以下命令安装所有必需的依赖项:
apt install dirmngr gnupg apt-transport-https ca-certificates software-properties-common -y安装所有依赖项后,将 Node.js 存储库添加到 APT
curl -sL https://deb.nodesource.com/setup_18.x | bash -添加存储库后,您可以使用以下命令安装 Node.js:
apt-get install nodejs -y安装成功后,使用以下命令验证 Node.js 版本:
node -v您将获得以下输出:
v18.7.0
安装 MongoDB 数据库
您还需要在服务器上安装 MongoDB 数据库。
首先,使用以下命令下载并安装 libssl 包:
wget http://archive.ubuntu.com/ubuntu/pool/main/o/openssl/libssl1.1_1.1.1f-1ubuntu2_amd64.deb
dpkg -i libssl1.1_1.1.1f-1ubuntu2_amd64.deb
接下来,使用以下命令添加 MongoDB GPG 密钥和存储库:
wget -qO - https://www.mongodb.org/static/pgp/server-4.4.asc | apt-key add -
echo "deb [ arch=amd64,arm64 ] https://repo.mongodb.org/apt/ubuntu focal/mongodb-org/4.4 multiverse" | tee /etc/apt/sources.list.d/mongodb-org-4.4.list
接下来,使用以下命令更新存储库缓存:
apt update更新存储库后,使用以下命令安装 MongoDB:
apt install -y mongodb-org安装 MongoDB 包后,使用以下命令启动并启用 MongoDB 服务:
systemctl start mongod
systemctl enable mongod
您可以使用以下命令检查 MongoDB 服务的状态:
systemctl status mongod您应该看到以下输出:
? mongod.service - MongoDB Database Server
     Loaded: loaded (/lib/systemd/system/mongod.service; disabled; vendor preset: enabled)
     Active: active (running) since Sun 2022-07-31 04:00:08 UTC; 6s ago
       Docs: https://docs.mongodb.org/manual
   Main PID: 42274 (mongod)
     Memory: 61.1M
        CPU: 1.014s
     CGroup: /system.slice/mongod.service
             ??42274 /usr/bin/mongod --config /etc/mongod.conf

Jul 31 04:00:08 ubuntu2204 systemd[1]: Started MongoDB Database Server.
安装让聊天
首先,您需要从 Git Hub 存储库下载最新版本的 Lets Chat。您可以使用以下命令下载它:
git clone https://github.com/sdelements/lets-chat.git下载完成后,将目录更改为下载的目录并使用以下命令安装所有必需的依赖项:
cd lets-chat
npm install
接下来,复制示例配置文件并使用以下命令启动 Lets Chat 服务器:
cp settings.yml.sample settings.yml
npm start
您应该看到以下输出:
>  start
> node app.js

(node:42373) DeprecationWarning: `open()` is deprecated in mongoose >= 4.11.0, use `openUri()` instead, or set the `useMongoClient` option if using `connect()` or `createConnection()`. See http://mongoosejs.com/docs/4.x/docs/connections.html#use-mongo-client
(Use `node --trace-deprecation ...` to show where the warning was created)

???     ?????????????????????????     ??????????  ??? ?????? ?????????
???     ?????????????????????????    ???????????  ????????????????????
???     ??????     ???   ????????    ???     ????????????????   ???
???     ??????     ???   ????????    ???     ????????????????   ???
????????????????   ???   ????????    ???????????  ??????  ???   ???
????????????????   ???   ????????     ??????????  ??????  ???   ???

Release 0.4.8
按 CTRL + C 停止 Lets Chat 服务。
为 Lets Chat 创建系统服务文件
接下来,您需要为 Lets Chat 创建一个 systemd 服务文件。您可以使用以下命令创建它:
nano /etc/systemd/system/letschat.service添加以下行:
[Unit]
Description=Let's Chat Server
Wants=mongodb.service
After=network.target mongod.service

[Service]
Type=simple
WorkingDirectory=/root/lets-chat
ExecStart=/usr/bin/npm start
User=root
Group=root
Restart=always
RestartSec=9

[Install]
WantedBy=multi-user.target
保存并关闭文件,然后使用以下命令重新加载 systemd 守护进程:
systemctl daemon-reload接下来,使用以下命令启动并启用 Lets Chat 服务:
systemctl start letschat
systemctl enable letschat
接下来,使用以下命令检查 Lets Chat 的状态:
systemctl status letschat您应该看到以下输出:
? letschat.service - Let's Chat Server
     Loaded: loaded (/etc/systemd/system/letschat.service; disabled; vendor preset: enabled)
     Active: active (running) since Sun 2022-07-31 04:02:34 UTC; 4s ago
   Main PID: 42429 (npm start)
      Tasks: 23 (limit: 2242)
     Memory: 157.9M
        CPU: 4.457s
     CGroup: /system.slice/letschat.service
             ??42429 "npm start" "" "" "" "" "" "" "" "" "" "" "" "" "" ""
             ??42440 sh /tmp/start-b5e830e4.sh
             ??42441 letschat "" "" ""

Jul 31 04:02:34 ubuntu2204 npm[42429]: > node app.js
Jul 31 04:02:38 ubuntu2204 npm[42441]: (node:42441) DeprecationWarning: `open()` is deprecated in mongoose >= 4.11.0, use `openUri()` instead>
Jul 31 04:02:38 ubuntu2204 npm[42441]: (Use `node --trace-deprecation ...` to show where the warning was created)
Jul 31 04:02:38 ubuntu2204 npm[42441]: ???     ?????????????????????????     ??????????  ??? ?????? ?????????
Jul 31 04:02:38 ubuntu2204 npm[42441]: ???     ?????????????????????????    ???????????  ????????????????????
Jul 31 04:02:38 ubuntu2204 npm[42441]: ???     ??????     ???   ????????    ???     ????????????????   ???
Jul 31 04:02:38 ubuntu2204 npm[42441]: ???     ??????     ???   ????????    ???     ????????????????   ???
Jul 31 04:02:38 ubuntu2204 npm[42441]: ????????????????   ???   ????????    ???????????  ??????  ???   ???
Jul 31 04:02:38 ubuntu2204 npm[42441]: ????????????????   ???   ????????     ??????????  ??????  ???   ???
Jul 31 04:02:38 ubuntu2204 npm[42441]: Release 0.4.8
此时Lets Chat服务启动,监听5000端口,可以通过以下命令查看ti:
ss -antpl | grep 5000您应该看到以下输出:
LISTEN 0 511 127.0.0.1:5000 0.0.0.0:* users:(("letschat",pid=42441,fd=20))
为 Lets Chat 配置 Nginx
接下来,您需要安装和配置 Nginx 作为 Lets Chat 的反向代理。这样您就可以通过端口 80 访问 Lets Chat。
首先,使用以下命令安装 Nginx 服务器包:
apt install nginx -y接下来,创建一个 Nginx 虚拟主机配置文件:
nano /etc/nginx/conf.d/letschat.conf添加以下配置:
server {
server_name letschat.example.com;
listen 80;

access_log /var/log/nginx/lets_chat-access.log;
error_log /var/log/nginx/lets_chat-error.log;

location / {
proxy_set_header   X-Real-IP $remote_addr;
proxy_set_header   Host      $host;
proxy_http_version 1.1;
proxy_set_header   Upgrade $http_upgrade;
proxy_set_header   Connection 'upgrade';
proxy_cache_bypass $http_upgrade;
proxy_pass         http://127.0.0.1:5000;
}

}
保存并关闭文件,然后验证 Nginx 是否存在任何语法错误:
nginx -t您应该看到以下输出:
nginx: the configuration file /etc/nginx/nginx.conf syntax is ok
nginx: configuration file /etc/nginx/nginx.conf test is successful
最后,重启 Nginx 服务以应用配置更改:
systemctl restart nginx您还可以使用以下命令检查 Nginx 的状态:
systemctl status nginx您应该在以下输出中看到 Nginx 状态:
? nginx.service - A high performance web server and a reverse proxy server
     Loaded: loaded (/lib/systemd/system/nginx.service; enabled; vendor preset: enabled)
     Active: active (running) since Sun 2022-07-31 04:04:23 UTC; 5s ago
       Docs: man:nginx(8)
    Process: 43193 ExecStartPre=/usr/sbin/nginx -t -q -g daemon on; master_process on; (code=exited, status=0/SUCCESS)
    Process: 43194 ExecStart=/usr/sbin/nginx -g daemon on; master_process on; (code=exited, status=0/SUCCESS)
   Main PID: 43195 (nginx)
      Tasks: 2 (limit: 2242)
     Memory: 2.5M
        CPU: 35ms
     CGroup: /system.slice/nginx.service
             ??43195 "nginx: master process /usr/sbin/nginx -g daemon on; master_process on;"
             ??43196 "nginx: worker process" "" "" "" "" "" "" "" "" "" "" "" "" "" "" "" "" "" "" "" "" "" "" "" "" "" "" ""

Jul 31 04:04:23 ubuntu2204 systemd[1]: Starting A high performance web server and a reverse proxy server...
Jul 31 04:04:23 ubuntu2204 systemd[1]: Started A high performance web server and a reverse proxy server.
访问 Lets Chat Web 界面
现在,打开您的 Web 浏览器并使用 URL http://letschat.example.com 访问 Lets Chat Web 界面。
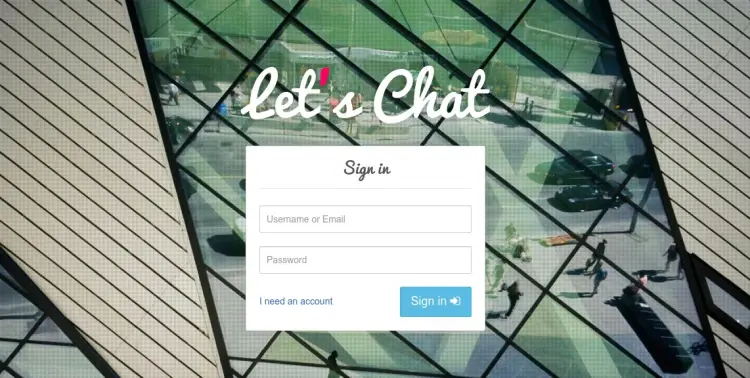
您需要单击“我需要一个帐户”按钮来创建一个帐户。您应该会看到以下页面:
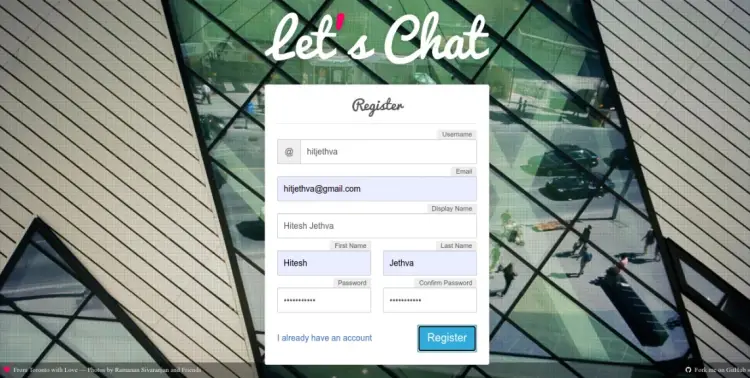
提供您的用户名、密码、电子邮件地址,然后单击“注册”按钮。注册成功后,您应该会看到以下屏幕:
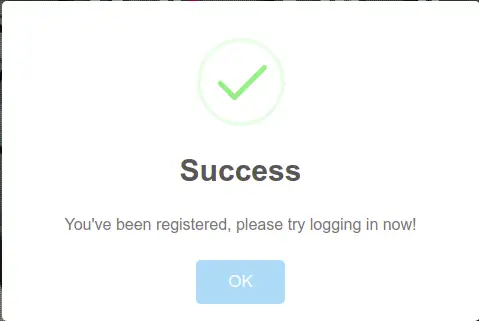
单击确定按钮。您将被重定向到 Lets Chat 登录屏幕:

提供您的 Lets Chat 用户名和密码,然后单击“登录”按钮。您应该在以下屏幕中看到 Lets Chat 仪表板:

结论
恭喜!您已经在 Ubuntu 22.04 上成功安装了 Lets Chat 服务器,并使用 Nginx 作为反向代理。您现在可以在工作环境中部署 Lets Chat 并开始与其他团队成员交流。如果您有任何问题,请随时问我。