如何在 Ubuntu 上安装 Shopware
Shopware Community Edition 是一款免费、开源、高度灵活、功能强大且可定制的软件解决方案,可让您快速轻松地创建在线商店。它基于 PHP 以及 Symfony 和 Zend 组件构建,并使用 MariaDB 来存储其数据。 Shopware 社区版非常适合那些希望在不进行任何重大投资的情况下使用市场上最先进、最灵活的解决方案的用户。
本教程将解释如何在 Ubuntu 18.04 服务器上安装 Shopware Community Edition。
要求
- 运行 Ubuntu 22.04 的服务器。
- 您的服务器已设置静态 IP 地址,例如 192.168.0.100。
- 具有 sudo 权限的非 root 用户。
入门
在开始之前,您必须将系统更新为最新版本。您可以通过运行以下命令来执行此操作:
sudo apt-get update -y
sudo apt-get upgrade -y
系统更新后,重新启动系统以应用更改。
安装 LAMP 服务器
首先,通过运行以下命令安装 Apache Web 服务器、MariaDB 服务器、PHP 和其他 PHP 模块:
sudo apt-get install apache2 mariadb-server php8.1 libapache2-mod-php8.1 php8.1-common php8.1-sqlite3 php8.1-curl php8.1-intl php8.1-mbstring php8.1-xmlrpc php8.1-mysql php8.1-gd php8.1-xml php8.1-cli php8.1-zip wget unzip ant -y安装所有软件包后,您将需要在 php.ini 文件中进行一些更改:
sudo nano /etc/php/8.1/apache2/php.ini进行以下更改:
memory_limit = 512M
upload_max_filesize = 200M
max_execution_time = 360
post_max_size = 200M
date.timezone = UTC
保存并关闭文件。
配置 MariaDB
接下来,您需要为 Shopware 创建数据库和用户。首先,使用以下命令登录 MariaDB shell:
mysql -u root -p输入您的根密码。然后,为 Shopware 创建数据库和用户:
MariaDB [(none)]> CREATE DATABASE shopwaredb;
 MariaDB [(none)]> CREATE USER 'shopware'@'localhost' IDENTIFIED BY 'password';
接下来,使用以下命令向 Shopware 授予所有权限:
MariaDB [(none)]> GRANT ALL ON shopwaredb.* TO 'shopware'@'localhost' IDENTIFIED BY 'password' WITH GRANT OPTION;接下来,刷新权限并退出 MariaDB shell:
MariaDB [(none)]> FLUSH PRIVILEGES;
 MariaDB [(none)]> EXIT;
安装商店软件
首先,使用以下命令从 Git 存储库下载最新版本的 Shopware:
wget https://github.com/shopware/shopware/archive/v5.4.6.zip接下来,使用以下命令解压缩下载的文件:
unzip v5.4.6.zip接下来,将解压的目录复制到Apache根目录:
sudo cp -r shopware-5.4.6 /var/www/html/shopware接下来,使用以下命令更改要构建的目录并设置配置和数据库连接:
cd build/
sudo ant configure
在配置过程中,您需要提供数据库详细信息,如下所示:
Buildfile: /var/www/html/shopware/build/build.xml
configure:
    [input] Please enter db-host: [localhost]
    [input] Please enter db-port: [3306]

    [input] Please enter db-name: []
shopwaredb
    [input] Please enter db-username: []
shopware
    [input] Please enter db-password:
password
    [input] Please enter app.host (Hostname e.g. example.com): []
example.com
    [input] Please enter app.path (e.g. /shopware. Leave blank if installed in document root): []


write-properties:
[propertyfile] Creating new property file: /var/www/html/shopware/build/build.properties

BUILD SUCCESSFUL
Total time: 2 minutes 0 seconds
接下来,使用以下命令构建 Shopware:
sudo ant build-unit构建成功完成后,您应该看到以下输出:
build-theme-initialize:
     [exec] Themes initialized

build-create-admin-account:
     [exec]
     [exec]  [OK] Adminuser "demo" was successfully created.
     [exec]

build-install-lock-file:

build-disable-firstrunwizard:
     [exec] First Run Wizard disabled

install-git-hooks:
    [mkdir] Created dir: /var/www/html/shopware/.git/hooks

build-unit:

BUILD SUCCESSFUL
Total time: 12 minutes 52 seconds
接下来,使用以下命令为 shopware 目录授予适当的权限:
sudo chown -R www-data:www-data /var/www/html/shopware
sudo chmod -R 777 /var/www/html/shopware
配置阿帕奇
接下来,为 Shopware 创建 Apache 虚拟主机文件:
sudo nano /etc/apache2/sites-available/shopware.conf添加以下行:
<VirtualHost *:80>
     ServerAdmin [email
     DocumentRoot /var/www/html/shopware
     ServerName example.com
     ServerAlias www.example.com

    <Directory /var/www/html/shopware/>
        Options FollowSymlinks
        AllowOverride All
        Require all granted
     </Directory>

     ErrorLog ${APACHE_LOG_DIR}/error.log
     CustomLog ${APACHE_LOG_DIR}/access.log combined

</VirtualHost>
保存并关闭文件。然后,启用 Apache 虚拟主机并使用以下命令重写模块:
sudo a2ensite shopware
sudo a2enmod rewrite
最后,重新启动 Apache 服务以应用所有更改:
sudo systemctl restart apache2访问商店软件
Shopware 现已安装并配置。现在可以访问 Shopware Web 界面了。打开 Web 浏览器并输入 URL http://example.com。您将被重定向到 Shopware 登录页面:
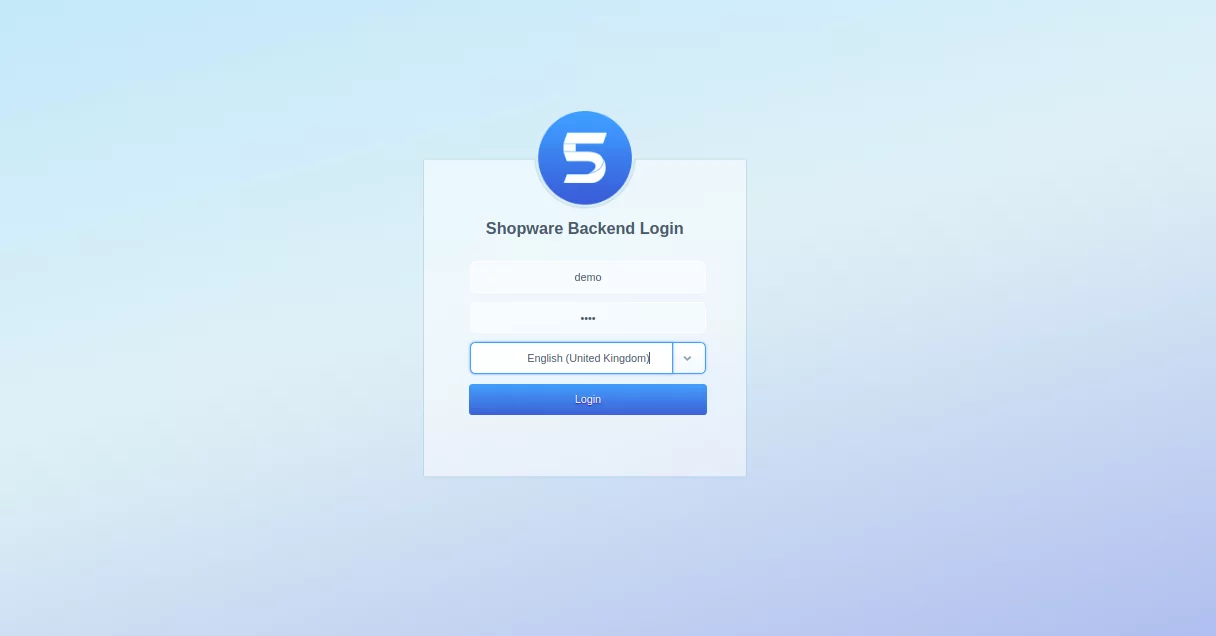
提供默认用户名/密码 demo/demo,然后单击登录按钮。您应该在以下页面中看到 Shopware 默认仪表板:
