如何在运行 Linux 的 VirtualBox 虚拟机上启用 EFI
大多数现代 PC 依靠 EFI 分区来启动操作系统。以下是如何在 VirtualBox 上的 Linux 虚拟机上启用 EFI 支持。

虽然基于 BIOS 的计算机是 VirtualBox 的标准,但在现实的硬件世界中,几乎所有新 PC 都使用 EFI 固件。使用新标准来设置 Linux 虚拟机很容易,即使它是官方实验性的。
下面介绍了如何在 VirtualBox 上轻松设置基于 EFI 的 Linux 虚拟机。但首先,让我们了解一下 EFI 到底是什么。
什么是 EFI?
EFI,也称为 UEFI,代表可扩展固件接口。它旨在取代自 1981 年最初的 IBM PC 创建以来一直存在的旧 BIOS 系统。
为什么要这样做?鉴于 BIOS 已经存在了很长时间,一旦 PC 变得更加强大,它的局限性就很明显了。 EFI 允许比 BIOS 更大的引导分区大小。
它还使安全启动成为可能,从而降低固件被损坏或被恶意软件接管的风险。出于这些原因,微软从 Windows 8 开始强制 PC 制造商支持 UEFI。
不仅真实的 PC 支持 EFI,而且随着操作系统对 EFI 的支持不断增加,虚拟机(包括 Oracle VirtualBox)也支持 EFI。
第 1 步:在 VirtualBox 上启用 EFI
要在 Linux 虚拟机中启用对 EFI 的支持,您只需选择一个菜单选项即可。
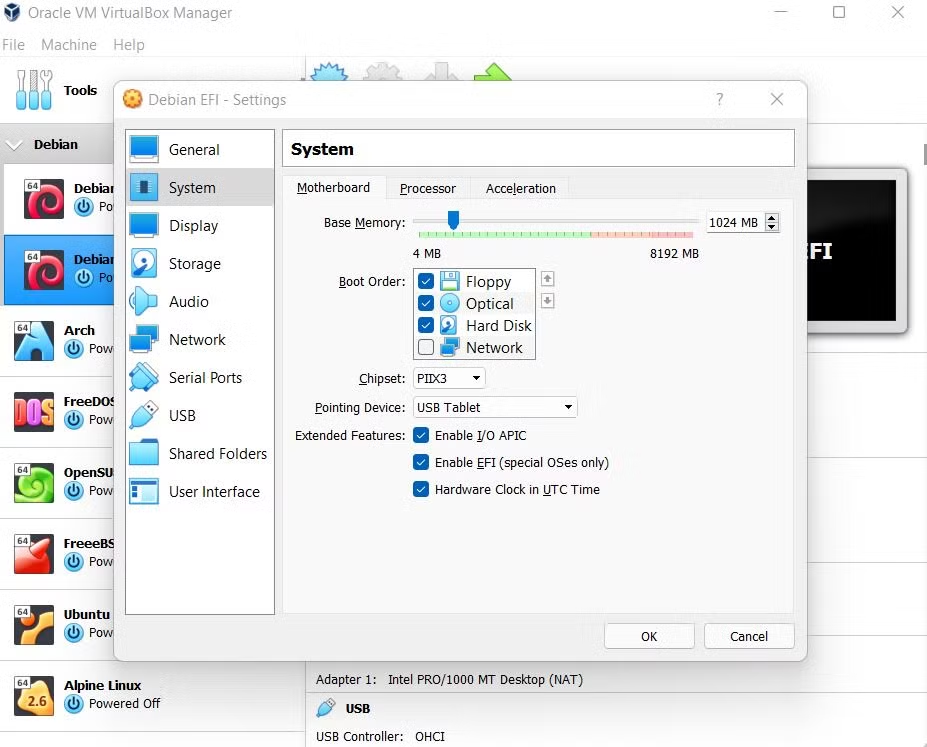
在 VirtualBox 计算机选择中,单击要在其中启用 EFI 的虚拟机,然后单击设置。切换到系统选项卡,然后选中启用 EFI(仅限特殊操作系统)复选框。 Linux 很特别,对吧?
现在您将能够在 VirtualBox 中使用 EFI 启动并安装 Linux 虚拟机。
第 2 步:安装并引导 Linux 发行版
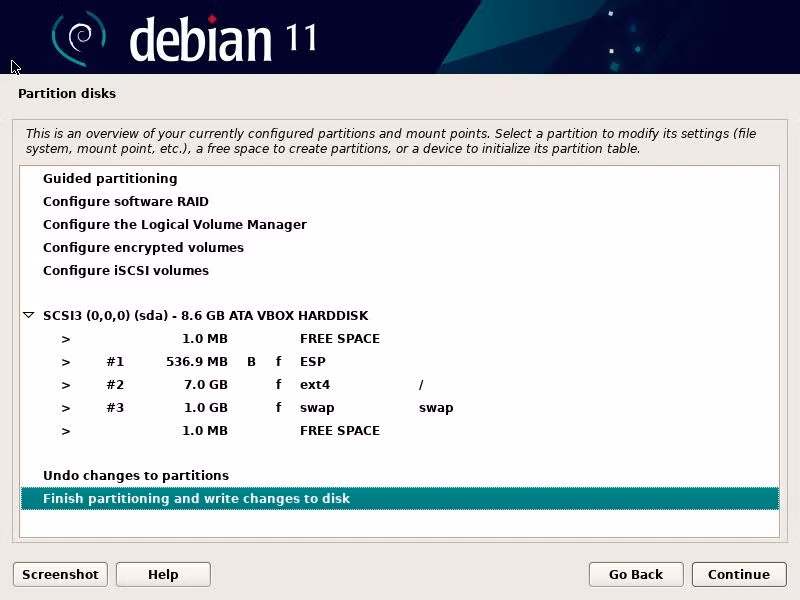
使用 EFI 安装 Linux 虚拟机应该与通过 BIOS 安装虚拟机类似。您可以照常启动安装介质。在本例中,我们将使用 Debian。为了获得最佳结果,创建全新的虚拟机会更容易。
该过程应该与 BIOS 安装几乎相同,但分区方案会有所不同,因为它使用 GPT 而不是旧的 MBR 样式。安装程序应该为您创建的虚拟磁盘提供合理的分区方案。
现在您可以使用 VirtualBox 启动 Linux 虚拟机
现在您可以将 VirtualBox Linux VM 从 BIOS 更改为 UEFI,您可以利用其功能。
如果您想了解更多有关 PC 固件新标准的优势,请继续阅读。