如何在 CentOS 7 上将 HAProxy 设置为 Nginx 的负载均衡器
在此页
- HAProxy 的基本概念
- 第 4 层和第 7 层
- 平衡算法
HAProxy 或高可用性代理是一个开源的 TCP 和 HTTP 负载平衡器和代理服务器软件。 HAProxy 由 Willy Tarreau 用 C 编写,它支持 SSL、压缩、保持活动、自定义日志格式和标头重写。 HAProxy 是一种快速且轻量级的代理服务器和负载均衡器,具有较小的内存占用和较低的 CPU 使用率。它被 Github、StackOverflow、Reddit、Tumblr、Twitter 等大型网站使用。它已成为过去几年最流行的软件负载平衡器和代理服务器。
在本教程中,我将指导您安装和配置 3 个服务器、一个负载均衡器和两个 Nginx Web 服务器的 HAProxy。我们将在一台服务器上安装 HAProxy,然后在其他服务器上安装 Nginx Web 服务器。 HAProxy 充当 Nginx Web 服务器的负载均衡器。
HAProxy 的基本概念
第 4 层和第 7 层
HAProxy 可以在两种模式下运行:TCP 模式第 4 层和 HTTP 模式第 7 层。在第 4 层 TCP 模式下,HAProxy 将 RAW TCP 数据包从客户端转发到应用程序服务器。在第 7 层 HTTP 模式下,HAProxy 在将它们转发到应用程序服务器之前解析 HTTP 标头。在本教程中,我们将使用 Nginx 作为仅支持七层 HTTP 模式的 Web 服务器。
平衡算法
这是 HAProxy 在进行负载平衡时用来选择服务器的算法。以下模式可用:
循环法
这是最简单的平衡算法。对于每个新连接,它将由下一个后端服务器处理。如果到达列表中的最后一个后端服务器,它将重新从后端列表的顶部开始。
最后连接
新连接将由连接数最少的后端服务器处理。当请求的时间和负载变化很大时,这很有用。
来源
这是针对粘性会话,客户端 IP 将被散列以确定从该 IP 接收最后一个请求的后端服务器。因此,IP A 将始终由 backend1 处理,而 IP B 将始终由 banckend2 处理,以免中断会话
还有其他算法 - 查看官方 HAProxy 站点了解详细信息。
先决条件
- 3 CentOS 7
负载均衡器
192.168.1.102
nginx1
192.168.1.104
nginx2
> 192.168.1.105- 所有 3 台服务器的根权限。
第 1 步 - 配置 /etc/hosts 文件
登录到负载均衡器服务器并编辑 /etc/hosts 文件。
ssh
sudo su
vi /etc/hosts添加 nginx1 和 nginx2 主机名:
192.168.1.104    nginx1.loadbalancer.me     nginx1
192.168.1.105    nginx2.loadbalancer.me     nginx2
保存文件并退出编辑器。
接下来,编辑 Nginx 服务器(nginx1 和 nginx2)上的主机文件:
ssh在主机文件中为负载均衡器编辑并添加新行:
vi /etc/host在每个 nginx 服务器上添加负载均衡器主机名:
192.168.1.102 loadbalancer在 nginx1 和 nginx2 服务器上执行此操作。
第 2 步 - 安装和配置 HAProxy
HAProxy 在 CentOS 7 存储库中可用,登录到负载均衡器服务器并更新包列表:
ssh
yum -y update
现在使用这个 yum 命令安装 HAProxy:
yum -y install haproxy安装完成后,进入“/etc/haproxy/”目录,备份原配置文件:
cd /etc/haproxy/
mv haproxy.cfg haproxy.cfg.orig
接下来,使用 vi 编辑器添加一个新的 HAProxy 配置文件“haproxy.cfg”文件:
vi haproxy.cfg粘贴下面的配置:
#---------------------------------------------------------------------
# Global settings
#---------------------------------------------------------------------
global
    log         127.0.0.1 local2     #Log configuration

    chroot      /var/lib/haproxy
    pidfile     /var/run/haproxy.pid
    maxconn     4000
    user        haproxy             #Haproxy running under user and group "haproxy"
    group       haproxy
    daemon

    # turn on stats unix socket
    stats socket /var/lib/haproxy/stats

#---------------------------------------------------------------------
# common defaults that all the 'listen' and 'backend' sections will
# use if not designated in their block
#---------------------------------------------------------------------
defaults
    mode                    http
    log                     global
    option                  httplog
    option                  dontlognull
    option http-server-close
    option forwardfor       except 127.0.0.0/8
    option                  redispatch
    retries                 3
    timeout http-request    10s
    timeout queue           1m
    timeout connect         10s
    timeout client          1m
    timeout server          1m
    timeout http-keep-alive 10s
    timeout check           10s
    maxconn                 3000

#---------------------------------------------------------------------
#HAProxy Monitoring Config
#---------------------------------------------------------------------
listen haproxy3-monitoring *:8080                #Haproxy Monitoring run on port 8080
    mode http
    option forwardfor
    option httpclose
    stats enable
    stats show-legends
    stats refresh 5s
    stats uri /stats                             #URL for HAProxy monitoring
    stats realm Haproxy\ Statistics
    stats auth howtoforge:howtoforge            #User and Password for login to the monitoring dashboard
    stats admin if TRUE
    default_backend app-main                    #This is optionally for monitoring backend

#---------------------------------------------------------------------
# FrontEnd Configuration
#---------------------------------------------------------------------
frontend main
    bind *:80
    option http-server-close
    option forwardfor
    default_backend app-main

#---------------------------------------------------------------------
# BackEnd roundrobin as balance algorithm
#---------------------------------------------------------------------
backend app-main
    balance roundrobin                                     #Balance algorithm
    option httpchk HEAD / HTTP/1.1\r\nHost:\ localhost    #Check the server application is up and healty - 200 status code
    server nginx1 192.168.1.104:80 check                 #Nginx1
    server nginx2 192.168.1.105:80 check                 #Nginx2
保存配置文件并退出。
接下来,为 HAProxy 配置 rsyslog。
我们将配置 rsyslog 守护进程来记录 HAProxy 统计信息。编辑 rsyslog.conf 文件以允许 rsyslog 使用 UDP 端口 514。
vi /etc/rsyslog.conf取消注释此行以启用 UDP 连接:
$ModLoad imudp
$UDPServerRun 514
如果你想使用一个特定的 IP,你可以像下面这样添加一个新行:
$UDPServerAddress 127.0.0.1保存文件并退出。
然后为 rsyslog 创建新的 haproxy 配置文件:
cd /etc/rsyslog.d/
vi haproxy.conf
下面粘贴配置:
local2.=info     /var/log/haproxy-access.log    #For Access Log
local2.notice    /var/log/haproxy-info.log      #For Service Info - Backend, loadbalancer
保存并退出。
现在重新启动 rsyslog,然后启动 haproxy:
systemctl restart rsyslog
systemctl start haproxy
添加 haproxy 以在启动时启动:
systemctl enable haproxy第 3 步 - 安装和配置 Nginx
在本节中,我们将在 nginx1 和 nginx2 服务器上从 epel 存储库安装 Nginx。
登录服务器:
ssh使用下面的 yum 命令安装 epel 存储库:
yum -y install epel-release现在你可以安装 Nginx 了:
yum -y install nginxNginx 已安装。进入web目录,更改index文件,这样我们就可以看到是两台服务器中的哪台服务器下发了html文件:
cd /usr/share/nginx/html/
echo "<h1>nginx1.loadbalance.me</h1>" > index.html     #For nginx1 server
echo "<h1>nginx2.loadbalance.me</h1>" > index.html     #For nginx2 server
接下来,将 Nginx 添加为在引导时启动,然后启动它:
systemctl enable nginx
systemctl start nginx
确保你在 nginx1 和 nginx2 服务器上执行此步骤。
第 4 步 - 测试
通过访问负载均衡器 IP 从浏览器进行测试:192.168.1.102


使用 curl 命令测试:
curl 192.168.1.102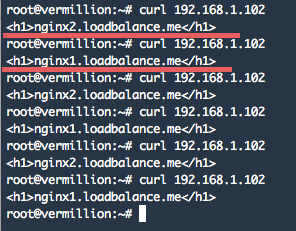
测试使用用户名和密码“howtoforge”登录到运行在端口 8080 上的 HAProxy web 监控:
http://192.168.1.102:8080/stats
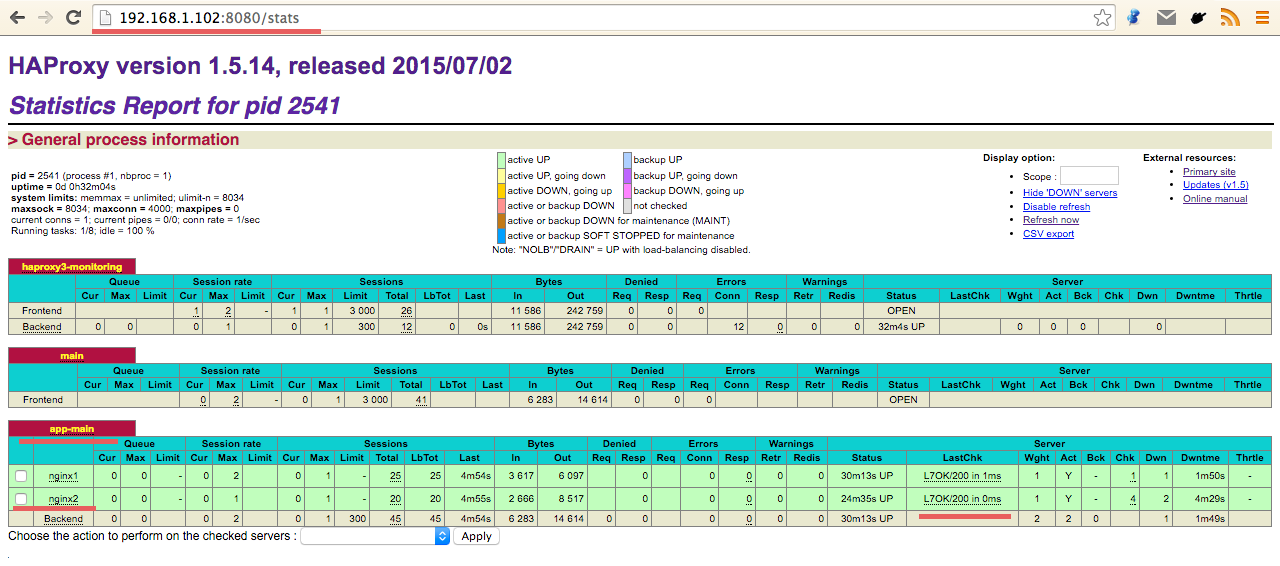
HAProxy 正在成功运行,并充当我们两个 Nginx Web 服务器的负载均衡器。
结论
HAProxy 或高可用性代理是一种开源软件,可为基于 TCP 的服务提供高可用性,它作为 HTTP 负载平衡器和代理服务器运行。该软件用C语言编写,支持SSL、keep-alive和压缩。对于需要负载均衡器和代理服务器的每个人来说,HAProxy 都是正确的选择,它具有快速、轻量级、内存占用少和 CPU 使用率低的特点。 Haproxy 可以运行在四层 TCP 模式和七层 HTTP 模式。 Nginx 仅支持带有 HAProxy 的第 7 层 HTTP 模式。如果要使用第 4 层 TCP 模式,可以使用其他 Web 服务器,如 apache。在 CentOS 7 上,HAProxy 在默认存储库中可用。它易于安装和配置。