如何在 Ubuntu 15.04 上使用 PostgreSQL 和 Nginx 安装 Gitlab
在此页
- 先决条件
- 第 1 步 - 更新 Linux 系统
- 第 2 步 - 安装 Gitlab 依赖项
- 第 3 步 - 安装 Ruby 和 Go
- 第 4 步 - 创建一个新的 Linux 用户并配置 PostgreSQL 数据库
- 第 5 步 - 配置 Redis 服务器
- 第 6 步 - 安装 GitLab
- - 配置 GitLab
- - 数据库配置
- - 安装 Gems
- - 安装 Gitlab-shell
- - 安装 gitlab-workhorse
- - 初始化数据库并激活gitlab功能
Gitlab 是一个基于 Web 的 git 存储库管理应用程序,使用 Ruby 编写。它类似于 GitHub,包括项目 wiki 和问题跟踪系统等功能。 Gitlab 项目由 Dmitriy Zaporozhets 发起,该软件被超过 100,000 家技术公司使用,包括 IBM、StackExchange、NASA、阿里巴巴、Red Hat 等。Gitlab 是构建您自己的 git 服务器的最佳解决方案之一。
Gitlab 得到主要 Linux 发行版的支持,例如 Ubuntu、Debian 和 CentOS。 Gitlab 为 Debian/Ubuntu 提供了 .deb 包,为 Rhel 和 CentOS 提供了 .rpm 包。该软件包包含所有依赖项,包括 Ruby、Redis、Nginx、Unicorn 和 PostgreSQL。 Gitlab 有 2 个版本,社区版 (Gitlab CE) 和企业版 (Gitlab EE)。如果您想构建自己的 git 服务器,那么免费的 CE 版本很可能会提供您需要的所有功能。
在本教程中,我将逐步指导您在 Ubuntu 15.04 版本上安装以 PostgreSQL 作为数据库系统,以 Nginx 作为 Web 服务器的 Gitlab CE。我们将使用 Ruby 版本 2.x.x,gitlab 稳定版本 8.x。
先决条件
- Ubuntu 15.04 - 64 位。
- CPU 2 核 - 从 gitlab 网站推荐。
- 2 GB RAM/内存 - 从 gitlab 网站推荐。
- 根特权。
第 1 步 - 更新 Linux 系统
在我们安装 Gitlab 依赖项之前,我们从 ubuntu 存储库中获取最新的更新。使用 SSH 访问登录到 ubuntu 服务器,成为 root 用户,然后更新存储库。
sudo su
apt-get update
第 2 步 - 安装 Gitlab 依赖项
Gitlab 有许多软件依赖项,例如 redis-server、git-core、nodejs 和用于发送电子邮件通知的 postfix。我将使用一个 apt 命令安装它们:
sudo apt-get install -y build-essential zlib1g-dev libyaml-dev libssl-dev libgdbm-dev libreadline-dev libncurses5-dev libffi-dev curl openssh-server redis-server checkinstall libxml2-dev libxslt-dev libcurl4-openssl-dev libicu-dev logrotate python-docutils pkg-config cmake nodejs git-core postfix注意:在 postfix 安装过程中,选择“internet site”,然后按 enter 确认主机名。
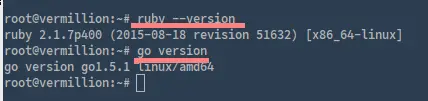
如果安装了所有包,请检查 git 版本并确保 git 版本为 1.7.x 或更高版本。
git --version
git version 2.1.4
第 3 步 - 安装 Ruby 和 Go
Gitlab 需要 ruby 2.x 或更高版本。在本教程中,我们将使用 ruby 2.7 版。在这个阶段,我们必须手动安装 ruby(从源代码)。如果您之前在系统上安装过 ruby,请使用以下命令将其删除:
apt-get remove ruby -y接下来,我们将手动安装 ruby。为 ruby 源文件创建新目录:
mkdir -p /tmp/ruby && cd /tmp/ruby使用 curl 命令下载 ruby 源代码:
curl -O --progress https://cache.ruby-lang.org/pub/ruby/2.1/ruby-2.1.7.tar.gz现在验证并解压 ruby.tar.gz,然后进入 ruby 目录:
echo 'e2e195a4a58133e3ad33b955c829bb536fa3c075  ruby-2.1.7.tar.gz' | shasum -c - && \
tar xzf ruby-2.1.7.tar.gz && \
cd ruby-2.1.7
编译安装 Ruby:
./configure --disable-install-rdoc --prefix=/usr/local
make
make install
下一步,我们必须安装 Go。从 gitlab 8.0 开始,git HTTP 请求由用 Go 编写的 gitlab-workhorse 处理。要安装 gitlab-workhorse,我们需要 go 编译器,下载并安装它。
为 Go 创建新目录:
mkdir -p /tmp/go && cd /tmp/go下载 Go - 我们使用 64 位版本:
curl -O --progress https://storage.googleapis.com/golang/go1.5.1.linux-amd64.tar.gz验证并解压到\/usr/local/\目录:
echo '46eecd290d8803887dec718c691cc243f2175fe0  go1.5.1.linux-amd64.tar.gz' | shasum -c - && \
sudo tar -C /usr/local -xzf go1.5.1.linux-amd64.tar.gz
现在在 bin 目录中为 Go 创建一个符号链接:
sudo ln -sf /usr/local/go/bin/{go,godoc,gofmt} /usr/local/bin/现在我们已经安装了 Ruby 和 Go。
第 4 步 - 创建一个新的 Linux 用户并配置 PostgreSQL 数据库
在此步骤中,我们将创建一个名为 \git\ 的新 Linux 系统用户,主目录为 \/home/git\。 Gitlab 稍后将以 git 用户身份运行。
使用 adduser 命令创建新用户 git:
sudo adduser --disabled-login --gecos 'GitLab' git现在我们为gitlab配置数据库。 Gitlab 支持 MySQL 和 PostgreSQL,在本教程中我们将使用推荐的数据库类型 PostGreSQL。
使用下面的 apt 命令安装 PostgreSQL:
sudo apt-get install -y postgresql postgresql-client libpq-dev完成后,登录 PostgreSQL 并为 gitlab 创建名为 \git\ 的新角色/用户:
sudo -u postgres psql -d template1
CREATE USER git CREATEDB;
然后为 gitlab 创建名为“gitlabhq_production”的新数据库,并将数据库授予 git 用户/角色:
CREATE DATABASE gitlabhq_production OWNER git;现在退出 postgresql shell 并使用我们创建的数据库测试新角色/用户:
\q
sudo -u git -H psql -d gitlabhq_production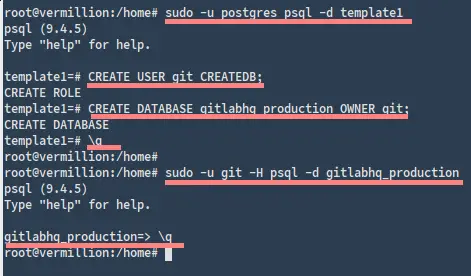
已创建名为 \git\ 的新系统用户。
已授予 gitlab 数据库 \gitlabhq_production\ 的 psotgreSQL 的新角色/用户 \git\ 也已创建。
第 5 步 - 配置 Redis 服务器
在我们编辑 \/etc/redis\ 目录中的 redis 配置文件之前,我们将创建一个名为 redis.conf.original 的备份副本。
cd /etc/redis/
cp redis.conf redis.conf.original
然后使用 vim 编辑器编辑文件“redis.conf”:
vim redis.conf
转到第 45 行并将值更改为 0,因为我们希望 Redis 仅侦听 unix 套接字而不是端口:Listen 0然后转到文件末尾并添加一个 redis 套接字及其权限:
unixsocket /var/run/redis/redis.sock
unixsocketperm 777
保存文件并退出。
接下来在\/var/run\目录下为redis socket新建一个目录,并调整目录的属主和权限:
mkdir -p /var/run/redis
chown redis:redis /var/run/redis
chmod 755 /var/run/redis
转到 redis 套接字目录并运行以下命令:
cd /var/run/redis
if [ -d /etc/tmpfiles.d ]; then
  echo 'd  /var/run/redis  0755  redis  redis  10d  -' | sudo tee -a /etc/tmpfiles.d/redis.conf
fi
如果一切都完成了,重启redis服务器并将用户\git\添加到组\redis\:
sudo service redis-server restart
sudo usermod -aG redis git
第 6 步 - 安装 GitLab
转到目录 \/home/git\ 并从其 GIT 存储库下载 gitlab:
cd /home/git
sudo -u git -H git clone https://gitlab.com/gitlab-org/gitlab-ce.git -b 8-2-stable gitlab
笔记 :
sudo -u git -H clone 命令=我们以用户 \git\ 运行命令 \clone\。
- 配置 GitLab
进入gitlab目录配置gitlab:
cd /home/git/gitlab将gitlab配置文件gitlab.yml.example的例子复制到“config”目录下的gitlab.yml中:
sudo -u git -H cp config/gitlab.yml.example config/gitlab.yml在gitlab目录下,将子目录“log和tmp”的所有者修改为git用户:
sudo chown -R git {log,tmp}然后更改其他目录的权限,以便 gitlab(git 用户)可以写入它们:
mkdir -p public/uploads/
sudo chmod -R u+rwX,go-w log/
sudo chmod -R u+rwX {tmp,tmp/pids,tmp/sockets,builds,shared/artifacts}
sudo chmod -R 0750 public/uploads
复制unicorn和Rack攻击配置的例子:
sudo -u git -H cp config/unicorn.rb.example config/unicorn.rb
sudo -u git -H cp config/initializers/rack_attack.rb.example config/initializers/rack_attack.rb
现在我们必须使用下面的 git 命令为 git 用户配置全局设置:
sudo -u git -H git config --global core.autocrlf input我们必须通过将文件“resque.yml”复制到 config 目录来配置 redis 连接,然后使用 vim 编辑它以更改 redis 配置,使用 unix 套接字,因为我们将 redis 配置为侦听套接字:
sudo -u git -H cp config/resque.yml.example config/resque.yml- 数据库配置
下一步是配置 GitLab 数据库设置,我们的数据库使用 postgreSQL。复制配置文件并更改权限:
sudo -u git -H cp config/database.yml.postgresql config/database.yml
sudo -u git -H chmod o-rwx config/database.yml
- 安装宝石
sudo gem install bundler
sudo -u git -H bundle install --deployment --without development test mysql aws kerberos
等到命令完成。
- 安装 Gitlab-shell
Gitlab-shell 允许对 Gitlab 进行 SSH 访问和存储库管理。我们将使用默认配置,因此不需要对其进行编辑。运行下面的命令来安装 gitlab-shell:
sudo -u git -H bundle exec rake gitlab:shell:install[v2.6.8] REDIS_URL=unix:/var/run/redis/redis.sock RAILS_ENV=productionREDIS_URL=确保在生产环境中使用 unix socket 进行 redis 配置。
- 安装 gitlab-workhorse
Gitlab-workhorse 是一个小守护进程,用于处理来自 unicorn 的 Git HTTP 流量,用 Go 编写。克隆并安装它:
cd /home/git
sudo -u git -H git clone https://gitlab.com/gitlab-org/gitlab-workhorse.git
cd gitlab-workhorse
sudo -u git -H git checkout 0.4.2
sudo -u git -H make
- 初始化数据库并激活gitlab功能
转到gitlab安装目录并运行以下命令:
cd /home/git/gitlab
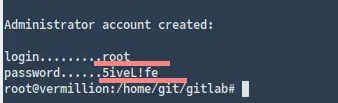
sudo -u git -H bundle exec rake gitlab:setup RAILS_ENV=production键入 \yes\ 以创建表。

结果将是一个 gitlab 帐户,用户名为“root”,密码为“5iveL!fe”。
第 7 步 - 配置初始化脚本
从 gitlab 安装目录复制 gitlab init 脚本,并使用 update-rc.d 命令添加 gitlab 以在启动时启动:
sudo cp lib/support/init.d/gitlab /etc/init.d/gitlab
sudo update-rc.d gitlab defaults 21
然后复制gitlab logrotate配置进行日志管理:
sudo cp lib/support/logrotate/gitlab /etc/logrotate.d/gitlab并检查应用程序状态和编译资产:
sudo -u git -H bundle exec rake gitlab:env:info RAILS_ENV=production
sudo -u git -H bundle exec rake assets:precompile RAILS_ENV=production
如果没有报错,启动gitlab:
/etc/init.d/gitlab start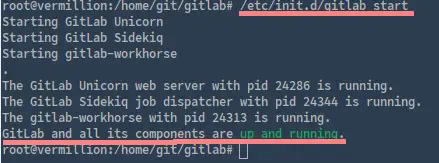
第 8 步 - 安装和配置 Nginx
我们将使用 Nginx 作为前端 Web 服务器来处理浏览器请求。只需使用以下 apt 命令安装它:
apt-get install nginx -y从 gitlab 目录复制 Nginx 虚拟主机配置并删除默认 Nginx 默认虚拟主机:
sudo cp lib/support/nginx/gitlab /etc/nginx/sites-available/gitlab
sudo rm /etc/nginx/sites-enabled/default
使用 vim 编辑配置文件:
sudo vim /etc/nginx/sites-available/gitlab更改 HTTP 部分中 Listen 和 ServerName 行的值:
Listen *:80; #Port Default

#Listen 0.0.0.0:80; #comment one of this

ServerName my.gitlab.me; #Gitlab FQDN/Domain
保存并退出。
激活gitlab虚拟主机,启动nginx并重启gitlab:
sudo ln -s /etc/nginx/sites-available/gitlab /etc/nginx/sites-enabled/gitlab
service nginx start
/etc/init.d/gitlab restart
现在您可以使用浏览器在 my.gitlab.me(您为服务器选择的主机名)访问 gitlab,并使用默认用户名“root”登录和密码 \5iveL!fe\。
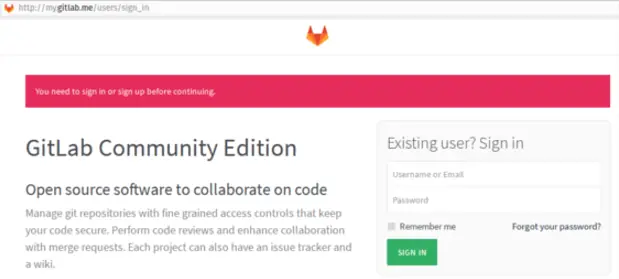
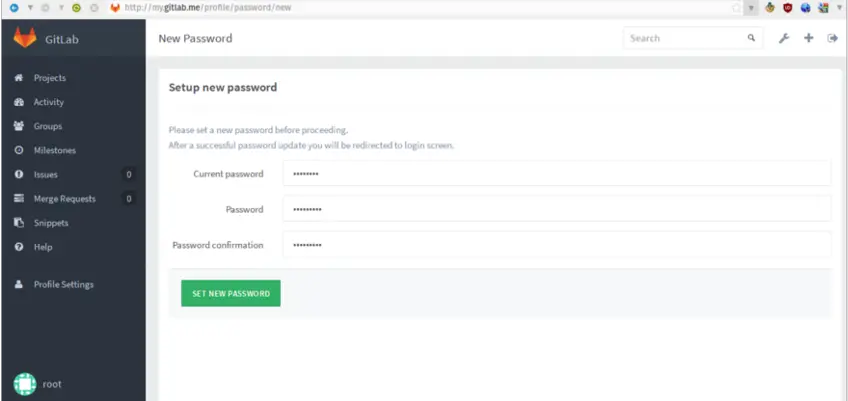
首先,您应该用您的密码替换 gitlab 默认密码。
Gitlab 8 with PostgreSQL and Nginx on ubuntu 15.04 现已成功安装。
笔记 :
如果您有错误,例如“502 错误网关”,则通过增加独角兽超时或升级您的硬件来修复它。进入gitlab安装目录,用vim编辑unicorn.rb文件:
sudo -u git -H vim config/unicorn.rb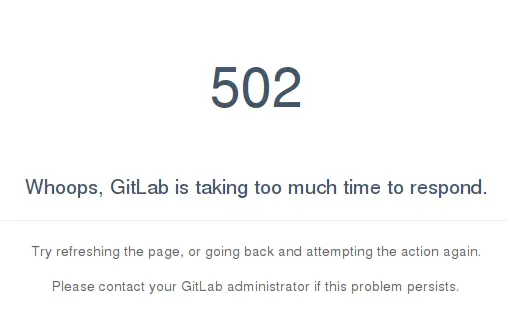
在此处查看有关 Gitlab 故障排除的更多信息 https://github.com/gitlabhq/gitlab-public-wiki/wiki/Trouble-Shooting-Guide。
结论
Gitlab 是一个用 Ruby 编写的开源 git 仓库管理软件。它是构建自己的 git 服务器的最佳解决方案之一。 Gitlab 由 Dmitriy Zaporozhets 创建,有 2 个版本,Gitlab CE(社区版)和 Gitlab EE(企业版)。 Gitlab 易于安装和配置,界面美观,被超过 100,000 家科技公司使用。它是一款非常强大的软件,可以帮助开发人员与其他开发人员一起构建应用程序。