如何在 Rocky Linux 上安装 GlusterFS
在此页
- 先决条件
- 设置 FQDN 和 /etc/hosts
- 设置分区
- 为 Rocky Linux 添加 GlusterFS 存储库
- 安装 GlusterFS 服务器
- 使用 Firewalld 打开端口
- 初始化 GlusterFS 集群
- 创建 GlusterFS 卷
- 在客户端机器上安装 GlusterFS 卷
- 测试写访问和高可用性
- 结论
GlusterFS 或 Gluster 文件系统是由 RedHat 开发的免费开源分布式文件系统。 GlusterFS 是一个可扩展的文件系统,由多个服务器组成一个实体文件系统,允许用户连接和挂载 GlusterFS 卷。
GlusterFS 是一个现代文件系统,可以处理 PB 级数据,易于安装和维护,也易于扩展文件系统。
在本教程中,您将学习如何在两个 Rocky Linux 系统上安装 GlusterFS 并在两个服务器之间设置集群。我们还将介绍如何在客户端计算机上安装 GlusterFS 卷。
先决条件
- 两台 Rocky Linux 服务器,每台服务器上都有一个额外的磁盘。
- 在两台服务器上都配置了 root 密码
设置 FQDN 和 /etc/hosts
在开始之前,您需要在每台服务器上设置 FQDN 和 /etc/hosts 文件。
下面是我们将用来创建 GlusterFS 集群的详细服务器:
- server1.localdomain.lan IP 地址为 192.168.10.15
- server2.localdomain.lan IP 地址为 192.168.10.20
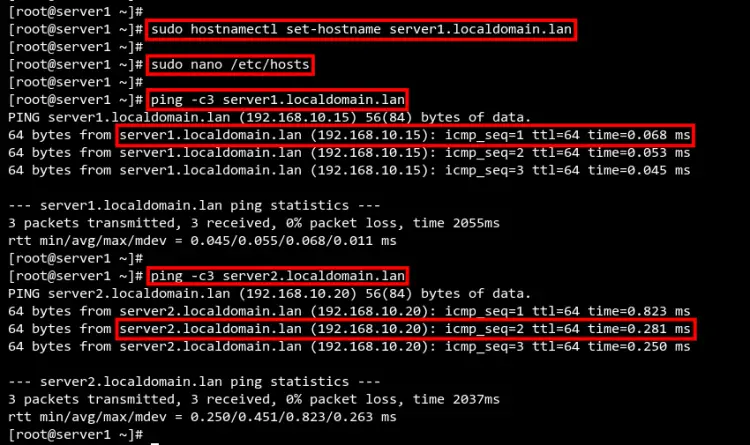
要在每台服务器上设置 FQDN,请运行下面的 hostnamectl 命令。
在 server1 上,运行下面的 hostnamectl 命令。
sudo hostnamectl set-hostname server1.localdomain.lan在 server2 上,运行以下命令。
sudo hostnamectl set-hostname server2.localdomain.lan接下来,使用 nano 编辑器编辑配置 /etc/hosts。
sudo nano /etc/hosts粘贴以下配置。
192.168.10.15 server1.localdomain.lan
192.168.10.20 server2.localdomain.lan
按 Ctrl+X 并输入 Y 确认保存文件。
现在使用下面的 ping 命令测试 server1 和 server2 之间的连接。
ping -c3 server1.localdomain.lan
ping -c3 server2.localdomain.lan
每个本地域名都会被解析为服务器正确的IP地址。
设置分区
部署GlusterFS,建议使用不同的磁盘存储,尤其是生产环境。
对于本教程,server1 和 server2 都有大小为 5GB 的辅助磁盘 /dev/vdb1。
现在使用nano 编辑器编辑/etc/fstab 配置以添加您的磁盘。
sudo nano /etc/fstab对于 server1,/dev/vda1 磁盘将挂载到 /data/vol1 目录。
/dev/vda1 /data/vol1 ext4 default 0 0对于 server2,/dev/vda1 磁盘将挂载到 /data/vol2 目录。
/dev/vda1 /data/vol2 ext4 default 0 0接下来,使用以下命令安装 /dev/vda1 磁盘。
sudo mount -a如果没有错误消息,请通过如下运行 df 命令来验证每个系统上的列表安装磁盘。
sudo df -h您应该看到 /dev/vda1 磁盘已挂载到 /data 目录。
在开始安装和配置 GlusterFS 集群之前,运行以下命令在 /data 目录中创建 brick0 目录。
在 server1 上,运行以下命令。
sudo mkdir -p /data/vol1/brick0对于 server2,运行以下命令。
sudo mkdir -p /data/vol2/brick0为 Rocky Linux 添加 GlusterFS 存储库
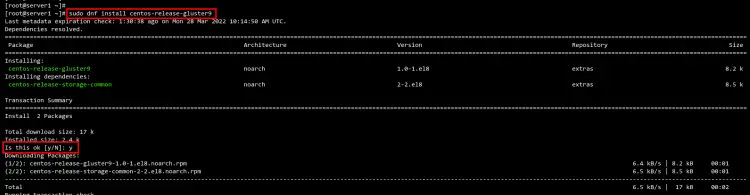
成功设置磁盘后,现在您将安装 GlusterFS 包到您的 Rocky Linux 服务器。
目前的 Rocky Linux 仍然没有提供 GlusterFS 服务器包,但是你可以使用 CentOS 发布的 GlusterFS 包。
使用以下命令将 GlusterFS 存储库添加到您的 Rocky Linux 系统。
sudo dnf install centos-release-gluster9输入 y 确认安装,然后按 ENTER 继续。
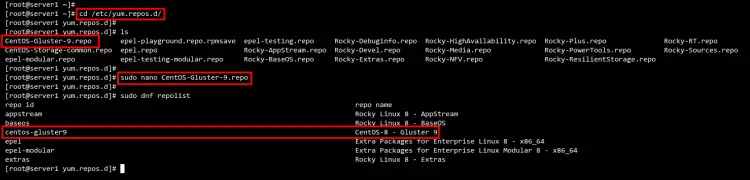
接下来,转到 /etc/yum.repos.d/ 目录并使用 nano 编辑存储库配置 CentOS-Gluster-9.repo编辑。
cd /etc/yum.repos.d/
sudo nano CentOS-Gluster-9.repo
使用 Rocky Linux 存储库更改 baseurl 行并注释 mirrorlist 行,如下所示
# CentOS-Gluster-9.repo
#
# Please see http://wiki.centos.org/SpecialInterestGroup/Storage for more
# information

[centos-gluster9]
name=CentOS-$releasever - Gluster 9
#mirrorlist=http://mirrorlist.centos.org?arch=$basearch&release=$releasever&repo=storage-gluster-9
baseurl=https://dl.rockylinux.org/vault/centos/8.5.2111/storage/x86_64/gluster-9/
gpgcheck=1
enabled=1
gpgkey=file:///etc/pki/rpm-gpg/RPM-GPG-KEY-CentOS-SIG-Storage

[centos-gluster9-test]
name=CentOS-$releasever - Gluster 9 Testing
baseurl=http://buildlogs.centos.org/centos/$releasever/storage/$basearch/gluster-9/
gpgcheck=0
enabled=0
gpgkey=file:///etc/pki/rpm-gpg/RPM-GPG-KEY-CentOS-SIG-Storage
使用 Ctrl+X 和 Y 确认保存文件。
现在使用以下命令检查 Rocky Linux 系统上的可用存储库。
sudo dnf repolist您将看到 GlusterFS 9 的 CentOS 发行存储库。
安装 GlusterFS 服务器
现在使用下面的 dnf 命令在 Rocky Linux 系统上安装 GlusterFS 包。
sudo dnf install glusterfs glusterfs-libs glusterfs-server输入 Y 确认安装,然后按 ENTER 继续。
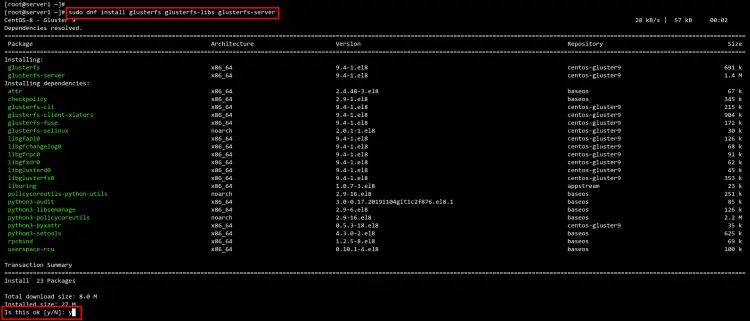
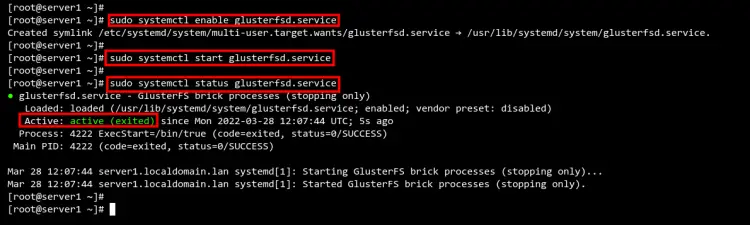
安装完成后,启动glusterfsd服务,使用以下命令将其添加到系统启动项中。
sudo systemctl enable glusterfsd.service
sudo systemctl start glusterfsd.service
现在使用以下命令验证 glusterfsd 服务状态。
sudo systemctl status glusterfsd.service您将看到 glusterfsd 服务处于活动状态,状态为退出,这意味着它正在运行,但 systemd 管理器找不到任何要监控的守护进程。
使用 Firewalld 打开端口
在开始配置 GlusterFS 集群之前,您需要打开 GlusterFS 服务的端口。
在基于 RHEL Linux 的操作系统上,默认的防火墙应用程序是 firewalld,它提供命令行工具 firewall-cmd 来管理防火墙。
将服务 glusterfs 添加到您的 firewalld 配置并使用以下命令重新加载 firewalld。
sudo firewall-cmd --add-service=glusterfs --permanent
sudo firewall-cmd --reload
之后,使用以下命令验证 firewalld 上的服务列表。
sudo firewall-cmd --list-services您将看到 glusterfs 服务已添加到 firewalld。

初始化 GlusterFS 集群
下一步将是在 Rocky Linux 系统上初始化和设置 GlusterFS 集群。
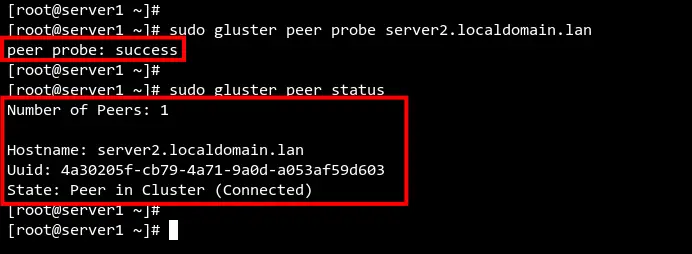
首先,使用以下命令初始化 GlusterFS 集群。该命令必须在server1服务器上运行,并且只能运行一次。
通过使用此命令,您将把 server2.localdomain.lan 添加到 server1 上的 GlusterFS 对等体。另外,在完成以下命令后,server2 将自动初始化。
sudo gluster peer probe server2.localdomain.lan现在您应该看到输出消息peer probe: success。
接下来,使用以下命令验证 server1 上的对等状态。
sudo gluster peer status您应该看到 server1 上只有一个对等点。
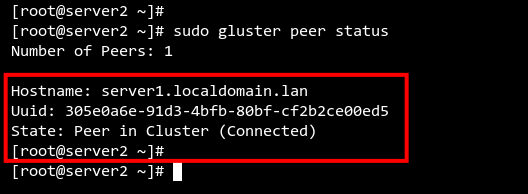
此外,在 server2 上运行以下命令以检查 server2 上的可用对等点。
sudo gluster peer status您应该看到 server2 上只有一个对等点。
创建 GlusterFS 卷
成功初始化 GlusterFS 集群后,您将创建一个新的 GlusterFS 卷,供客户端机器使用。
在本教程中,您将创建一个名为 myvolume 的新卷,其类型为来自 server1 和 server2 的 2 个磁盘的副本。
sudo gluster volume create myvolume replica 2 server1.localdomain.lan:/data/vol1/brick0 server2.localdomain.com:/data/vol2/brick0现在键入 y 确认并按 ENTER 键创建 GlusterFS 卷。
当该过程成功时,您将看到类似于以下屏幕截图的输出。

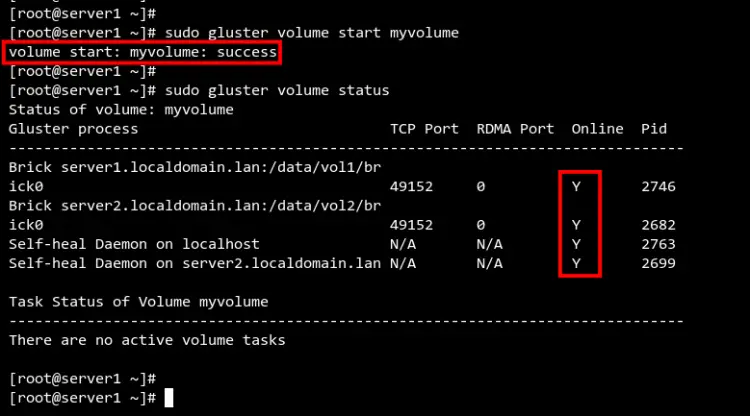
接下来,使用以下命令启动 Glusterfs 卷 myvolume。
sudo gluster volume start myvolume您将看到输出消息 volume start: myvolume: success, 这意味着 myvolume 已启动。
现在运行下面的命令来验证 GLusterFS 卷状态。
sudo gluster volume status您将在下方看到 myvolume 的状态为在线并可供客户使用。
或者,您还可以使用以下命令验证 GlusterFS 卷的状态。
sudo gluster volume info您将看到类型为 replicate 且状态为 started 的卷 myvolume。 myvolume 基于 server1 和 server2 上的磁盘。

在客户端机器上安装 GlusterFS 卷
现在您已经创建了 GlusterFS 卷 myvolume。接下来,您将学习如何设置 cline 机器并安装 GlusterFS 卷。
在本教程中,我们将使用名为 client 的客户端计算机。
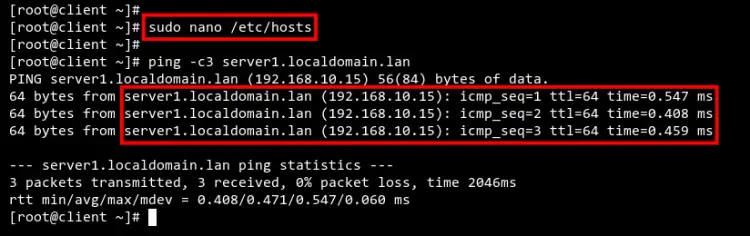
使用 nano 编辑器在客户端计算机上编辑 /etc/hosts 配置。
sudo nano /etc/hosts粘贴以下配置。
192.168.10.15 server1.localdomain.lan
192.168.10.20 server2.localdomain.lan
使用 Ctrl+X 保存文件并输入 Y 确认。
要验证客户端计算机与 GlusterFS 服务器之间的连接,请运行下面的 ping 命令。
ping -c3 server1.localdomain.lan您将看到客户端命令可以连接到 GlusterFS 服务器。
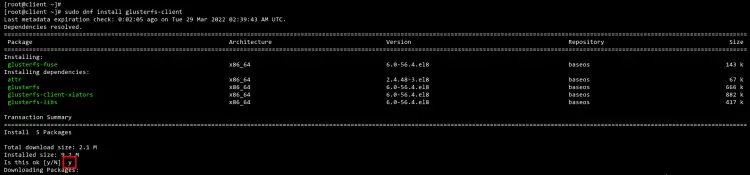
接下来,使用以下命令从 AppStream Rocky Linux 存储库安装 GlusterFS 客户端包。
sudo dnf install glusterfs-client输入 y 确认安装,然后按 ENTER 继续。
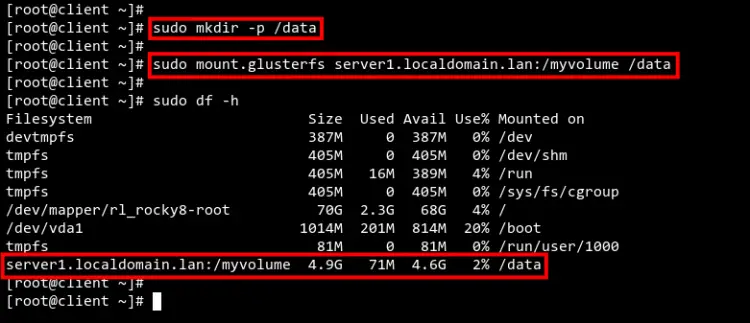
安装完成后,使用以下命令创建新的挂载目录/data。
sudo mkdir /data使用下面的 mount 命令将 GlusterFS 卷 myvolume 挂载到 /data 目录。
sudo mount.glusterfs server1.localdomain.lan:/myvolume /data如果没有错误,则 GlusterFS 卷已成功安装到您的客户端计算机。
运行以下命令以验证 GlusterFS 卷。
df -h您将看到 GlusterFS myvolume 已成功安装到客户端计算机上的 /data 目录。
测试写访问和高可用性
在客户端机器上,转到 /data 目录并使用以下命令创建一个新文件。
使用此命令,您将在 /data 目录中创建5 个文件。
cd /data
touch file{1..5}.md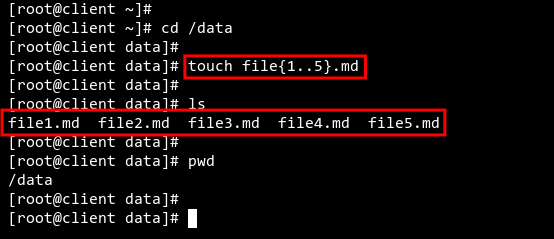
现在移动到 server1 并使用以下命令检查目录 /data/vol1/brick0。
ls /data/vol1/brick0您应该看到该文件在 server1 上可用。

接下来,使用以下命令关闭或关闭 server1。
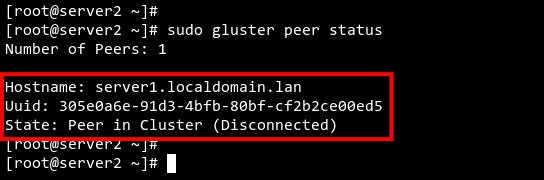
sudo shutdown -r now再次移动到 server2 并使用以下命令验证 server2 上 GlusterFS 的状态。
sudo gluster peer status您将看到对等服务器 1 的状态是断开连接。
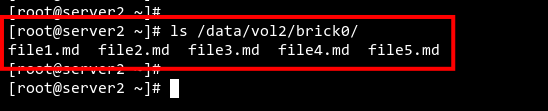
从server2 验证 /data/vol2/brick0 目录中的可用文件。
ls /data/vol2/brick0您将看到来自客户端的所有文件在 server2 上也可用,这意味着数据是从对等服务器复制的。
现在,如果您返回客户端计算机,您将看到与 GlusterFS 服务器的连接状态仍然处于活动状态并正在运行,即使 server1 已关闭。这意味着 GlusterFS 的高可用性是成功的。
结论
恭喜!您现在已经成功地在 Rocky Linux 系统上安装和配置了 GlusterFS 集群存储。此外,您还学习了如何设置 GlusterFS 卷以及如何在客户端计算机上安装 GlusterFS 卷。