如何在 Ubuntu 15.04 上安装带有 TLS 的 Proftpd
在此页
- 先决条件
- 安装 Proftpd 和 OpenSSL
- 配置 Proftpd
- 添加 FTP 用户
- 在 Proftpd 中配置 TLS
- 测试
FTP(文件传输协议)可能是最流行的将文件上传到服务器的方法。 ProFTPD 是一种流行且易于配置的 FTP 服务器,适用于支持 SSL/TLS 加密的 Linux 系统。
FTP 是一种不安全的协议,因为所有密码和所有数据都以明文形式(纯文本)传输。通过使用 TLS,可以对整个通信进行加密,从而使 FTP 成为传输文件的安全协议。本文介绍了如何在 Ubuntu 服务器 15.04 中使用 TLS 配置 proftpd。
先决条件
- Ubuntu 服务器 15.04 64 位
- sudo/root权限
我们将在本教程中做什么:
- 安装 Proftpd 和 OpenSSL
- 配置 Proftpd
- 配置用户
- 使用 proftpd 配置 TLS
- 测试
安装 Proftpd 和 OpenSSL
Proftpd 和 OpenSSL 在 Ubuntu 存储库中可用,可以使用 apt 命令安装。与安装命令一样,我们通过 sudo 运行 apt 命令以使用 root 权限运行它:
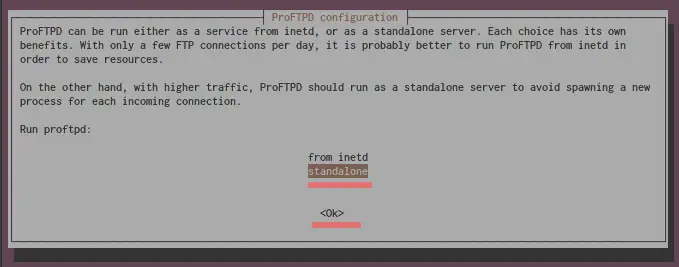
sudo apt-get install -y proftpd openssl安装开始时,系统会询问您是将 Proftpd 作为 inetd 服务还是独立服务运行。在此处选择独立选项,然后选择 Ok。
配置 Proftpd
安装 Proftpd 后,您将不得不更改一些配置文件。 Proftpd 配置文件位于 /etc/proftpd/ 目录中。我将使用 nano 编辑器编辑 proftpd.conf 文件。
cd /etc/proftpd/
nano proftpd.conf
在 ServerName 行,将名称更改为您的主机名或域:
ServerName "myhostname"取消注释 DefaultRoot:
# Use this to jail all users in their homes
DefaultRoot   		~
并重新启动 Proftpd:
systemctl restart proftpd添加 FTP 用户
访问 FTP 服务器的常用方法有两种:
1. 匿名FTP,任何人无需用户帐号和密码即可访问FTP 服务器。
2.使用用户名和密码访问,只有拥有可以访问 FTP 服务器的用户帐户和密码的用户。
我将在这里配置选项 2。匿名 FTP 在互联网时代初期很流行,但如今匿名 FTP 服务器的滥用如此之多,以至于此选项仅在家庭或公司网络等封闭环境中可用。
在为 Proftpd 创建用户之前,请将 /bin/false 添加到 /etc/shells 文件。
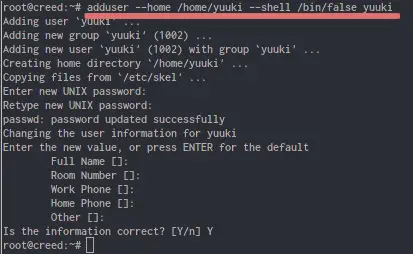
echo "/bin/false" >> /etc/shells现在您将创建一个用户,该用户有一个主目录,他可以通过 FTP 访问该主目录。我将通过为他分配 \/bin/false\ shell 来禁用该用户的 shell 访问,以确保他无法通过 SSH 登录。我的用户名为 \yuuki\,请在下一个命令中将 yuuki 替换为您的用户名。
adduser --home /home/yuuki --shell /bin/false yuuki上面的命令将创建一个名为 yuuki 的新用户,其主目录为 /home/yuuki/,没有 shell 访问权限 /bin/false。
现在配置 Proftpd 以允许用户 yuuki 访问 FTP 服务器。
cd /etc/proftpd/
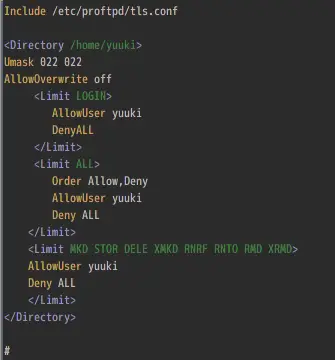
nano proftpd.conf添加此配置以允许用户 yuuki 登录并向/从他的主目录/home/yuuki 上传/下载文件:
<Directory /home/yuuki>
Umask 022 022
AllowOverwrite off
     <Limit LOGIN>
        AllowUser yuuki
        DenyALL
     </Limit>
     <Limit ALL>
        Order Allow,Deny
        AllowUser yuuki
        Deny ALL
    </Limit>
    <Limit MKD STOR DELE XMKD RNRF RNTO RMD XRMD>
    AllowUser yuuki
    Deny ALL
    </Limit>
</Directory>
然后重新启动 Proftpd。
systemctl restart proftpd在此阶段之前,FTP 已经可以在不加密的情况下使用。现在我们将通过启用 TLS 来确保它的安全。
在 Proftpd 中配置 TLS
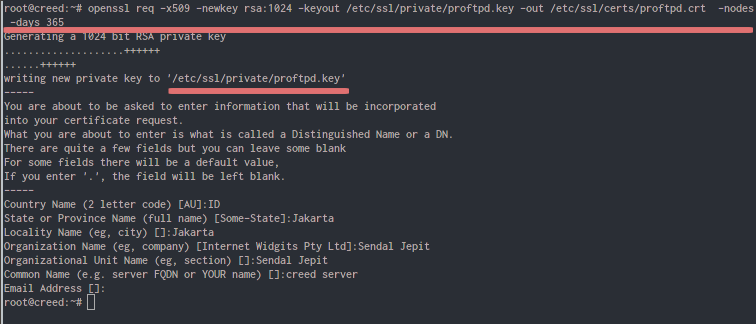
要使用 TLS,您必须创建 SSL 证书。我将使用 OpenSSL 命令生成 SSL 证书:
openssl req -x509 -newkey rsa:1024 -keyout /etc/ssl/private/proftpd.key -out /etc/ssl/certs/proftpd.crt -nodes -days 365该命令将在 /etc/ssl/certs/ 目录中生成证书文件 proftpd.crt,并在 /etc/ssl/private/ 目录中生成证书密钥文件 proftpd.key。
将证书文件的文件权限更改为 600 以禁止其他用户访问:
chmod 600 /etc/ssl/certs/proftpd.crt
chmod 600 /etc/ssl/private/proftpd.key
现在回到 Proftpd 目录并将 Proftpd 配置为使用 SSL 您生成的证书。
cd /etc/proftpd/
nano proftpd.conf
取消注释 tls 行:
Include /etc/proftpd/tls.conf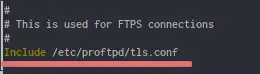
保存并编辑 tls 文件:
nano tls.conf取消注释所有这些行:
TLSEngine                               on
TLSLog                                  /var/log/proftpd/tls.log
TLSProtocol                             SSLv23

TLSRSACertificateFile                   /etc/ssl/certs/proftpd.crt
TLSRSACertificateKeyFile                /etc/ssl/private/proftpd.key

TLSOptions                              NoCertRequest

TLSVerifyClient                         off

TLSRequired                             on
保存并退出。最后一步是重新启动 Proftpd 服务器:
systemctl restart proftpd测试
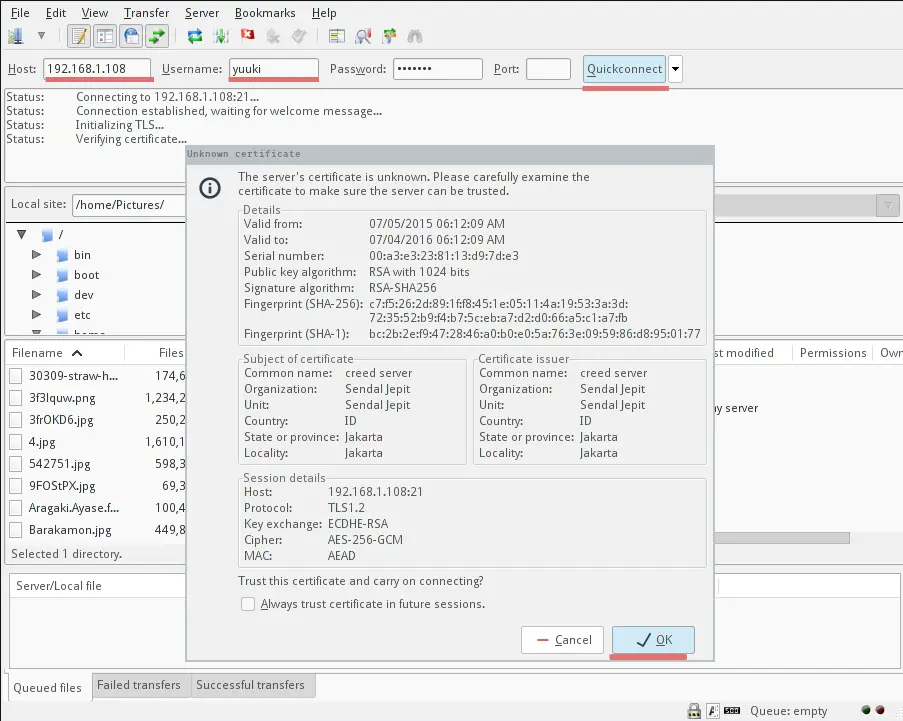
要测试配置,请尝试使用 FTP 客户端连接到您的 FTP 服务器。我将在这里使用 FileZilla。填写服务器IP、用户名、密码、端口:
Server IP : 192.168.1.108
username : yuuki
Password ******
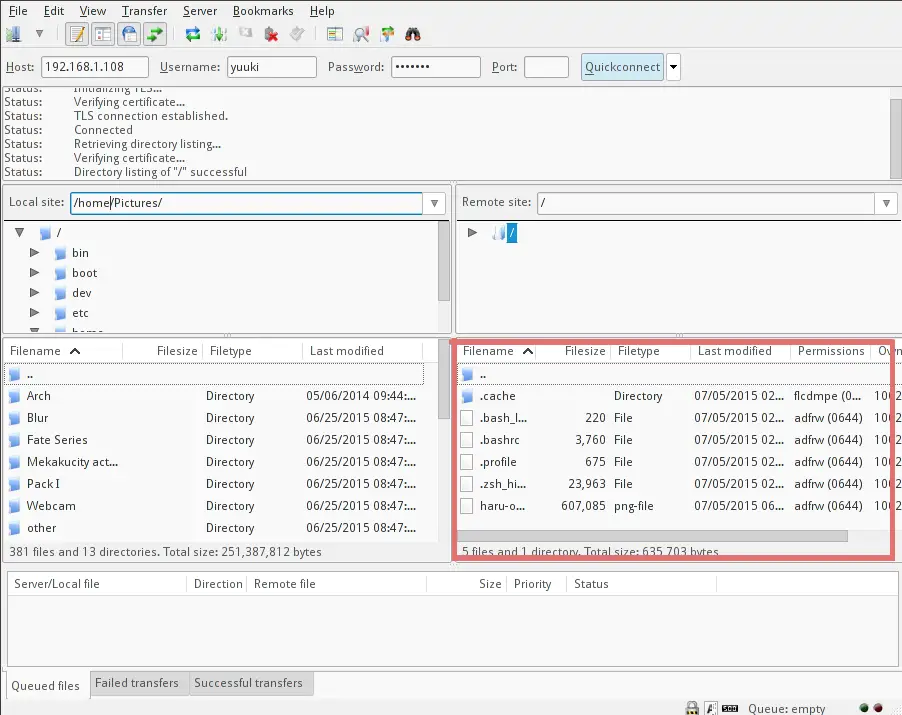
Port : 21然后点击快速连接。系统将要求您确认 SSL 证书,只需单击确定。