如何在 Rocky Linux 8 上安装 Redmine 项目管理软件
在此页
- 先决条件
- 第 1 步 - 配置防火墙
- 第 2 步 - 安装 Apache 服务器
- 第 3 步 - 安装和配置 MySQL 服务器
- 第 4 步 - 安装 EPEL 存储库
- 第 5 步 - 安装 Ruby 和其他必备软件
- 第 6 步 - 安装 Redmine
- 第 7 步 - 安装 Phusion Passenger
- 配置 Apache 服务器
- 更改 Apache 侦听端口
- 配置 Nginx
Redmine 是一个免费的开源项目管理软件和问题跟踪工具。它使用 Ruby on Rails 框架编写,可以与各种版本控制系统集成。它包括一个存储库浏览器和差异查看器。它可用于管理每个项目维基和论坛的项目功能、时间跟踪和基于角色的访问控制。跨平台、跨数据库,支持49种语言。
在本教程中,您将学习如何在基于 Rocky Linux 8 的服务器上安装 Redmine。
先决条件
-
A Server running Rocky Linux.
-
A non-sudo user with root privileges.
-
Disable SELinux.
-
Everything is updated.
$ sudo dnf update
第 1 步 - 配置防火墙
第一步是配置防火墙。 Rocky Linux 使用 Firewalld 防火墙。检查防火墙状态。
$ sudo firewall-cmd --state
running
打开3000端口,我们可以用它来检查Redmine。
$ sudo firewall-cmd --permanent --add-port=3000允许 HTTP 和 HTTPS 端口。
$ sudo firewall-cmd --permanent --add-service=http
$ sudo firewall-cmd --permanent --add-service=https
重新加载防火墙以启用更改。
$ sudo firewall-cmd --reload第 2 步 - 安装 Apache 服务器
我们将使用 Apache 网络服务器来部署 Redmine。使用以下命令安装 Apache。
$ sudo dnf install httpd启用并启动 Apache 服务。
$ sudo systemctl enable --now httpd.service将您当前登录的用户授予 apache 用户,以便它具有对
/var/www/redmine目录的必要访问权限。$ sudo usermod -aG $USER apache第 3 步 - 安装和配置 MySQL 服务器
我们将使用 MySQL 数据库来存储数据。 Rocky Linuxs Appstream 存储库附带最新版本的 MySQL。
安装 MySQL。
$ sudo dnf install mysql-server启用并启动 MySQL 服务。
$ sudo systemctl enable mysqld --now安全的 MySQL 安装。
$ sudo mysql_secure_installation第一步,系统会询问您是否要设置验证密码插件,您可以使用它来测试 MySQL 密码的强度。选择
Y继续。下一步将要求您选择密码验证级别。选择最强等级的2,要求您的密码长度至少为八个字符,并且包括大写、小写、数字和特殊字符的组合。Securing the MySQL server deployment. Connecting to MySQL using a blank password. VALIDATE PASSWORD COMPONENT can be used to test passwords and improve security. It checks the strength of password and allows the users to set only those passwords which are secure enough. Would you like to setup VALIDATE PASSWORD component? Press y|Y for Yes, any other key for No: Y There are three levels of password validation policy: LOW Length >= 8 MEDIUM Length >= 8, numeric, mixed case, and special characters STRONG Length >= 8, numeric, mixed case, special characters and dictionary file Please enter 0 = LOW, 1 = MEDIUM and 2 = STRONG: 2下一步将要求您选择根密码。选择一个满足密码验证插件要求的强密码。在下一步中,系统将询问您是否继续使用所选密码。按
y继续。Please set the password for root here. New password: Re-enter new password: Estimated strength of the password: 100 Do you wish to continue with the password provided?(Press y|Y for Yes, any other key for No) : Y按
Y然后按ENTER键以获取以下所有提示以删除匿名用户和测试数据库,禁用 root 登录并加载新设置的规则。... Remove anonymous users? (Press y|Y for Yes, any other key for No) : Y Success. ... Disallow root login remotely? (Press y|Y for Yes, any other key for No) : Y Success. ... Remove test database and access to it? (Press y|Y for Yes, any other key for No) : Y - Dropping test database... Success. - Removing privileges on test database... Success. Reloading the privilege tables will ensure that all changes made so far will take effect immediately. ... Reload privilege tables now? (Press y|Y for Yes, any other key for No) : Y Success. All done!进入 MySQL 外壳。输入您的根密码以继续。
$ mysql -u root -p创建
redmine用户。确保密码符合之前设置的要求。mysql> CREATE USER 'redmine'@'localhost' IDENTIFIED BY 'Your_password2';创建
redmine数据库。mysql> CREATE DATABASE redmine CHARACTER SET utf8mb4;授予用户对
redmine数据库的权限。mysql> GRANT ALL PRIVILEGES ON redmine.* TO 'redmine'@'localhost';退出外壳。
mysql> exit第 4 步 - 安装 EPEL 存储库
EPEL 存储库中提供了 Redmine 所需的一些软件包。运行以下命令来安装 EPEL 存储库。
$ sudo dnf install epel-release启用 PowerTools 存储库。
$ sudo dnf config-manager --set-enabled powertools第 5 步 - 安装 Ruby 和其他必备软件
Rocky Linux 8 附带四个不同版本的 Ruby——2.5、2.6、2.7 和 3.0。
列出所有可用的 Ruby 模块。
$ dnf module list ruby
Last metadata expiration check: 0:18:58 ago on Mon 03 Jan 2022 11:50:10 AM UTC.
Rocky Linux 8 - AppStream
Name            Stream             Profiles              Summary
ruby            2.5 [d]            common [d]            An interpreter of object-oriented scripting language
ruby            2.6                common [d]            An interpreter of object-oriented scripting language
ruby            2.7                common [d]            An interpreter of object-oriented scripting language
ruby            3.0                common [d]            An interpreter of object-oriented scripting language

Hint: [d]efault, [e]nabled, [x]disabled, [i]nstalled
Redmines 最新版本兼容除 3.0 以外的所有版本。我们将为我们的教程安装 Ruby 2.7。
重置其他版本并启用 2.7 版本的 Ruby。
$ sudo dnf module reset ruby
$ sudo dnf module enable ruby:2.7
安装红宝石。
$ sudo dnf install ruby ruby-devel验证安装。
$ ruby -v
ruby 2.7.4p191 (2021-07-07 revision a21a3b7d23) [x86_64-linux]
安装 Redmine 所需的所有剩余包。
$ sudo dnf install rpm-build wget libxml2-devel make automake libtool ImageMagick ImageMagick-devel mariadb-devel httpd-devel openssl-devel libcurl-devel gcc gcc-c++第 6 步 - 安装 Redmine
访问 Redmine 下载页面并检查可用的最新稳定版本。在编写本教程时,最新的可用版本是 4.2.3。
使用
wget下载Redmine。$ wget https://redmine.org/releases/redmine-4.2.3.tar.gz提取文件并将其移动到
/var/www/redmine目录。$ tar xfz redmine-4.2.3.tar.gz $ sudo mv redmine-4.2.3 /var/www/redmine切换到
/var/www/redmine目录。$ cd /var/www/redmine使用提供的示例文件创建 Redmine 配置文件。
$ cp config/configuration.yml.example config/configuration.yml
$ cp config/database.yml.example config/database.yml
$ cp public/dispatch.fcgi.example public/dispatch.fcgi
打开
database.yml文件进行编辑。$ nano config/database.yml在以下部分中查找并配置您的数据库设置。
production:
  adapter: mysql2
  database: redmine
  host: localhost
  username: redmine
  password: "Your_password2"
  # Use "utf8" instead of "utfmb4" for MySQL prior to 5.7.7
  encoding: utf8mb4
通过按 Ctrl + X 并在出现提示时输入 Y 来保存文件。
安装用于管理 ruby gem 依赖项的捆绑器。
$ gem install bundler设置安装 gem 依赖项的环境。
$ bundle config set --local without 'development test'安装 gem 依赖项。
$ bundle install如果您遇到 gem 版本的任何问题,请使用以下命令进行恢复。
$ sudo gem pristine --all生成随机密钥以防止篡改用于存储会话数据的 cookie。
$ bundle exec rake generate_secret_token创建数据库结构。
$ RAILS_ENV=production bundle exec rake db:migrate将数据插入 MySQL 数据库。
$ RAILS_ENV=production REDMINE_LANG=en bundle exec rake redmine:load_default_data创建必要的目录并设置文件权限。
$ mkdir -p tmp/pdf
$ mkdir -p public/plugin_assets
$ chown -R $USER:$USER files log tmp public/plugin_assets
$ chmod -R 755 /var/www/remine/
运行以下命令以启动 Rails 服务器实例。
$ bundle exec rails server webrick -e production
=> Booting WEBrick
=> Rails 5.2.6 application starting in production on http://0.0.0.0:3000
=> Run `rails server -h` for more startup options
[2022-01-03 12:58:19] INFO  WEBrick 1.6.1
[2022-01-03 12:58:19] INFO  ruby 2.7.4 (2021-07-07) [x86_64-linux]
[2022-01-03 12:58:19] INFO  WEBrick::HTTPServer#start: pid=117224 port=3000
打开 URL
http://获取 Redmine 登录屏幕。:3000/login 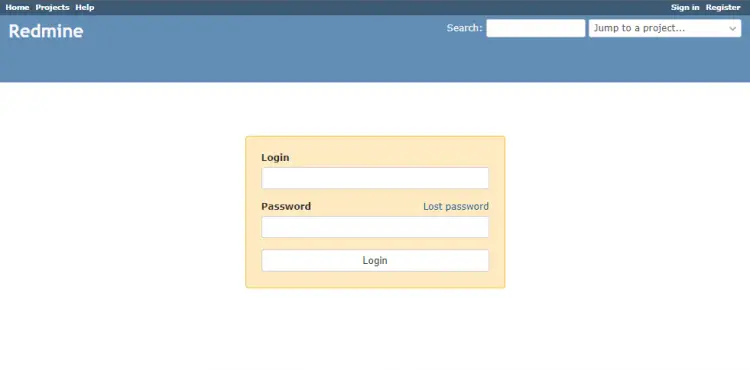
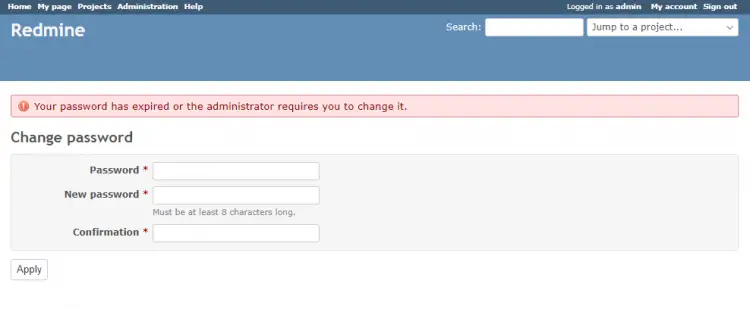
输入默认凭据 (admin/admin) 以登录。您将被要求更改密码。
接下来,您将被重定向到“我的帐户”页面。
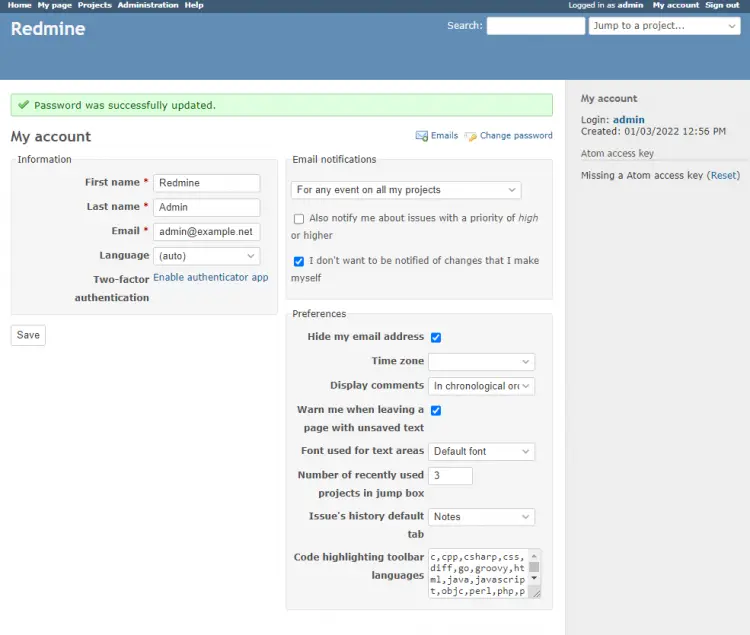
Redmine 已经安装成功。
接下来,在终端上按 CTRL+C 停止服务器。
第 7 步 - 安装 Phusion Passenger
Phusion Passenger 是一个 ruby 应用程序服务器,它允许我们通过第三方服务器为 Redmine 提供服务。在我们的例子中,我们将使用 Apache。
安装乘客。
$ gem install passenger为 Apache 服务器安装 Passenger 模块。
$ passenger-install-apache2-module您将收到一条欢迎消息。按 Enter 键继续。
Welcome to the Phusion Passenger Apache 2 module installer, v6.0.12.

This installer will guide you through the entire installation process. It
shouldn't take more than 3 minutes in total.

Here's what you can expect from the installation process:

 1. The Apache 2 module will be installed for you.
 2. You'll learn how to configure Apache.
 3. You'll learn how to deploy a Ruby on Rails application.

Don't worry if anything goes wrong. This installer will advise you on how to
solve any problems.

Press Enter to continue, or Ctrl-C to abort.


--------------------------------------------
接下来,系统会询问您的语言。默认选择 Ruby,因此只需按 Enter 继续。
Which languages are you interested in?

Use <space> to select.
If the menu doesn't display correctly, press '!'

 ? ?  Ruby
   ?  Python
   ?  Node.js
   ?  Meteor

--------------------------------------------
您可能会收到有关文件权限的警告。如果您一直在学习我们的教程,只需按 Enter 继续。
Warning: some directories may be inaccessible by the web server!

The web server typically runs under a separate user account for security
reasons. That user must be able to access the Phusion Passenger(R) files.
However, it appears that some directories have too strict permissions. This
may prevent the web server user from accessing Phusion Passenger(R) files.

It is recommended that you relax permissions as follows:

  sudo chmod o+x "/home/navjot"

Press Ctrl-C to return to the shell. (Recommended)
After relaxing permissions, re-run this installer.
  -OR-
Press Enter to continue anyway.
整个过程大约需要 10-15 分钟才能完成。如果您收到如下错误,很可能是因为 RAM 不足。您应该增加服务器上的 RAM 或安装交换空间。
c++: fatal error: Killed signal terminated program cc1plus
compilation terminated.
rake aborted!
该过程完成后,您将收到以下消息。
--------------------------------------------
Almost there!

Please edit your Apache configuration file, and add these lines:

   LoadModule passenger_module /home/navjot/.gem/ruby/gems/passenger-6.0.12/buildout/apache2/mod_passenger.so
   <IfModule mod_passenger.c>
     PassengerRoot /home/navjot/.gem/ruby/gems/passenger-6.0.12
     PassengerDefaultRuby /usr/bin/ruby
   </IfModule>

After you restart Apache, you are ready to deploy any number of web
applications on Apache, with a minimum amount of configuration!

Press ENTER when you are done editing.
不要按 Enter 键。以当前用户身份在服务器上打开一个新会话并执行以下配置。
配置 Apache 服务器
为 Phusion Passenger 创建 Apache 模块配置文件。
$ sudo nano /etc/httpd/conf.modules.d/00-passenger.conf粘贴您在乘客安装结束时获得的代码。
 LoadModule passenger_module /home/navjot/.gem/ruby/gems/passenger-6.0.12/buildout/apache2/mod_passenger.so
   <IfModule mod_passenger.c>
     PassengerRoot /home/username/.gem/ruby/gems/passenger-6.0.12
     PassengerDefaultRuby /usr/bin/ruby
   </IfModule>
通过按 Ctrl + X 并在出现提示时输入 Y 来保存文件。
为 Redmine 站点创建另一个 Apache 配置文件。
$ sudo nano /etc/httpd/conf.d/redmine.conf将以下代码粘贴到其中。
Listen 3000
<IfModule mod_passenger.c>
  PassengerRoot /home/username/.gem/ruby/gems/passenger-6.0.12
  PassengerDefaultRuby /usr/bin/ruby
</IfModule>
<VirtualHost *:3000>
    ServerName redmine.example.com
    DocumentRoot "/var/www/redmine/public"

    CustomLog logs/redmine_access.log combined
    ErrorLog logs/redmine_error_log
    LogLevel warn

    <Directory "/var/www/redmine/public">
        Options Indexes ExecCGI FollowSymLinks
        Require all granted
        AllowOverride all
    </Directory>
</VirtualHost>
通过按 Ctrl + X 并在出现提示时输入 Y 来保存文件。
打开主 Apache 配置文件
/etc/httpd/conf/httpd.conf进行编辑。$ sudo nano /etc/httpd/conf/httpd.conf找到变量
ServerName并通过删除其前面的井号 (#) 并将其值设置为以下内容来取消注释。ServerName localhost通过按 Ctrl + X 并在出现提示时输入 Y 来保存文件。
验证您的 Apache 配置。
$ httpd -t
Syntax OK
返回并按 Enter 继续您的 Passenger 安装。它将执行一些检查,成功完成后您应该会看到以下消息。
Deploying a web application

To learn how to deploy a web app on Passenger, please follow the deployment
guide:

  https://www.phusionpassenger.com/library/deploy/apache/deploy/

Enjoy Phusion Passenger, a product of Phusion® (www.phusion.nl) :-)
https://www.phusionpassenger.com

Passenger® is a registered trademark of Phusion Holding B.V.
重新启动 Apache 服务器。
$ sudo systemctl restart httpd您的网站应该位于
http://redmine.example.com:3000。这不是访问 Redmine 的完美方式。它仍然通过不安全的 HTTP 协议提供服务并使用端口号。我们将安装 Nginx 作为反向代理,并使用 HTTPS 协议为 Redmine 服务以改进这一点。在进行 Nginx 安装和配置之前,我们需要设置 SSL 证书。
第 8 步 - 安装 SSL
要使用 Lets Encrypt 安装 SSL 证书,我们需要安装 Certbot 工具。运行以下命令来安装 Certbot。
$ sudo dnf install certbot停止 Apache 服务器。
$ sudo systemctl stop httpd生成 SSL 证书。
$ sudo certbot certonly --standalone --agree-tos --no-eff-email --staple-ocsp --preferred-challenges http -m -d redmine.example.com上面的命令会将证书下载到服务器上的
/etc/letsencrypt/live/redmine.example.com目录。启动 Apache 服务器。
$ sudo systemctl start httpd生成 Diffie-Hellman 组证书。
$ sudo openssl dhparam -out /etc/ssl/certs/dhparam.pem 2048为 Lets Encrypt 自动更新创建一个挑战 webroot 目录。
$ sudo mkdir -p /var/lib/letsencrypt创建 Cron 作业以更新 SSL。它将每天运行以检查证书并在需要时更新。为此,首先,创建文件
/etc/cron.daily/certbot-renew并打开它进行编辑。$ sudo nano /etc/cron.daily/certbot-renew粘贴以下代码。
#!/bin/sh
certbot renew --cert-name redmine.example.com --webroot -w /var/lib/letsencrypt/ --post-hook "systemctl restart nginx"
通过按 Ctrl + X 并在出现提示时输入 Y 来保存文件。
更改任务文件的权限以使其可执行。
$ sudo chmod +x /etc/cron.daily/certbot-renew第 9 步 - 安装 Nginx 并将其配置为反向代理
Rocky Linux 8 附带四个不同版本的 Nginx——1.14、1.16、1.18 和 1.20。
列出所有可用的 Nginx 模块。
$ dnf module list nginx
Last metadata expiration check: 20:23:20 ago on Mon 03 Jan 2022 12:38:07 PM UTC.
Rocky Linux 8 - AppStream
Name                      Stream                       Profiles                      Summary
nginx                     1.14 [d]                     common [d]                    nginx webserver
nginx                     1.16                         common [d]                    nginx webserver
nginx                     1.18                         common [d]                    nginx webserver
nginx                     1.20                         common [d]                    nginx webserver

Extra Packages for Enterprise Linux Modular 8 - x86_64
Name                      Stream                       Profiles                      Summary
nginx                     mainline                     common                        nginx webserver
nginx                     1.20                         common [d]                    nginx webserver

Hint: [d]efault, [e]nabled, [x]disabled, [i]nstalled
重置其他版本并启用1.20版本的Nginx。
$ sudo dnf module reset nginx
$ sudo dnf module enable nginx:1.20
安装 Nginx。我们暂时禁用
Epel存储库,因为我们想从 Appstream 获取 Nginx。$ sudo dnf install nginx --disablerepo=epel-modular验证安装。
$ nginx -v
nginx version: nginx/1.20.0
为避免与 Nginx 发生任何冲突,我们需要更改 Apache 正在侦听的默认端口。
更改 Apache 监听端口
打开文件
/etc/httpd/conf/httpd.conf进行编辑。$ sudo nano /etc/httpd/conf/httpd.conf将端口从 80 更改为 8080,如下所示。
Listen 8080通过按 Ctrl + X 并在出现提示时输入 Y 来保存文件。
重新启动阿帕奇。
$ sudo systemctl restart httpd配置 Nginx
创建并打开文件
/etc/nginx/conf.d/redmine.conf进行编辑。$ sudo nano /etc/nginx/conf.d/redmine.conf将以下代码粘贴到其中。
# Redirect all non-encrypted to encrypted
server {
    listen 80;
    server_name redmine.example.com;
    return 301 https://$host$request_uri;
}

server {
    listen 443 ssl http2;

    server_name redmine.example.com;

    ssl_certificate     /etc/letsencrypt/live/redmine.example.com/fullchain.pem;
    ssl_certificate_key /etc/letsencrypt/live/redmine.example.com/privkey.pem;
	ssl_trusted_certificate /etc/letsencrypt/live/redmine.example.com/chain.pem;

	ssl_session_timeout  5m;
    ssl_session_cache shared:MozSSL:10m;
    ssl_session_tickets off;

    ssl_protocols TLSv1.2 TLSv1.3;
    ssl_prefer_server_ciphers on;
    ssl_ciphers ECDHE-ECDSA-AES128-GCM-SHA256:ECDHE-RSA-AES128-GCM-SHA256:ECDHE-ECDSA-AES256-GCM-SHA384:ECDHE-RSA-AES256-GCM-SHA384:ECDHE-ECDSA-CHACHA20-POLY1305:ECDHE-RSA-CHACHA20-POLY1305:DHE-RSA-AES128-GCM-SHA256:DHE-RSA-AES256-GCM-SHA384;
    ssl_ecdh_curve X25519:prime256v1:secp384r1:secp521r1;
    ssl_stapling on;
    ssl_stapling_verify on;
    ssl_dhparam /etc/ssl/certs/dhparam.pem;
    resolver 8.8.8.8;

    access_log /var/log/nginx/redmine.example.com.access.log main;
    error_log  /var/log/nginx/redmine.example.com.error.log;

	location / {
        proxy_pass          http://localhost:3000;
        proxy_redirect      off;
        proxy_buffering     off;
        proxy_set_header    Host $host;
        proxy_set_header    X-Real-IP $remote_addr;
        proxy_set_header    X-Forwarded-For $proxy_add_x_forwarded_for;
    }
}
完成后按 Ctrl + X 并在出现提示时输入 Y 来保存文件。
打开文件
/etc/nginx/nginx.conf进行编辑。$ sudo nano /etc/nginx/nginx.conf在行
include /etc/nginx/conf.d/*.conf;之前添加以下行。server_names_hash_bucket_size 64;通过按 Ctrl + X 并在出现提示时输入 Y 来保存文件。
验证 Nginx 配置文件语法。
$ sudo nginx -t
nginx: the configuration file /etc/nginx/nginx.conf syntax is ok
nginx: configuration file /etc/nginx/nginx.conf test is successful
启动 Nginx 服务以启用新配置。
$ sudo systemctl start nginx您的 Redmine 应用程序应该可以在
https://redmine.example.com上访问。结论
我们的教程到此结束,您在其中学习了如何在基于 Rocky Linux 8 的服务器上安装 Redmine 项目管理器。您还学习了使用 HTTPS 协议通过 Nginx 为 Redmine 应用程序提供服务。如果您有任何问题,请在下面的评论中发表。