如何在 CentOS 7 上使用 Nginx 和 MariaDB 安装 OwnCloud 8
本教程适用于这些操作系统版本
- CentOS 7.3
- CentOS 7
在此页
- 先决条件
- 待办事项
- 禁用 SELinux 并配置 firewalld
- 安装和配置 LEMP
- 第 1 步 - 启用 epel-repository
- 第 1 步 - 创建数据库和用户
- 第 2 步 - 创建 SSL 证书
- 为 OwnCloud 配置虚拟主机
OwnCloud 是一种用于数据同步和文件共享的服务器软件,具有易于使用的基于 Web 的前端,可在开源许可下使用。 Owncloud 可以安装在 Linux 或 Windows 网络服务器上,易于配置并具有全面的在线文档。本机客户端适用于 Windows、MacOS 和 Linux(桌面应用程序)。还有适用于 Android 和 iOS 的移动应用程序。
本教程介绍了在 CentOS 7 上使用 nginx 网络服务器和 MariaDB 数据库安装 Owncloud 8。
截至今天的最新版本是 OwnCloud 8.0。
先决条件
- CentOS 7
去做
这些是我们将在本教程中执行的步骤:
- 禁用 SELinux 并配置 firewalld。
- 安装和配置 Nginx、MariaDB、php-fpm。
- 创建数据库并配置 SSL。
- 安装 OwnCloud。
- 为 OwnCloud 配置虚拟主机。
- 在浏览器中测试 OwnCloud。
禁用 SELinux 并配置 firewalld
要禁用 SELinux,请编辑文件 /etc/sysconfig/selinux,并将 enforced 更改为 disabled。
vim /etc/sysconfig/selinux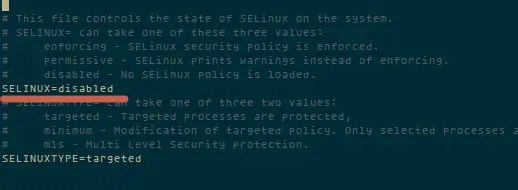
运行这些命令在firewalld中打开端口80/http和443/https,以便我们稍后可以通过http和https访问OwnCloud接口。
firewall-cmd --permanent --add-service=http
 firewall-cmd --permanent --add-service=https
 firewall-cmd --reload
安装和配置 LEMP
这些是设置基本 LEMP(Linux - Nginx - MariaDB - PHP)服务器以运行 OwnCloud 的步骤。
第 1 步 - 启用 epel-repository
要安装 LEMP(Linux、Nginx、MariaDB 和 PHP),您必须启用 epel-repository。
yum -y install epel-release第 2 步 - 安装 Nginx、MariaDB 和 php-fpm
sudo rpm -Uvh http://nginx.org/packages/centos/7/noarch/RPMS/nginx-release-centos-7-0.el7.ngx.noarch.rpm
 yum -y install nginx mariadb mariadb-server php-fpm php-cli php-gd php-mcrypt php-mysql php-pear php-xml bzip2 vim
第 3 步 - 启动和配置 MariaDB
systemctl start mariadb
 mysql_secure_installation
第一次只需按 Enter。
Change the root password? [Y/n] Y
Remove anonymous users? [Y/n] Y
Disallow root login remotely? [Y/n] Y
Remove test database and access to it? [Y/n] Y
Reload privilege tables now? [Y/n] Y
第 4 步 - 配置 php-fpm
编辑文件 /etc/php-fpm.d/www.conf。
vim /etc/php-fpm.d/www.conf确保线路 listen 是:
listen = 127.0.0.1:9000并编辑用户组的行:
user = nginx
group = nginx
为会话路径创建目录。
mkdir -p /var/lib/php/session
 chown nginx:nginx -R /var/lib/php/session/
启动 php-fpm。
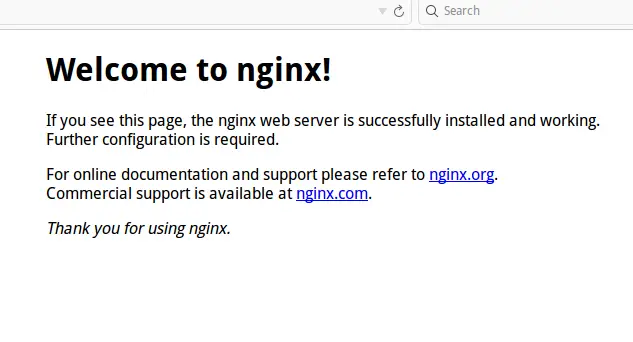
systemctl start php-fpm第 5 步 - 启动 nginx
systemctl start nginx在这一步你可以访问你的网络服务器http://192.168.1.101/。
创建数据库并配置 SSL
第 1 步 - 创建数据库和用户
使用 mysql 命令行客户端登录 MariaDB:
mysql -u root -p创建数据库:
create database owncloud_db;添加用户:
create user identified by 'ownclouduser';授予用户对数据库的权限
grant all privileges on owncloud_db.* to  identified by 'ownclouduser';
 flush privileges;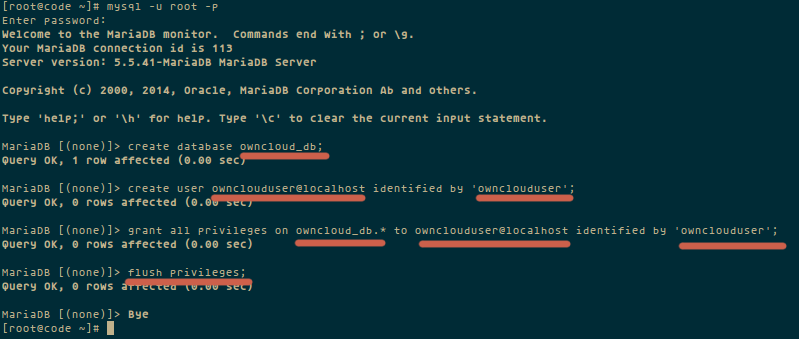
第 2 步 - 创建 SSL 证书
mkdir -p /etc/nginx/cert/
 cd /etc/nginx/cert/
 openssl req -new -x509 -days 365 -nodes -out /etc/nginx/cert/owncloud.crt -keyout /etc/nginx/cert/owncloud.key
该命令将在目录 /etc/nginx/cert/ 中生成一个 owncloud.crt 和 owncloud.key。
更改权限证书文件。
chmod 600 owncloud.crt
 chmod 600 owncloud.key
安装 OwnCloud
使用 wget 下载应用程序源。
yum -y install wget
 cd /tmp/
 wget https://download.owncloud.org/community/owncloud-8.0.0.tar.bz2
提取 owncloud 目录并将其移动到 /usr/share/nginx/html。
tar -xjvf owncloud-8.0.0.tar.bz2
 mv owncloud/ /usr/share/nginx/html/
将 owncloud 目录的所有者更改为 nginx。
cd /usr/share/nginx/html/
 chown nginx:nginx -R owncloud/
在 owncloud 目录上创建名为 data 的目录,并将所有者更改为 nginx。
mkdir -p owncloud/data/
 chown nginx:nginx -R owncloud/data/
为 OwnCloud 配置虚拟主机
最后一步是为 owncloud 配置虚拟主机。
cd /etc/nginx/conf.d/
 mv default.conf default
将 owncloud 配置添加到 /etc/nginx/conf.d/
vim owncloud.conf粘贴配置如下:
upstream php-handler {
    server 127.0.0.1:9000;
    #server unix:/var/run/php5-fpm.sock;
}

server {
        listen 80;
        server_name 192.168.1.101; #YourIP or domain
        return 301 https://$server_name$request_uri;  # redirect all to use ssl
}


server {
        listen 443 ssl;
        server_name 192.168.1.101; #YourIP or domain

        #SSL Certificate you created
        ssl_certificate /etc/nginx/cert/owncloud.crt;
        ssl_certificate_key /etc/nginx/cert/owncloud.key;

        # owncloud path
        root /usr/share/nginx/html/owncloud/;

        client_max_body_size 10G; # set max upload size
        fastcgi_buffers 64 4K;

        rewrite ^/caldav(.*)$ /remote.php/caldav$1 redirect;
        rewrite ^/carddav(.*)$ /remote.php/carddav$1 redirect;
        rewrite ^/webdav(.*)$ /remote.php/webdav$1 redirect;

        index index.php;
        error_page 403 /core/templates/403.php;
        error_page 404 /core/templates/404.php;

        location = /robots.txt {
            allow all;
            log_not_found off;
            access_log off;
        }

        location ~ ^/(data|config|\.ht|db_structure\.xml|README) {
                deny all;
        }

        location / {
                # The following 2 rules are only needed with webfinger
                rewrite ^/.well-known/host-meta /public.php?service=host-meta last;
                rewrite ^/.well-known/host-meta.json /public.php?service=host-meta-json last;

                rewrite ^/.well-known/carddav /remote.php/carddav/ redirect;
                rewrite ^/.well-known/caldav /remote.php/caldav/ redirect;

                rewrite ^(/core/doc/[^\/]+/)$ $1/index.html;

                try_files $uri $uri/ index.php;
        }

        location ~ ^(.+?\.php)(/.*)?$ {
                try_files $1 = 404;

                include fastcgi_params;
                fastcgi_param SCRIPT_FILENAME $document_root$1;
                fastcgi_param PATH_INFO $2;
                fastcgi_param HTTPS on;
                fastcgi_pass php-handler;
        }

        # Optional: set long EXPIRES header on static assets
        location ~* ^.+\.(jpg|jpeg|gif|bmp|ico|png|css|js|swf)$ {
                expires 30d;
                # Optional: Don't log access to assets
                access_log off;
        }

}
然后重新启动 LEMP 堆栈:
systemctl restart nginx mariadb php-fpm现在将 LEMP 服务配置为开机启动。
systemctl enable nginx
 systemctl enable php-fpm
 systemctl enable mariadb
然后重启你的服务器:
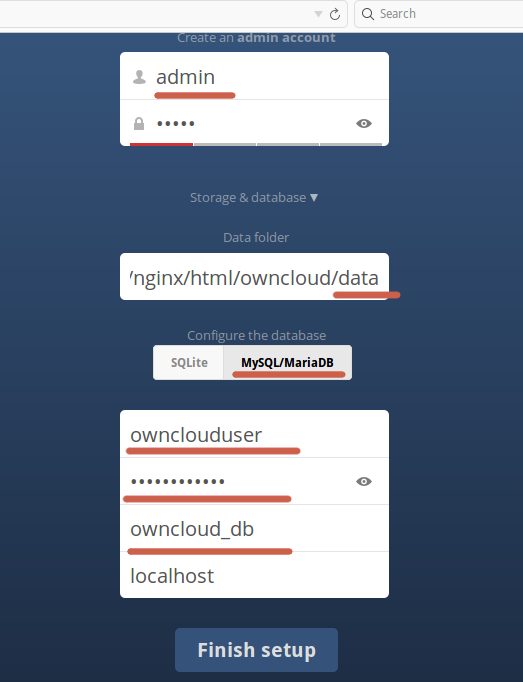
reboot测试自己的云
创建管理员帐户并填写所有数据库(用户名、密码、数据库名),然后单击完成设置。
结论
OwnCloud 是当今私有云的正确解决方案。易于使用和配置,并具有易于使用和安装的用户友好界面。 Owncloud 快速、稳定且具有许多功能。
链接
- 自有云
- 中央操作系统
- Nginx
- MariaDB
- PHP