如何在 Ubuntu 22.04 上使用 Docker 安装 Drupal
在此页
- 先决条件
- 第 1 步 - 配置防火墙
- 第 2 步 - 安装 Docker 和 Docker Compose
- 第 3 步 - 为 Drupal 创建 Docker Compose 文件
- MySQL Docker 服务
- Drupal 服务
- Nginx 服务
- Certbot 服务
Drupal 是一个用 PHP 编写的开源内容管理系统 (CMS)。世界各地的许多组织都使用它来创建博客、政府网站、公司网站等。它带有越来越多的功能和模块来扩展其功能,允许您创建任何您想要的网站。
本教程将教您如何在 Ubuntu 22.04 服务器上使用 Docker 安装 Drupal。 Drupal 适用于 PHP 8.2 和 MySQL。从版本 9 开始它也支持 PostgreSQL,但存在一些错误。因此,我们将坚持在教程中使用 MySQL。我们将使用 Docker Compose 将 Drupal 与 Nginx 和 Certbot 工具集成,以在安全的 HTTPS 协议上为站点 Drupal 网站提供服务。
先决条件
-
A server running Ubuntu 22.04 with a minimum of 1GB of RAM for smaller communities. To host larger communities, you should get a server with a minimum of 2GB of RAM or more.
-
A non-root user with sudo privileges.
-
A fully qualified domain name (FQDN) pointing to your server. For our purposes, we will use
example.comas the domain name. -
Make sure everything is updated.
$ sudo apt update -
Install basic utility packages. Some of them may already be installed.
$ sudo apt install wget curl nano software-properties-common dirmngr apt-transport-https gnupg gnupg2 ca-certificates lsb-release ubuntu-keyring unzip -y
第 1 步 - 配置防火墙
第一步是配置防火墙。 Ubuntu 默认带有 ufw (Uncomplicated Firewall)。
检查防火墙是否正在运行。
$ sudo ufw status您应该得到以下输出。
Status: inactive允许 SSH 端口,以便防火墙在启用时不会中断当前连接。
$ sudo ufw allow OpenSSH也允许 HTTP 和 HTTPS 端口。
$ sudo ufw allow http
$ sudo ufw allow https
启用防火墙
$ sudo ufw enable
Command may disrupt existing ssh connections. Proceed with operation (y|n)? y
Firewall is active and enabled on system startup
再次检查防火墙的状态。
$ sudo ufw status您应该会看到类似的输出。
Status: active

To                         Action      From
--                         ------      ----
OpenSSH                    ALLOW       Anywhere
80/tcp                     ALLOW       Anywhere
443                        ALLOW       Anywhere
OpenSSH (v6)               ALLOW       Anywhere (v6)
80/tcp (v6)                ALLOW       Anywhere (v6)
443 (v6)                   ALLOW       Anywhere (v6)
第 2 步 - 安装 Docker 和 Docker Compose
Ubuntu 22.04 附带旧版本的 Docker。要安装最新版本,首先,导入 Docker GPG 密钥。
$ curl -fsSL https://download.docker.com/linux/ubuntu/gpg | sudo gpg --dearmor -o /etc/apt/keyrings/docker.gpg创建 Docker 存储库文件。
$ echo \
  "deb [arch=$(dpkg --print-architecture) signed-by=/etc/apt/keyrings/docker.gpg] https://download.docker.com/linux/ubuntu \
  $(lsb_release -cs) stable" | sudo tee /etc/apt/sources.list.d/docker.list > /dev/null
更新系统存储库列表。
$ sudo apt update安装最新版本的 Docker。
$ sudo apt install docker-ce docker-ce-cli containerd.io docker-compose-plugin确认它正在运行。
$ sudo systemctl status docker
? docker.service - Docker Application Container Engine
     Loaded: loaded (/lib/systemd/system/docker.service; enabled; vendor preset: enabled)
     Active: active (running) since Sat 2023-01-14 10:41:35 UTC; 2min 1s ago
TriggeredBy: ? docker.socket
       Docs: https://docs.docker.com
   Main PID: 2054 (dockerd)
      Tasks: 52
     Memory: 22.5M
        CPU: 248ms
     CGroup: /system.slice/docker.service
             ??  2054 /usr/bin/dockerd -H fd:// --containerd=/run/containerd/containerd.sock
默认情况下,Docker 需要 root 权限。如果您想避免每次运行
docker命令时都使用sudo,请将您的用户名添加到docker组。$ sudo usermod -aG docker $(whoami)您将需要注销服务器并以同一用户身份重新登录以启用此更改或使用以下命令。
$ su - ${USER}确认您的用户已添加到 Docker 组。
$ groups
navjot wheel docker
第 3 步 - 为 Drupal 创建 Docker Compose 文件
为 Drupal 创建目录。
$ mkdir ~/drupal切换到目录。
$ cd ~/drupal创建并打开
docker-compose.yml文件进行编辑。$ nano docker-compose.yml将以下代码粘贴到其中。
services:
  mysql:
    image: mysql:8.0
    container_name: mysql
    restart: unless-stopped
    env_file: .env
    volumes:
      - db-data:/var/lib/mysql
    networks:
      - internal

  drupal:
    image: drupal:10-fpm-alpine
    container_name: drupal
    depends_on:
      - mysql
    restart: unless-stopped
    networks:
      - internal
      - external
    volumes:
      - drupal-data:/var/www/html

  webserver:
    image: nginx:1.22.1-alpine
    container_name: webserver
    depends_on:
      - drupal
    restart: unless-stopped
    ports:
      - 80:80
    volumes:
      - drupal-data:/var/www/html
      - ./nginx-conf:/etc/nginx/conf.d
      - certbot-etc:/etc/letsencrypt
    networks:
      - external

  certbot:
    depends_on:
      - webserver
    image: certbot/certbot
    container_name: certbot
    volumes:
      - certbot-etc:/etc/letsencrypt
      - drupal-data:/var/www/html
    command: certonly --webroot --webroot-path=/var/www/html --email _domain --agree-tos --no-eff-email --staging -d example.com -d www.example.com

networks:
  external:
    driver: bridge
  internal:
    driver: bridge

volumes:
  drupal-data:
  db-data:
  certbot-etc:
通过按 Ctrl + X 并在出现提示时输入 Y 来保存文件。
让我们来看看上面文件中定义的每个服务。
MySQL Docker 服务
在这里,我们从 Docker 中心拉取最新的 mysql:8.0 镜像。我们使用的是 8.x 版本,而不是使用最新的标签。这样我们就可以坚持使用与 Drupal 一起工作的稳定且经过测试的 MySQL 版本。我们为容器设置了一个名称,可以与 Docker 命令一起使用来停止、启动和查看日志。除非手动停止,否则容器将继续运行。我们已经定义了一个
.env文件,我们将使用 MySQL 凭据填充该文件。我们还将命名卷db-data挂载到容器上的/var/lib/mysql目录。 MySQL 服务将使用内部网络连接 drupal。服务
我们正在使用 Drupal 10 Alpine 图像。 Alpine docker 图像尺寸较小。此图像还包含 PHP-FPM 来处理 PHP 处理。这将与 Nginx 一起为站点提供服务。
depends_on选项告诉 Drupal 连接 MySQL 服务。它还确保 Drupal 容器将始终在 MySQL 容器之后启动。 Drupal 使用内部网络与 MySQL 连接,使用外部网络将自己暴露给其他容器。我们还为 Drupal 创建了一个命名卷,以指向容器中的/var/www/html目录。Nginx服务
我们正在为 Nginx 使用 Alpine 镜像。它将端口 80 暴露给主机。我们使用两个命名卷,一个用于 Drupals 公共目录,另一个用于存储 Lets Encrypt SSL 证书。第三个卷是绑定挂载到我们稍后定义的主机上的Nginx配置目录。 Nginx 还连接到外部 Docker 网络,以便 Drupal 站点正常工作。
Certbot 服务
最后,我们拉取 Certbot 镜像来安装 SSL 证书。它与 Nginx 服务共享其卷以获取证书和 webroot 定义。我们还包括一个将在创建容器时运行的命令。这里的命令第一次使用
--staging标志来获取测试服务器。我们需要 nginx 来验证证书,但如果证书丢失,Nginx 将无法启动。这就是为什么我们要创建一个暂存证书,用它来启动 Nginx,然后创建真正的证书。第 4 步 - 创建 Nginx 配置
为 Nginx 配置创建目录。
$ mkdir nginx-conf为 Nginx 创建并打开文件。
$ nano nginx-conf/drupal.conf将以下代码粘贴到其中。
server {
    listen 80;
    listen [::]:80;

    server_name drupal.example.com;

    index index.php index.html index.htm;

    root /var/www/html;

    location ~ /.well-known/acme-challenge {
        allow all;
        root /var/www/html;
    }

    location / {
        try_files $uri $uri/ /index.php$is_args$args;
    }

    rewrite ^/core/authorize.php/core/authorize.php(.*)$ /core/authorize.php$1;

    location ~ \.php$ {
        try_files $uri =404;
        fastcgi_split_path_info ^(.+\.php)(/.+)$;
        fastcgi_pass drupal:9000;
        fastcgi_index index.php;
        include fastcgi_params;
        fastcgi_param SCRIPT_FILENAME $document_root$fastcgi_script_name;
        fastcgi_param PATH_INFO $fastcgi_path_info;
    }

    location ~ /\.ht {
        deny all;
    }

    location = /favicon.ico {
        log_not_found off; access_log off;
    }
    location = /robots.txt {
        log_not_found off; access_log off; allow all;
    }
    location ~* \.(css|gif|ico|jpeg|jpg|js|png)$ {
        expires max;
        log_not_found off;
    }
}
通过按 Ctrl + X 并在出现提示时输入 Y 来保存文件。
在此文件中,我们将添加一个服务器块,其中包含针对我们的服务器名称和文档根目录的指令,以及用于指示 Certbot 客户端对证书、PHP 处理和静态资产请求的请求的位置块。目前,Nginx 将仅侦听端口 80,以允许 Certbot 通过在 /var/www/html/.well-known/acme-challenge 中放置一个临时文件来请求暂存证书code> 目录来验证 DNS。这允许我们将 Certbot 与 webroot 插件一起使用。
第 5 步 - 生成 SSL 证书
要生成 SSL 证书,我们将启动我们的容器。正确的暂存证书将在 Nginx 容器的
/etc/letsencrypt/live文件夹中可用。$ docker compose up -d检查服务的状态。
$ docker compose ps
NAME                IMAGE                  COMMAND                  SERVICE             CREATED             STATUS                     PORTS
certbot             certbot/certbot        "certbot certonly --…"   certbot             6 minutes ago       Exited (1) 5 minutes ago
drupal              drupal:10-fpm-alpine   "docker-php-entrypoi…"   drupal              6 minutes ago       Up 6 minutes               9000/tcp
mysql               mysql:8.0              "docker-entrypoint.s…"   mysql               6 minutes ago       Up 6 minutes               3306/tcp, 33060/tcp
webserver           nginx:1.22.1-alpine    "/docker-entrypoint.…"   webserver           6 minutes ago       Up 6 minutes               0.0.0.0:80->80/tcp, :::80->80/tcp
Certbot 容器在生成证书后成功退出。检查证书在 Nginx 容器中的位置。
$ docker compose exec webserver ls -la /etc/letsencrypt/live您将获得以下输出。
total 16
drwx------    3 root     root          4096 Jan 17 09:15 .
drwxr-xr-x    9 root     root          4096 Jan 17 09:15 ..
-rw-r--r--    1 root     root           740 Jan 17 09:15 README
drwxr-xr-x    2 root     root          4096 Jan 17 09:15 drupal.example.com
这证实一切成功。下一步是生成实际的证书。
打开
docker-compose.yml文件进行编辑。$ nano docker-compose.yml将 Certbot 服务部分中的
--staging标志替换为--force-renewal标志。这会告诉 Certbot 为您的域申请新证书。使用更新标志是因为它将用于从这里更新证书。certbot: depends_on: - webserver image: certbot/certbot container_name: certbot volumes: - certbot-etc:/etc/letsencrypt - drupal-data:/var/www/html command: certonly --webroot --webroot-path=/var/www/html --email --agree-tos --no-eff-email --staple-ocsp --force-renewal -d drupal.example.com通过按 Ctrl + X 并在出现提示时输入 Y 来保存文件。
再次运行
docker compose up命令重新创建 Certbot 容器。--no-deps标志告诉 Certbot 跳过启动webserver容器,因为它已经在运行。$ docker compose up --force-recreate --no-deps certbot您将获得以下输出。
[+] Running 1/0
 ? Container certbot  Recreated                                                                                                                                                                             0.1s
Attaching to certbot
certbot  | Saving debug log to /var/log/letsencrypt/letsencrypt.log
certbot  | Account registered.
certbot  | Renewing an existing certificate for drupal.example.com
certbot  |
certbot  | Successfully received certificate.
certbot  | Certificate is saved at: /etc/letsencrypt/live/drupal.example.com/fullchain.pem
certbot  | Key is saved at:         /etc/letsencrypt/live/drupal.example.com/privkey.pem
certbot  | This certificate expires on 2023-04-17.
certbot  | These files will be updated when the certificate renews.
certbot  | NEXT STEPS:
certbot  | - The certificate will need to be renewed before it expires. Certbot can automatically renew the certificate in the background, but you may need to take steps to enable that functionality. See https://certbot.org/renewal-setup for instructions.
certbot  |
certbot  | - - - - - - - - - - - - - - - - - - - - - - - - - - - - - - - - - - - - - - - -
certbot  | If you like Certbot, please consider supporting our work by:
certbot  |  * Donating to ISRG / Let's Encrypt:   https://letsencrypt.org/donate
certbot  |  * Donating to EFF:                    https://eff.org/donate-le
certbot  | - - - - - - - - - - - - - - - - - - - - - - - - - - - - - - - - - - - - - - - -
certbot exited with code 0
第 6 步 - 为 SSL 配置 Nginx
现在我们的证书已经生效,我们需要配置 Nginx 来为它们提供服务并将 HTTP 请求重定向到 HTTPS。
停止 Nginx 服务器。
$ docker stop webserver为 SSL 配置创建一个新的 Nginx 文件并打开它进行编辑。
$ nano nginx-conf/drupal-ssl.conf将以下代码粘贴到其中。
server {
    listen 80;
    listen [::]:80;

    server_name drupal.example.com;

    location ~ /.well-known/acme-challenge {
        allow all;
        root /var/www/html;
    }

    location / {
        rewrite ^ https://$host$request_uri? permanent;
    }
}
server {
    listen 443 ssl http2;
    listen [::]:443 ssl http2;
    server_name drupal.example.com;

    index index.php index.html index.htm;

    root /var/www/html;

    server_tokens off;

    ssl_certificate /etc/letsencrypt/live/drupal.example.com/fullchain.pem;
    ssl_certificate_key /etc/letsencrypt/live/drupal.example.com/privkey.pem;
    ssl_trusted_certificate /etc/letsencrypt/live/drupal.example.com/chain.pem;
    ssl_session_timeout 1d;
    ssl_session_cache shared:SSL:10m;
    ssl_session_tickets off;
    ssl_protocols TLSv1.2 TLSv1.3;
    ssl_ciphers ECDHE-ECDSA-AES128-GCM-SHA256:ECDHE-RSA-AES128-GCM-SHA256:ECDHE-ECDSA-AES256-GCM-SHA384:ECDHE-RSA-AES256-GCM-SHA384:ECDHE-ECDSA-CHACHA20-POLY1305:ECDHE-RSA-CHACHA20-POLY1305:DHE-RSA-AES128-GCM-SHA256:DHE-RSA-AES256-GCM-SHA384;
    ssl_prefer_server_ciphers off;
    ssl_ecdh_curve secp384r1;
    ssl_dhparam /etc/ssl/certs/dhparam.pem;

    # OCSP stapling
    ssl_stapling on;
    ssl_stapling_verify on;
    resolver 8.8.8.8 8.8.4.4 valid=300s;
    resolver_timeout 5s;

    add_header X-Frame-Options "SAMEORIGIN" always;
    add_header X-XSS-Protection "1; mode=block" always;
    add_header X-Content-Type-Options "nosniff" always;
    add_header Referrer-Policy "no-referrer-when-downgrade" always;
    add_header Content-Security-Policy "default-src * data: 'unsafe-eval' 'unsafe-inline'" always;

    location / {
        try_files $uri $uri/ /index.php$is_args$args;
    }

    rewrite ^/core/authorize.php/core/authorize.php(.*)$ /core/authorize.php$1;

    location ~ \.php$ {
        try_files $uri =404;
        fastcgi_split_path_info ^(.+\.php)(/.+)$;
        fastcgi_pass drupal:9000;
        fastcgi_index index.php;
        include fastcgi_params;
        fastcgi_param SCRIPT_FILENAME $document_root$fastcgi_script_name;
        fastcgi_param PATH_INFO $fastcgi_path_info;
    }

    location ~ /\.ht {
        deny all;
    }

    location = /favicon.ico {
        log_not_found off; access_log off;
    }
    location = /robots.txt {
        log_not_found off; access_log off; allow all;
    }
    location ~* \.(css|gif|ico|jpeg|jpg|js|png)$ {
        expires max;
        log_not_found off;
    }
}
通过按 Ctrl + X 并在出现提示时输入 Y 来保存文件。
HTTP 块指定 Certbots webroot 插件的位置,并将任何 HTTP 请求重定向到 HTTPS。
下一步是确保 Nginx 容器监听端口 443。打开
docker-compose.yml文件进行编辑。$ nano docker-compose.yml在文件的 Nginx 部分中,进行更改以公开 443 并启用 SSL,如下所示。
  webserver:
    image: nginx:1.22.1-alpine
    container_name: webserver
    depends_on:
      - drupal
    restart: unless-stopped
    ports:
      - 80:80
      - 443:443
    volumes:
      - drupal-data:/var/www/html
      - ./nginx-conf:/etc/nginx/conf.d
      - certbot-etc:/etc/letsencrypt
      - /etc/ssl/certs/dhparam.pem:/etc/ssl/certs/dhparam.pem
    networks:
      - external
通过按 Ctrl + X 并在出现提示时输入 Y 来保存文件。
现在我们已经为 Nginx 启用并添加了 SSL 配置,您可以删除旧的 HTTP 配置文件。
$ rm nginx-conf/drupal.conf在重启 Nginx 之前,我们需要生成一个我们已经在上面配置的 Diffie-Hellman 组证书。
$ sudo openssl dhparam -dsaparam -out /etc/ssl/certs/dhparam.pem 4096重新创建 Nginx 容器。
$ docker compose up -d --force-recreate --no-deps webserver检查容器的状态。
$ docker compose ps
NAME                IMAGE                  COMMAND                  SERVICE             CREATED             STATUS                   PORTS
certbot             certbot/certbot        "certbot certonly --…"   certbot             3 hours ago         Exited (0) 3 hours ago
drupal              drupal:10-fpm-alpine   "docker-php-entrypoi…"   drupal              3 hours ago         Up 3 hours               9000/tcp
mysql               mysql:8.0              "docker-entrypoint.s…"   mysql               3 hours ago         Up 3 hours               3306/tcp, 33060/tcp
webserver           nginx:1.22.1-alpine    "/docker-entrypoint.…"   webserver           15 seconds ago      Up 13 seconds            0.0.0.0:80->80/tcp, :::80->80/tcp, 0.0.0.0:443->443/tcp, :::443->443/tcp
第 7 步 - 启动 Drupal Web 安装程序
是时候启动 Drupal Web 安装程序了。在浏览器中打开 URL
https://drupal.example.com,您将看到以下屏幕。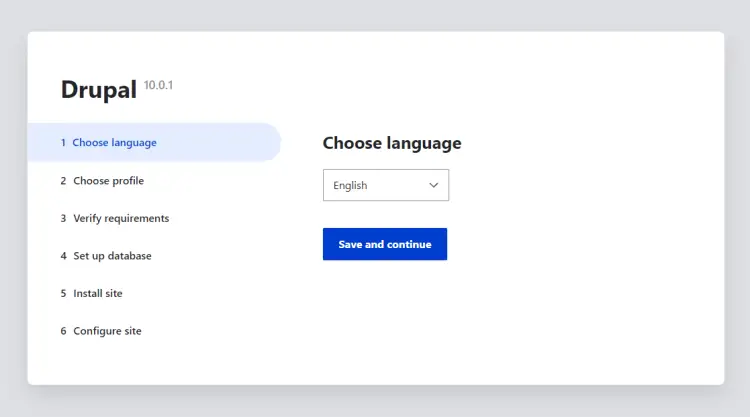
单击 Save and continue 按钮进入 Installation profile 页面。
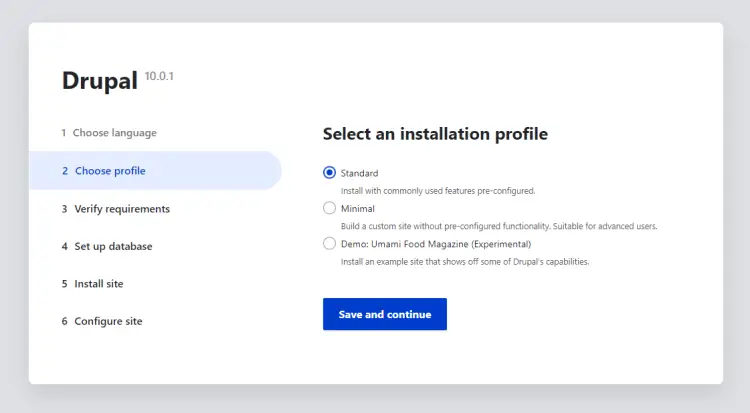
我们将坚持使用标准配置文件。单击“保存并继续”按钮进入数据库配置页面。
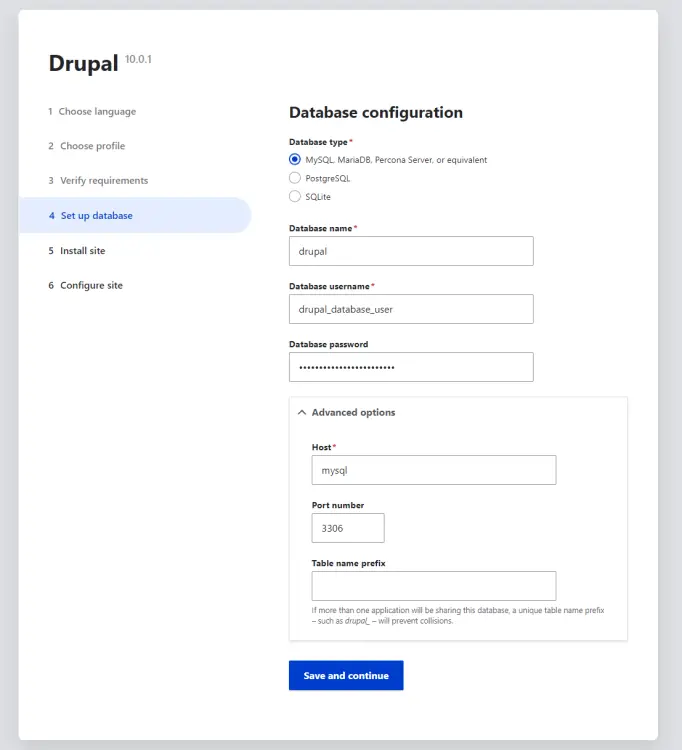
填写我们在环境文件中使用的数据库凭据,展开高级选项部分,然后输入
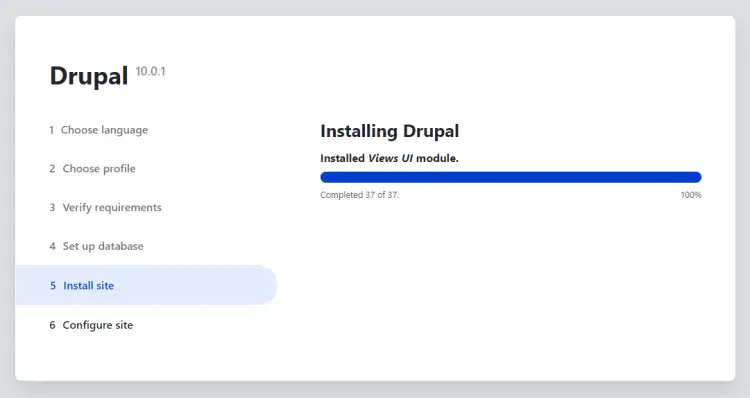
mysql作为数据库主机。这与 Drupal 需要连接的 Docker 组合文件中的 MySQL 服务名称相匹配。单击保存并继续按钮继续。 Drupal 将开始安装默认模块和主题。
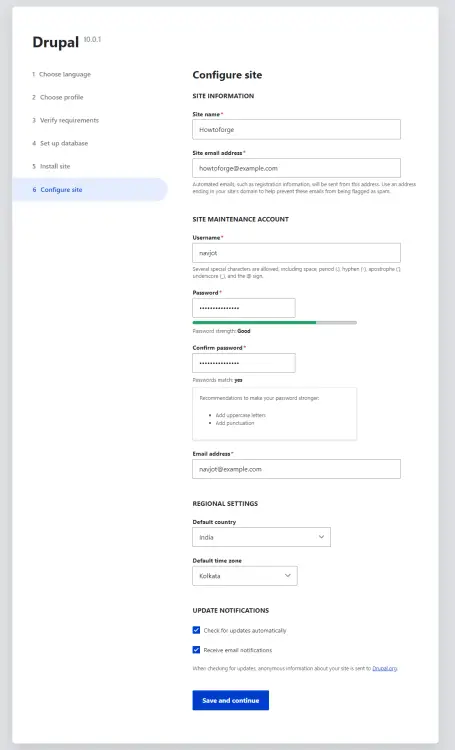
接下来,您将被带到 Drupal 配置页面。填写站点名称、电子邮件、用户名、密码和区域设置。完成后单击保存并继续按钮。
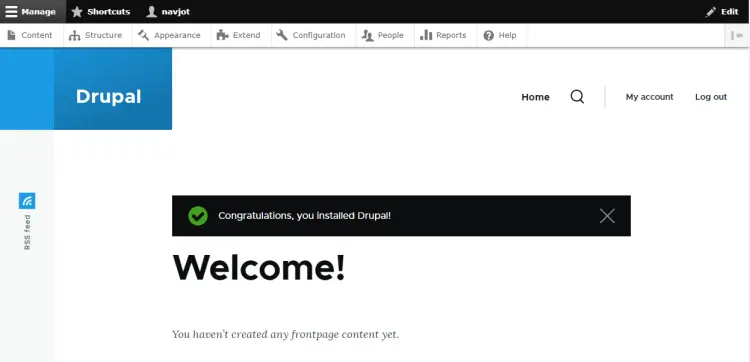
最后,您将被带到 Drupal 仪表板。您可以开始使用 Drupal 来制作您的网站。
第 8 步 - 配置 Drupal
此步骤是可选的,但有助于提高 Drupal 的性能。第一步是设置 MySQL 事务隔离级别。 MySQL、MariaDB 和等效数据库的默认事务隔离级别是“可重复读取”。 Drupal 的此设置可能会导致表出现死锁,这将导致站点变得非常缓慢或根本没有响应。推荐的 Drupal 站点事务隔离级别是 READ COMMITTED。
登录到 MySQL 容器 SSH shell。
$ docker exec -it mysql bash使用 root 用户打开 MySQL shell。
bash-4.4# mysql -u root -p
Enter password:
运行以下命令以全局更改事务级别。
mysql> SET GLOBAL TRANSACTION ISOLATION LEVEL READ COMMITTED;输入两次
exit退出 MySQL shell 和容器。下一步是输入您的域作为受信任的主机,以防止 HTTP HOST 标头攻击。为此,我们需要编辑 Drupal 容器内的
/var/www/html/sites/default/settings.php文件。由于我们为 Drupal 文件使用命名卷,因此进行任何更改的推荐方法是将文件从容器复制到主机,进行编辑,然后将其复制回容器。您可以对 Drupal 安装中需要更改的任何文件执行此操作。将设置文件从容器复制到主机。
$ docker cp drupal:/var/www/html/sites/default/settings.php settings.php该文件处于只读模式。给它写入权限。
$ chmod+w settings.php打开文件进行编辑。
$ nano settings.php在文件中找到以下部分。
#$settings['trusted_host_patterns'] = [
#  '^www\.example\.com$',
#];
通过删除井号并添加您的 Drupal 域来取消注释,如下所示。
$settings['trusted_host_patterns'] = [
  '^drupal\.example\.com$',
];
通过按 Ctrl + X 并在出现提示时输入 Y 来保存文件。
再次删除写入权限。
$ chmod -w settings.php将文件复制回容器内。
$ docker cp settings.php drupal:/var/www/html/sites/default第 9 步 - 备份 Drupal
我们将使用命令行来备份 Drupal 数据库。切换到 Drupal 目录。
$ cd ~/drupal创建备份目录。
$ mkdir backup-data使用以下命令备份 Drupal 数据库。系统将要求您提供 MySQL root 密码。
$ docker compose exec mysql sh -c "exec mysqldump drupal -uroot -p" | tee backup-data/data_`date +%d-%m-%Y"_"%H_%M_%S`.sql >/dev/null
Enter password: root_password
上面的命令将在
~/drupal/backup-data目录中创建 SQL 备份。检查目录内容。
$ ls -al backup-data
total 6716
drwxrwxr-x 2 navjot navjot    4096 Jan 19 13:59 .
drwxrwxr-x 4 navjot navjot    4096 Jan 19 13:35 ..
-rw-rw-r-- 1 navjot navjot 6868325 Jan 19 13:37 data_19-01-2023_13_36_58.sql
可以在目录中看到备份的数据库。您可以使用 phpMyAdmin 工具或使用以下命令恢复此数据库。
$ docker compose exec mysql sh -c "exec mysql -uroot -p" < backup-data/data_19-01-2023_13_36_58.sql您可以创建一个 cron 作业来定期备份数据库。
在
/etc/cron.daily目录下创建备份脚本并打开进行编辑。$ sudo nano /etc/cron.daily/drupalbackup.sh将以下代码粘贴到其中。
#!/bin/bash
cd /home/navjot/drupal/
/usr/bin/docker compose exec mysql sh -c "exec mysqldump drupal -uroot -p" | tee backup-data/data_`date +%d-%m-%Y"_"%H_%M_%S`.sql >/dev/null
通过按 Ctrl + X 并在出现提示时输入 Y 来保存文件。
使脚本可执行。
$ sudo chmod +x /etc/cron.daily/drupalbackup.sh现在,您的数据库将每天备份。
第 10 步 - 升级 Drupal
升级 Drupal 的第一步是使用步骤 9 中的命令备份 Drupal 数据库。
然后,切换到目录。
$ cd ~/drupal停止容器。
$ docker compose down拉取最新的容器镜像。
$ docker compose pull drupal:10-fpm-alpine如果你想升级到下一个主要版本,你需要相应地调整图像名称并通过 Drupals 发行说明检查是否有任何问题。
如果需要,请在
docker-compose.yml中进行所需的任何更改。您可以通过更改 Docker 组合文件中的定义来更新其余图像。重新启动 Drupal 容器。这还将为其他软件包的次要版本提取最新图像。
$ docker compose up -d结论
我们关于在 Ubuntu 22.04 服务器上使用 Docker 安装 Drupal 的教程到此结束。如果您有任何问题,请在下面的评论中发表。