如何在 Ubuntu 18.04 LTS 上使用 Docker 安装 Mastodon 社交网络
本教程适用于这些操作系统版本
- Ubuntu 22.04(果酱水母)
- Ubuntu 18.04(仿生海狸)
在此页
- 先决条件
- 第 1 步 - 安装依赖项
- 第 2 步 - 配置防火墙
- 第 3 步 - 安装 Docker
- 第 4 步 - 安装 Docker Compose
- 第 5 步 - 安装 Mastodon
- 第 6 步 - 安装和配置 Nginx
- 第 7 步 - 安装和配置 Lets Encrypt
- 设置 SSL 证书的自动更新
Mastodon 是一个免费、去中心化和开源的社交网络。它是作为 Twitter 的替代品而创建的。就像 Twitter 一样,人们可以相互关注、发布消息、图像和视频。但与 Twitter 不同的是,内容没有中央存储或授权。
相反,Mastodon 在数千个不同的服务器上运行,每个服务器运行着社区的不同成员。在一个服务器上注册的用户可以轻松连接到另一个网络上的用户,并跨实例相互关注。
任何人都可以安装自己的 Mastodon 服务器实例。本教程将教您如何使用 Docker 在装有 Ubuntu 18.04 的服务器上设置您的 Mastodon 实例。
先决条件
-
An Ubuntu 18.04 based server with a non-root sudo user.
-
Ensure your system is up to date.
$ sudo apt update $ sudo apt upgrade -
Mastodon sends email notifications to users. One option to make it work is to set up your own mail server. You can do it on the same server as you will be installing mastodon or on a different server. Doing it is out of the scope of this guide.
We will recommend you to use a 3rd party Transactional mail service like Mailgun, Sendgrid, Amazon SES or Sparkpost. The instructions in the guide will be using Mailgun as your SMTP provider.
-
Make sure you have a domain name pointing to the server. For this tutorial, we will be using example.com as the domain.
第 1 步 - 安装依赖项
在我们安装 Mastodon 之前,我们需要确保我们的服务器具有某些需要正确安装的软件。运行以下命令来安装依赖项。
$ sudo apt update
$ sudo apt install ca-certificates curl ufw apt-transport-https software-properties-common git -y
上面的某些软件可能已为您预装。
因为我们安装了 Git,所以我们应该在继续之前配置它。
$ git config --global user.name "Your Name"
$ git config --global user.email ""
第 2 步 - 配置防火墙
在我们之前的步骤中,我们安装了 ufw(简单防火墙)。在我们继续安装 Mastodon 之前,我们需要配置它。
启用 SSH 和我们刚刚创建的端口,这样我们就不会被锁定。
$ sudo ufw allow OpenSSH启用 ufw 防火墙。
$ sudo ufw enable我们还需要为 Mastodon 启用 http 和 https 才能运行。
$ sudo ufw allow http
$ sudo ufw allow https
检查防火墙的状态。
$ sudo ufw status您应该会看到如下所示的输出。
Status: active

To                         Action      From
--                         ------      ----
OpenSSH                    ALLOW       Anywhere
80/tcp                     ALLOW       Anywhere
443/tcp                    ALLOW       Anywhere
OpenSSH (v6)               ALLOW       Anywhere (v6)
80/tcp (v6)                ALLOW       Anywhere (v6)
443/tcp (v6)               ALLOW       Anywhere (v6)
第 3 步 - 安装 Docker
将 Dockers GPG 密钥添加到您的系统。
$ curl -fsSL https://download.docker.com/linux/ubuntu/gpg | sudo apt-key add -验证下载密钥的指纹。
$ sudo apt-key fingerprint 0EBFCD88您应该会看到如下所示的输出。
pub   rsa4096 2017-02-22 [SCEA]
      9DC8 5822 9FC7 DD38 854A  E2D8 8D81 803C 0EBF CD88
uid           [ unknown] Docker Release (CE deb) <>
sub   rsa4096 2017-02-22 [S]
添加 Docker 存储库。
$ sudo add-apt-repository "deb [arch=amd64] https://download.docker.com/linux/ubuntu $(lsb_release -cs) stable"更新您的包数据库。
$ sudo apt update安装 Docker-CE。 CE 是 Docker 的社区版。
$ sudo apt install docker-ce -y现在应该安装 Docker。检查它是否正在运行。
$ sudo systemctl status docker输出应类似于以下内容。
? docker.service - Docker Application Container Engine
   Loaded: loaded (/lib/systemd/system/docker.service; enabled; vendor preset: enabled)
   Active: active (running) since Tue 2019-10-22 18:26:29 UTC; 25min ago
     Docs: https://docs.docker.com
 Main PID: 3574 (dockerd)
    Tasks: 8
   CGroup: /system.slice/docker.service
   ??3574 /usr/bin/dockerd -H fd:// --containerd=/run/containerd/containerd.sock
按 q 退出。
将您的受限 Linux 用户帐户添加到 docker 组,这样您就可以在没有 sudo 的情况下运行 docker。
sudo usermod -aG docker $USER$USER 变量将选择当前登录的用户并将其添加到 docker 组。如果您当前未使用该用户登录,请将 $USER 替换为实际用户名。
切换到我们刚刚添加的用户。即使您已经登录,您仍然需要再次切换到它以重新加载权限。
$ su - ${USER}通过运行内置的“Hello World”程序检查一切是否正常运行。
$ docker run hello-world您应该看到以下输出,这将告诉 Docker 已安装并正常工作。
Unable to find image 'hello-world:latest' locally
latest: Pulling from library/hello-world
1b930d010525: Pull complete
Digest: sha256:c3b4ada4687bbaa170745b3e4dd8ac3f194ca95b2d0518b417fb47e5879d9b5f
Status: Downloaded newer image for hello-world:latest

Hello from Docker!
This message shows that your installation appears to be working correctly.
第 4 步 - 安装 Docker Compose
可以跳过此步骤并继续,但安装 Docker Compose 将使运行 Mastodon 变得更加容易,特别是如果您想在多个服务器上执行此操作。
$ sudo curl -L "https://github.com/docker/compose/releases/download/1.24.1/docker-compose-$(uname -s)-$(uname -m)" -o /usr/local/bin/docker-compose在编写本教程时,1.24.1 是 Docker Compose 当前的稳定版本。您可以从他们的 Github 页面检查最新的发布版本。
将可执行权限应用于 docker compose 二进制文件。
$ sudo chmod +x /usr/local/bin/docker-compose将命令完成添加到 Docker Compose。
$ sudo curl -L https://raw.githubusercontent.com/docker/compose/1.24.1/contrib/completion/bash/docker-compose -o /etc/bash_completion.d/docker-compose验证您的安装是否成功。
$ docker-compose --version它将打印出以下输出。
docker-compose version 1.24.1, build 4667896b第 5 步 - 安装 Mastodon
将 Mastodons 存储库克隆到您的服务器。
$ git clone https://github.com/tootsuite/mastodon导航到我们刚刚将文件复制到的目录。
$ cd mastodonMastodon 附带一个示例配置文件。我们需要重命名它以使 Mastodon 正常工作。
$ cp .env.production.sample .env.production我们需要为我们的配置文件生成密钥。但在此之前,我们需要构建 Docker 镜像。
$ docker-compose build现在镜像已成功构建,您需要创建配置 Mastodon 所需的几个密钥。
首先生成 SECRET_KEY_BASE。
$ SECRET_KEY_BASE=$(docker-compose run --rm web bundle exec rake secret)在配置文件中插入上面的密钥。
$ sed -i -e "s/SECRET_KEY_BASE=/&${SECRET_KEY_BASE}/" .env.production生成 OTP_SECRET 并将其插入配置文件。
$ OTP_SECRET=$(docker-compose run --rm web bundle exec rake secret)
$ sed -i -e "s/OTP_SECRET=/&${OTP_SECRET}/" .env.production
生成 PAPERCLIP_SECRET 并将其插入到配置文件中。
$ PAPERCLIP_SECRET=$(docker-compose run --rm web bundle exec rake secret)
$ sed -i -e "s/PAPERCLIP_SECRET=/&${PAPERCLIP_SECRET}/" .env.production
为 VAPID_PRIVATE_KEY 和 VAPID_PUBLIC_KEY 生成值。
$ docker-compose run --rm web bundle exec rake mastodon:webpush:generate_vapid_key打开 .env.production 文件。
$ sudo nano ./.env.production在文件中搜索 VAPID_PRIVATE_KEY 和 VAPID_PUBLIC_KEY 并复制上一个命令的输出。
找到 LOCAL_DOMAIN 变量并将其值从 example.com 更改为您为 Mastodon 安装选择的域名。
输入您从 SMTP 提供商处获得的值。
SMTP_SERVER = smtp.mailgun.org
SMTP_PORT = 587
SMTP_LOGIN = username
SMTP_PASSWORD = password
SMTP_FROM_ADDRESS =
完成后按 Ctrl + X 并保存文件。
您需要再次构建 Docker 镜像以实现上面所做的所有更改。
$ docker-compose build设置数据库。
$ docker-compose run --rm web rails db:migrate预编译 Mastodons 资产。
$ docker-compose run --rm web rails assets:precompile运行以下命令来执行容器。
$ docker-compose up -d第 6 步 - 安装和配置 Nginx
我们指南的下一步是安装 Nginx 服务器以使 Mastodons 网站正常运行。
运行以下命令来安装 Nginx 服务器。
$ sudo apt install nginx -yNginx 带有配置的默认站点。删除它。
$ sudo rm /etc/nginx/sites-available/default此外,删除默认站点的符号链接。
$ sudo rm /etc/nginx/sites-enabled/default为 Mastodon 创建一个 Nginx 配置文件。
$ sudo touch /etc/nginx/sites-available/mastodon为 Mastodons 配置创建符号链接。
$ sudo ln -s /etc/nginx/sites-available/mastodon /etc/nginx/sites-enabled/mastodon在 Nano 编辑器中打开 Mastodons 配置。 (你可以选择任何你想要的编辑器)
$ sudo nano /etc/nginx/sites-available/mastodon将以下文本复制粘贴到其中。
map $http_upgrade $connection_upgrade {
  default upgrade;
  ''      close;
}

server {
  listen 80;
  listen [::]:80;
  server_name example.com;
  root /home/user/mastodon/public;
  # Useful for Let's Encrypt
  location /.well-known/acme-challenge/ { allow all; }
  location / { return 301 https://$host$request_uri; }
}

server {
  listen 443 ssl http2;
  listen [::]:443 ssl http2;
  server_name example.com;

  ssl_protocols TLSv1.2;
  ssl_ciphers HIGH:!MEDIUM:!LOW:!aNULL:!NULL:!SHA;
  ssl_prefer_server_ciphers on;
  ssl_session_cache shared:SSL:10m;

  ssl_certificate     /etc/letsencrypt/live/example.com/fullchain.pem;
  ssl_certificate_key /etc/letsencrypt/live/example.com/privkey.pem;

  keepalive_timeout    70;
  sendfile             on;
  client_max_body_size 80m;

  root /home/user/mastodon/public;

  gzip on;
  gzip_disable "msie6";
  gzip_vary on;
  gzip_proxied any;
  gzip_comp_level 6;
  gzip_buffers 16 8k;
  gzip_http_version 1.1;
  gzip_types text/plain text/css application/json application/javascript text/xml application/xml application/xml+rss text/javascript;

  add_header Strict-Transport-Security "max-age=31536000";

  location / {
    try_files $uri @proxy;
  }

  location ~ ^/(emoji|packs|system/accounts/avatars|system/media_attachments/files) {
    add_header Cache-Control "public, max-age=31536000, immutable";
    try_files $uri @proxy;
  }

  location /sw.js {
    add_header Cache-Control "public, max-age=0";
    try_files $uri @proxy;
  }

  location @proxy {
    proxy_set_header Host $host;
    proxy_set_header X-Real-IP $remote_addr;
    proxy_set_header X-Forwarded-For $proxy_add_x_forwarded_for;
    proxy_set_header X-Forwarded-Proto https;
    proxy_set_header Proxy "";
    proxy_pass_header Server;

    proxy_pass http://127.0.0.1:3000;
    proxy_buffering off;
    proxy_redirect off;
    proxy_http_version 1.1;
    proxy_set_header Upgrade $http_upgrade;
    proxy_set_header Connection $connection_upgrade;

    tcp_nodelay on;
  }

  location /api/v1/streaming {
    proxy_set_header Host $host;
    proxy_set_header X-Real-IP $remote_addr;
    proxy_set_header X-Forwarded-For $proxy_add_x_forwarded_for;
    proxy_set_header X-Forwarded-Proto https;
    proxy_set_header Proxy "";

    proxy_pass http://127.0.0.1:4000;
    proxy_buffering off;
    proxy_redirect off;
    proxy_http_version 1.1;
    proxy_set_header Upgrade $http_upgrade;
    proxy_set_header Connection $connection_upgrade;

    tcp_nodelay on;
  }

  error_page 500 501 502 503 504 /500.html;
}
上面的配置假设您使用 Lets encrypt 作为您的 SSL 提供商。如果您使用的是其他 SSL 服务,则需要编辑密钥的位置并跳过本教程的下一部分。
第 7 步 - 安装和配置 Lets Encrypt
确保 Nginx 已停止。
$ sudo systemctl stop nginx添加 Certbot 存储库。
$ sudo add-apt-repository ppa:certbot/certbot更新系统包。
$ sudo apt update安装 Certbot 工具。
$ sudo apt install certbot您需要创建证书两次 - 一次使用 TLS SNI 方法,第二次使用 webroot 方法。
sudo certbot certonly --standalone -d example.com现在,使用 webroot 方法创建证书。这将需要运行 Nginx。
sudo systemctl start nginx
sudo certbot certonly --webroot -d example.com -w /home/user/mastodon/public/
该工具会询问您是要保留证书还是续订证书。选择续订选项。
设置 SSL 证书的自动更新
Lets Encrypt 证书的有效期为 90 天。之后,您需要再次更新它们。为此,您可以创建一个 cron 作业来自动为您完成。
创建一个 cron 作业。
$ sudo nano /etc/cron.daily/letsencrypt-renew将以下内容复制并粘贴到文件中。
#!/usr/bin/env bash
certbot renew
systemctl reload nginx
按 Ctrl + X 并在出现提示时输入 Y 保存并退出文件。
使脚本可执行并重新启动 cron 守护进程,以便我们的脚本每天运行。
$ sudo chmod +x /etc/cron.daily/letsencrypt-renew
$ sudo systemctl restart cron
第 8 步 - 创建您的 Mastodon 用户
在浏览器中访问您的 mastodon 站点。您应该会看到以下屏幕。
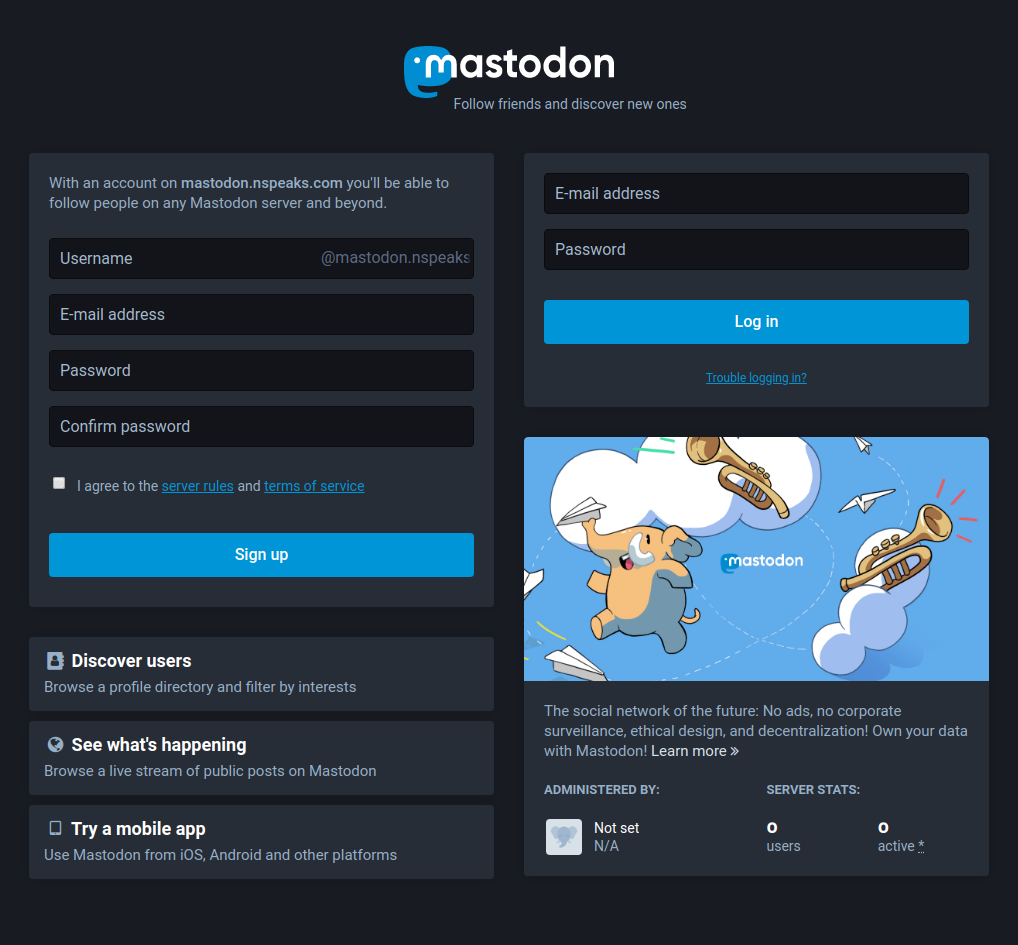
输入您想要的用户名、电子邮件地址和密码,以在您的 Mastodon 实例上创建一个新帐户。您需要连接到其他 Mastodon 服务器的用户的完整用户名是 howtoforge
@example.com。 Mastodon 将向您发送一封确认邮件以验证注册。
您也可以手动确认注册。为此,您需要通过 SSH 连接到您的 Docker 实例。列出所有当前的 Docker 实例。
$ docker ps您将看到如下所示的输出。
CONTAINER ID        IMAGE                 COMMAND                  CREATED             STATUS                  PORTS                      NAMES
32f2c4cd2598        tootsuite/mastodon    "/tini -- bash -c 'r…"   16 hours ago        Up 16 hours (healthy)   127.0.0.1:3000->3000/tcp   mastodon_web_1
76beca2b858d        tootsuite/mastodon    "/tini -- node ./str…"   16 hours ago        Up 16 hours (healthy)   127.0.0.1:4000->4000/tcp   mastodon_streaming_1
08f7a42b75ac        tootsuite/mastodon    "/tini -- bundle exe…"   16 hours ago        Up 16 hours                                        mastodon_sidekiq_1
bacaa8c09a85        redis:5.0-alpine      "docker-entrypoint.s…"   17 hours ago        Up 17 hours (healthy)                              mastodon_redis_1
62e9b2175a53        postgres:9.6-alpine   "docker-entrypoint.s…"   17 hours ago        Up 17 hours (healthy)                              mastodon_db_1
要进行所需的更改,我们需要访问流式容器。通过 SSH 进入 mastodon_streaming_1 容器。
$ docker exec -it mastodon_streaming_1 /bin/bash这将在您的容器内启动一个 Bash shell。
运行以下命令以批准您新创建的用户名。
:~$ RAILS_ENV=production bin/tootctl accounts modify howtoforge --confirm运行以下命令使您新创建的帐户成为管理员。
:~$ RAILS_ENV=production bin/tootctl accounts modify howtoforge --role admin退出容器。
:~$ exit使用您的用户名和密码登录到您的实例,您将看到以下屏幕。
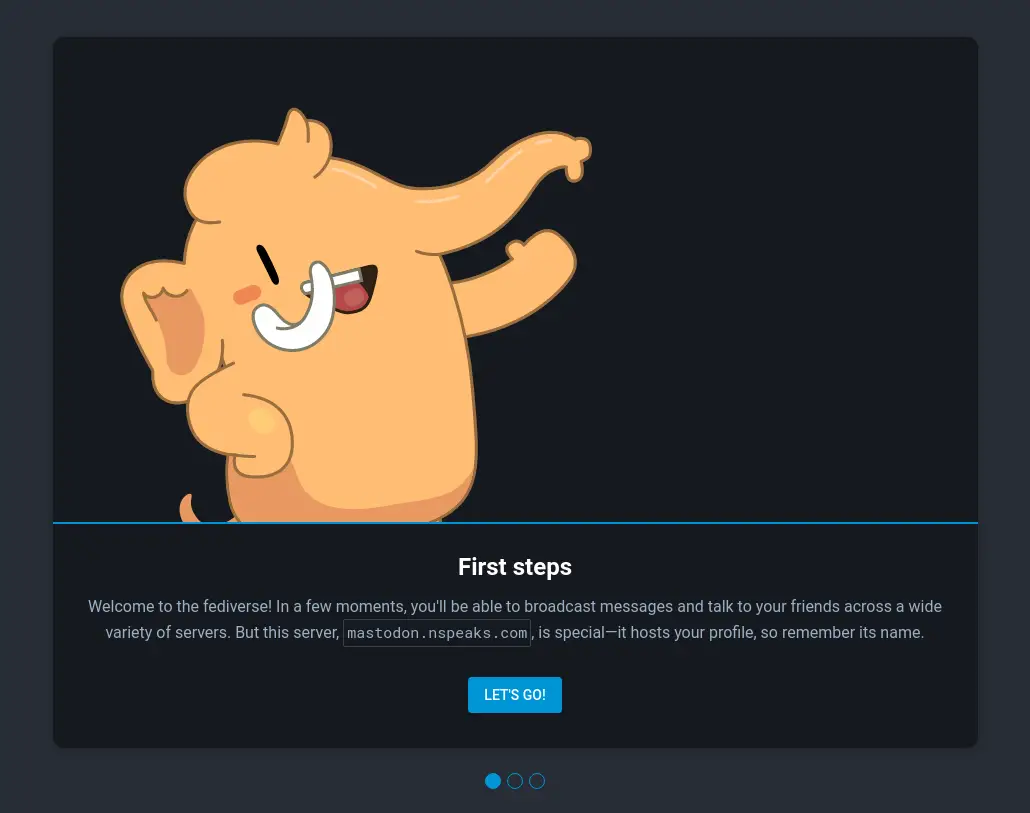
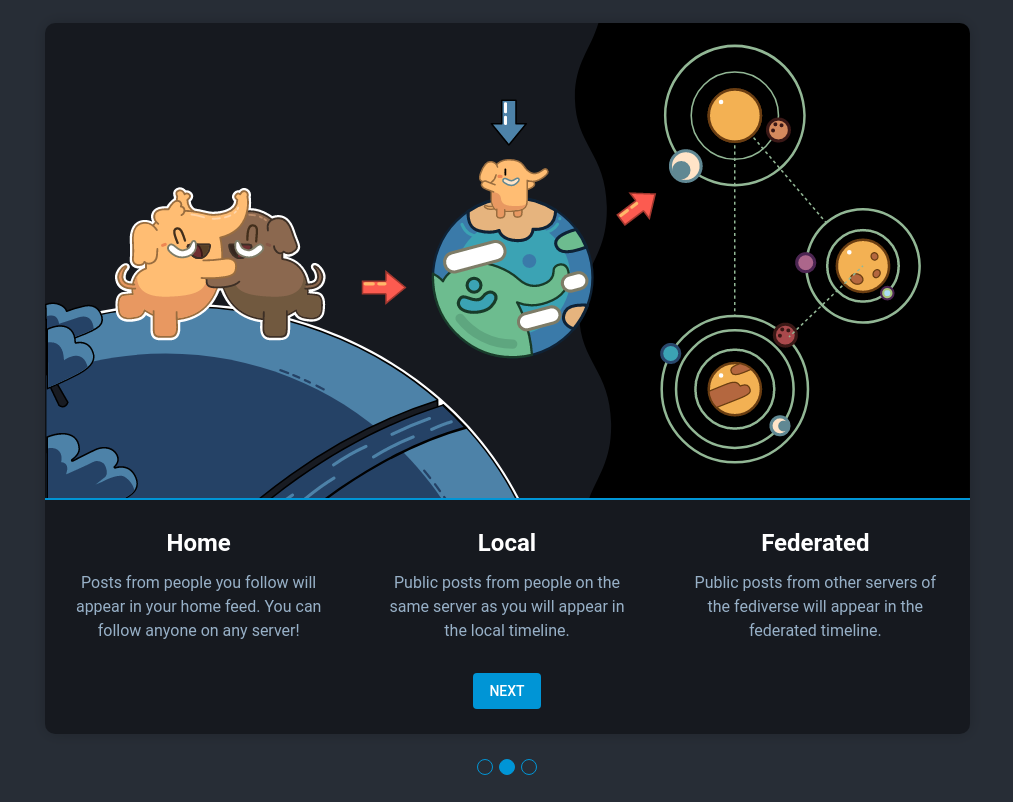
单击 Lets Go,您将进入以下页面,这些页面将让您了解 Mastodon 工作原理的一些基础知识。
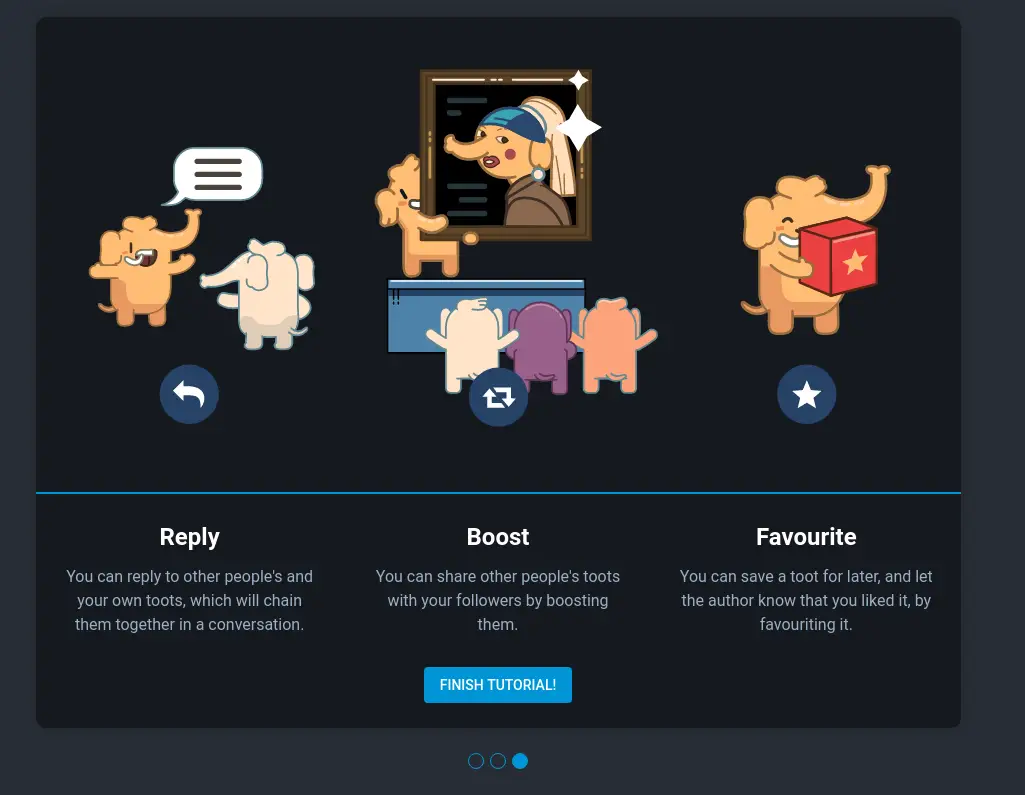
单击 Finish Tutorial 即可看到您的 Mastodons 主页,您可以在其中开始发布您喜欢的内容。
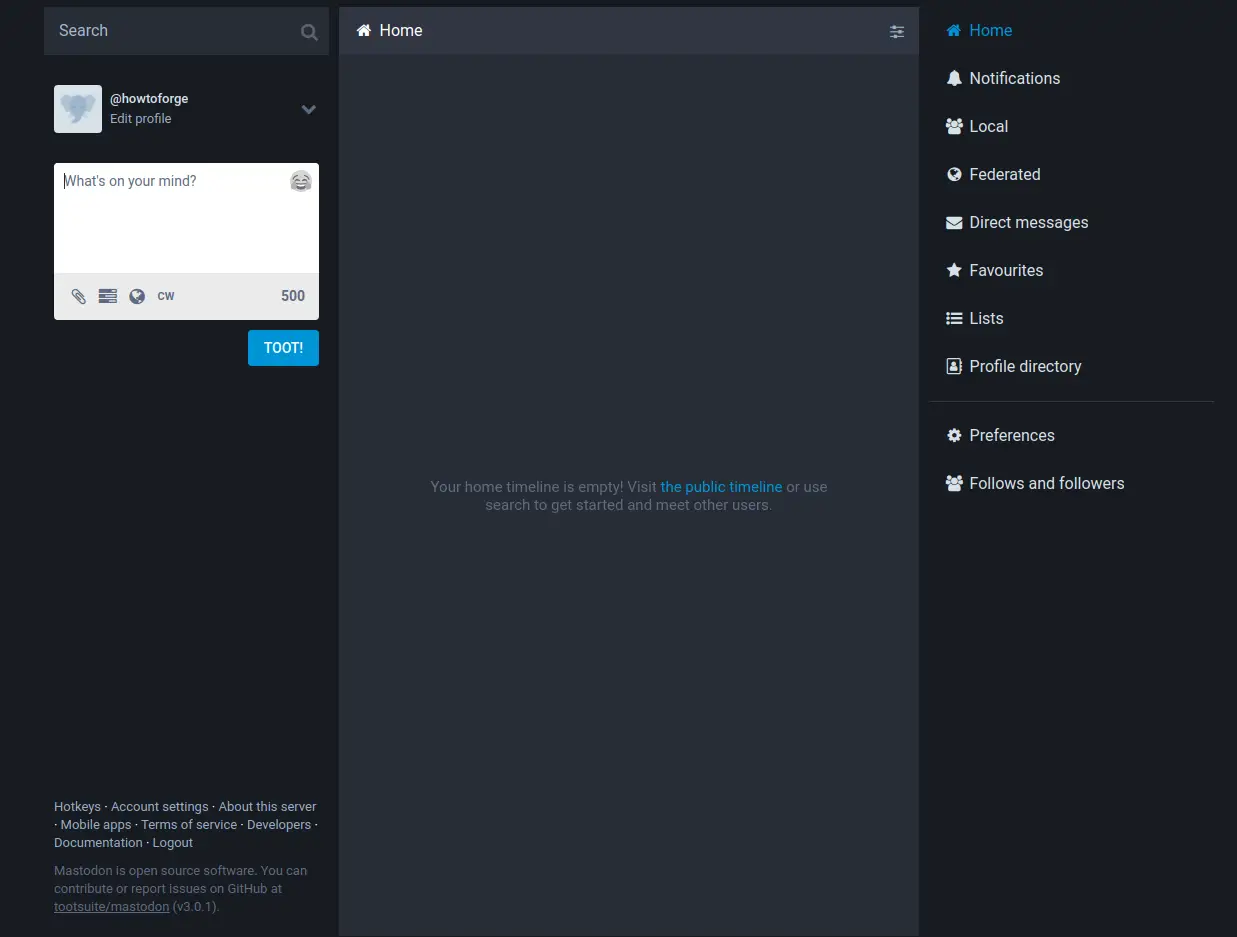
您可以从首选项菜单访问设置和管理区域。
第 9 步 - 维护
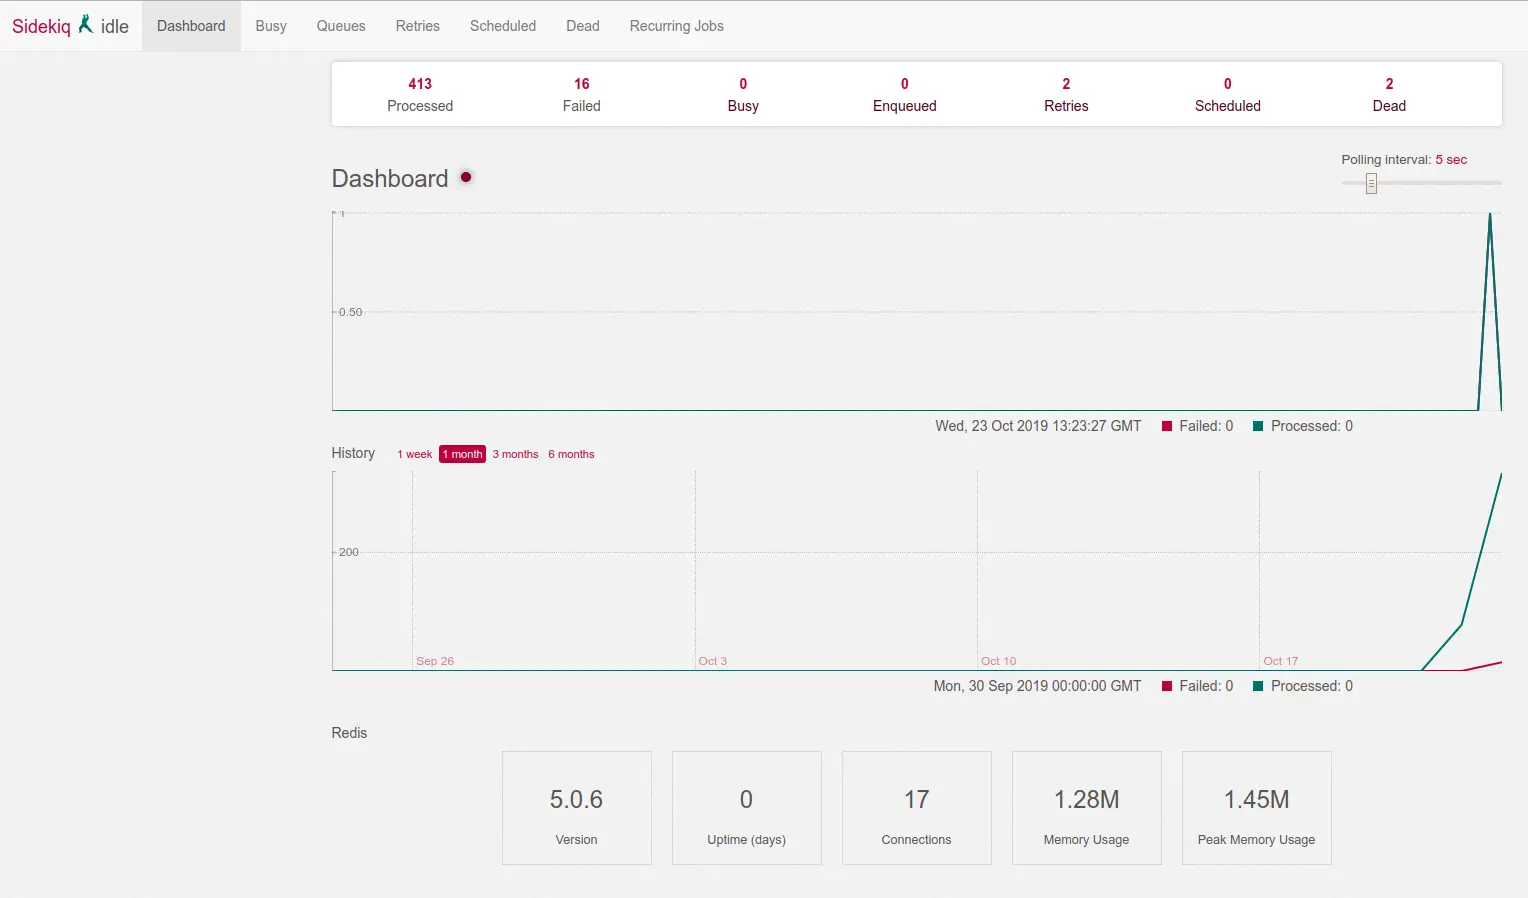
要查看您的 Mastodon 实例的性能和日志,请前往 https://example.com/sidekiq/
您可以在此处查看与您的 Mastodon 实例相关的各种进程和计划任务的列表。您还可以在 Dead 或 Retries 部分下检查失败的任务。它还会告诉您实例的内存使用情况。
您可以从 https://example.com/pghero/ 检查实例数据库的健康状况
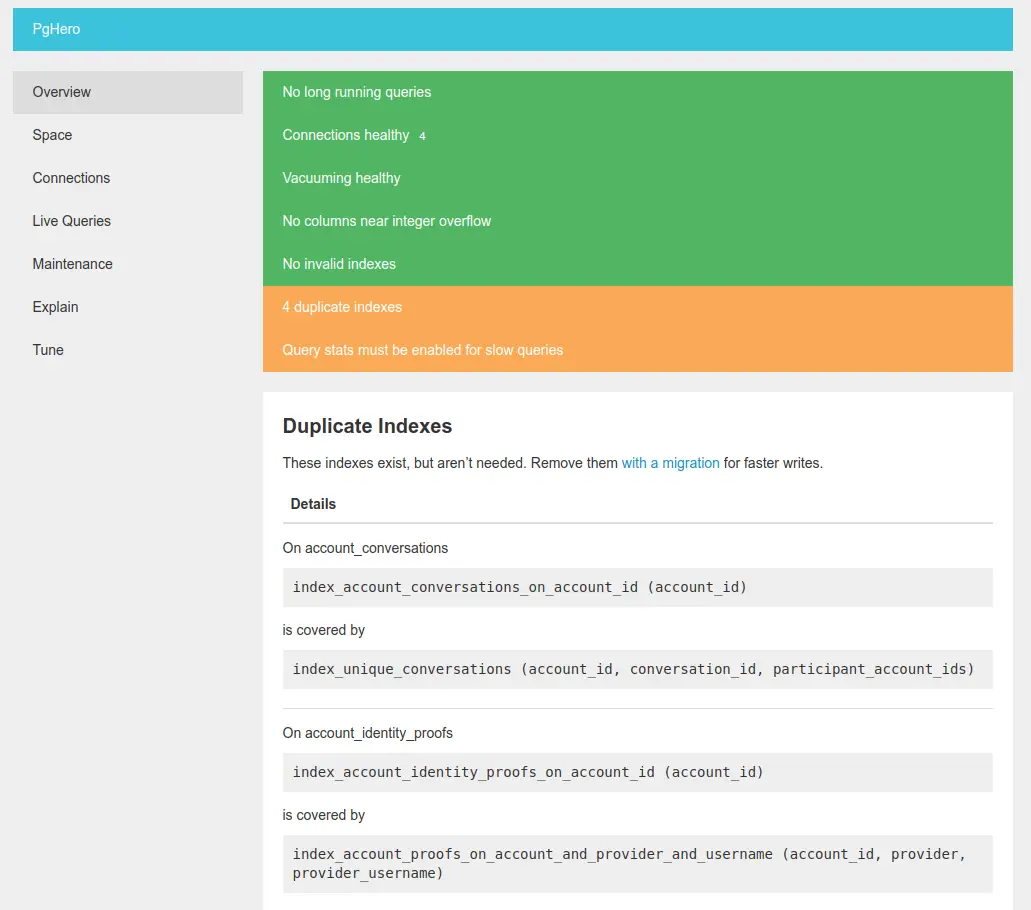
您可以执行数据库维护、运行 SQL 查询和删除未使用的索引。
如果您的站点由于某种原因根本没有加载,您可以检查 Docker 生成的日志。
为此,请先关闭容器。
$ docker-compose down在附加状态下运行 Docker compose,以便您可以查看每个容器生成的日志。
$ docker-compose up步骤 10 升级您的 Mastodon
切换到您的 mastodon 目录。
$ cd /home/user/mastdon从存储库下载更新
$ git fetch如果由于某种原因更改了 docker-compose.yml 文件,则需要先运行以下命令。
$ git status这将告诉您对其所做的所有更改。如果文件被修改,则首先存储您的更改。
$ git stash查看最新的 Mastodon 版本。从发布页面检查最新版本。
$ git checkout <version/tag>如果您之前运行了 git stash,则运行以下命令以重做对 docker-compose.yml 文件的更改。
$ git stash pop构建 docker 镜像。
$ docker-compose build执行数据库迁移。
$ docker-compose run --rm web rails db:migrate预编译 Mastodons 资产。
$ docker-compose run --rm web rails assets:precompile运行以下命令来执行容器。
$ docker-compose up -d这就是本教程的全部内容。要了解有关 Mastodon 的更多信息,请参阅他们的文档。