如何在 Debian 10 上安装 Feng Office
在此页
- 先决条件
- 开始
- 安装 Apache 和 MariaDB
- 安装和配置 PHP
- 为冯办公室配置MariaDB
- 下载冯办公室
- 为冯办公室配置Apache
- 访问 Feng Office Web 界面
- 使用 Lets Encrypt 免费 SSL 保护 Feng Office
- 结论
Feng Office 是一个用 PHP 编写的免费开源在线项目管理和协作工具。它是一个基于 Web 的工具,集成了项目管理、客户关系管理、财务和计费,可帮助您的组织更好地运行。 Feng Office 提供了丰富的功能集,包括任务管理、时间跟踪、甘特图、知识管理、日历、时间表、自动警报和提醒等等。 Feng Office有社区版、专业版和企业版三个版本。
在本教程中,我们将解释如何在 Debian 10 VPS 上安装 Feng Office Community Edition。
先决条件
- 一台运行 Debian 10 且内存至少为 2 GB 的服务器。
- 指向您的服务器 IP 的有效域名。在本教程中,我们将使用 example.com 域。
- 在您的服务器上配置了根密码。
入门
在开始之前,请使用最新版本更新您的系统。您可以通过运行以下命令来完成此操作:
apt-get update -y
 apt-get upgrade -y
更新系统后,重新启动它以应用更改。
安装 Apache 和 MariaDB
首先,您需要在您的服务器上安装 Apache Web 服务器和 MariaDB 服务器。您可以通过运行以下命令来安装它们:
apt-get install apache2 mariadb-server -y安装完这两个包后,启动 Apache 和 MariaDB 服务,并使用以下命令使它们在系统重启后启动:
systemctl start apache2
 systemctl start mariadb
 systemctl enable apache2
 systemctl enable mariadb
完成后,您可以继续下一步。
安装和配置 PHP
默认情况下,Debian 10 附带 PHP 7.3。您需要安装 PHP 7.1 版才能正常使用 Feng Office。
首先,使用以下命令安装所需的包:
apt-get install software-properties-common ca-certificates apt-transport-https -y接下来,使用以下命令添加 SURY 存储库:
wget https://packages.sury.org/php/apt.gpg
 apt-key add apt.gpg
 echo "deb https://packages.sury.org/php/ $(lsb_release -sc) main" | tee /etc/apt/sources.list.d/php7.list
接下来,使用以下命令更新存储库并使用所有必需的模块安装 PHP:
apt-get install php7.1 php7.1-mysql php7.1-curl php7.1-json php7.1-cgi libapache2-mod-php7.1 php7.1-mcrypt php7.1-xmlrpc php7.1-gd php7.1-mbstring php7.1-common php7.1-soap php7.1-xml php7.1-intl php7.1-cli php7.1-ldap unzip php7.1-zip wget php7.1-readline php7.1-imap php7.1-tidy php7.1-recode php7.1-sq -y安装所有软件包后,打开 php.ini 文件并调整一些设置:
nano /etc/php/7.1/cli/php.ini更改以下行:
max_execution_time = 300
max_input_time = 300
memory_limit = 512M
post_max_size = 128M
upload_max_filesize = 128M
html_errors = Off
display_startup_errors = Off
log_errors = On
output_buffering = Off
保存并关闭文件。
接下来,打开另一个 php.ini 文件:
nano /etc/php/7.1/apache2/php.ini更改以下行:
max_execution_time = 300
max_input_time = 300
memory_limit = 512M
post_max_size = 128M
upload_max_filesize = 128M
html_errors = Off
display_startup_errors = Off
log_errors = On
output_buffering = Off
保存并关闭文件。然后,使用以下命令安装 Feng Office 所需的其他包:
apt-get install catdoc xpdf ghostscript imagemagick wkhtmltopdf -y安装所有软件包后,您可以继续下一步。
为冯办公室配置MariaDB
接下来,您需要为 Feng Office 创建数据库和用户。
首先,使用以下命令登录 MariaDB shell:
mysql -u root -p在出现提示时提供您的 root 密码,然后使用以下命令为 Feng Office 创建数据库和用户:
MariaDB [(none)]> CREATE DATABASE fengdb;
 MariaDB [(none)]> GRANT ALL PRIVILEGES ON fengdb.* TO 'fenguser'@'localhost' IDENTIFIED BY 'password' WITH GRANT OPTION;
接下来,使用以下命令刷新权限并退出 MariaDB shell:
MariaDB [(none)]> FLUSH PRIVILEGES;
 MariaDB [(none)]> EXIT;
完成后,您可以继续下一步。
下载冯办公
首先,使用以下命令下载最新版本的 Feng Office:
wget -O fengoffice.zip --no-check-certificate https://www.fengoffice.com/web/reference.php?dest=latest_version下载后,使用以下命令解压缩下载的文件:
unzip fengoffice.zip接下来,使用以下命令将提取的目录移动到 Apache Web 根目录:
mv fengoffice-3.7.0.5 /var/www/html/fengoffice接下来,给 fengoffice 目录适当的权限:
chown -R www-data:www-data /var/www/html/fengoffice
 chmod -R 777 /var/www/html/fengoffice
完成后,您可以继续下一步。
为冯办公配置Apache
接下来,您需要创建一个 Apache 虚拟主机配置文件来为 Feng Office 应用程序提供服务。您可以使用以下命令执行此操作:
nano /etc/apache2/sites-available/feng.conf添加以下行:
<VirtualHost *:80>
     ServerAdmin
     DocumentRoot /var/www/html/fengoffice
     ServerName example.com

     <Directory /var/www/html/fengoffice/>
          Options FollowSymlinks
          AllowOverride All
          Require all granted
     </Directory>

     ErrorLog ${APACHE_LOG_DIR}/error.log
     CustomLog ${APACHE_LOG_DIR}/access.log combined

</VirtualHost>
完成后保存并关闭文件。然后,使用以下命令启用 Apache 虚拟主机、标头和重写模块:
a2ensite feng.conf
 a2enmod rewrite
 a2enmod headers
接下来,重新启动 Apache Web 服务以应用更改:
systemctl restart apache2您可以使用以下命令检查 Apache 网络服务器的状态:
systemctl status apache2您应该得到以下输出:
? apache2.service - The Apache HTTP Server
   Loaded: loaded (/lib/systemd/system/apache2.service; enabled; vendor preset: enabled)
   Active: active (running) since Mon 2019-12-02 07:02:28 EST; 1min 3s ago
     Docs: https://httpd.apache.org/docs/2.4/
  Process: 2329 ExecStart=/usr/sbin/apachectl start (code=exited, status=0/SUCCESS)
 Main PID: 2333 (apache2)
    Tasks: 7 (limit: 1138)
   Memory: 21.8M
   CGroup: /system.slice/apache2.service
           ??2333 /usr/sbin/apache2 -k start
           ??2334 /usr/sbin/apache2 -k start
           ??2335 /usr/sbin/apache2 -k start
           ??2336 /usr/sbin/apache2 -k start
           ??2337 /usr/sbin/apache2 -k start
           ??2338 /usr/sbin/apache2 -k start
           ??2341 /usr/sbin/apache2 -k start

Dec 02 07:02:28 debian systemd[1]: Starting The Apache HTTP Server...
Dec 02 07:02:28 debian apachectl[2329]: AH00558: apache2: Could not reliably determine the server's fully qualified domain name, using 127.0.1.
Dec 02 07:02:28 debian systemd[1]: Started The Apache HTTP Server.
访问冯办公Web界面
现在,打开您的 Web 浏览器并浏览 URL http://example.com。您将被重定向到以下页面:
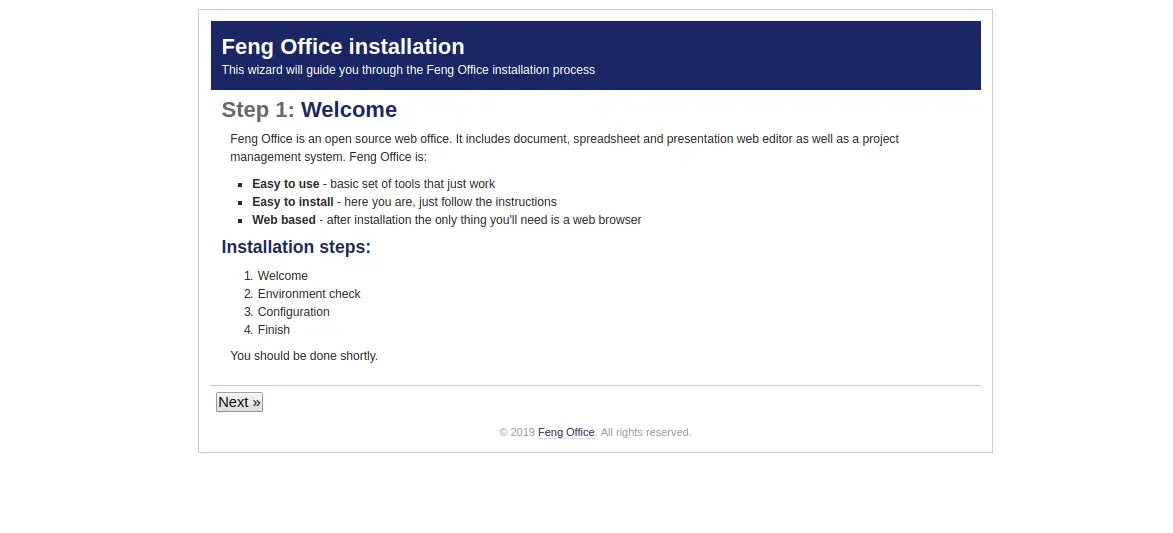
单击下一步按钮。您应该会看到以下页面:
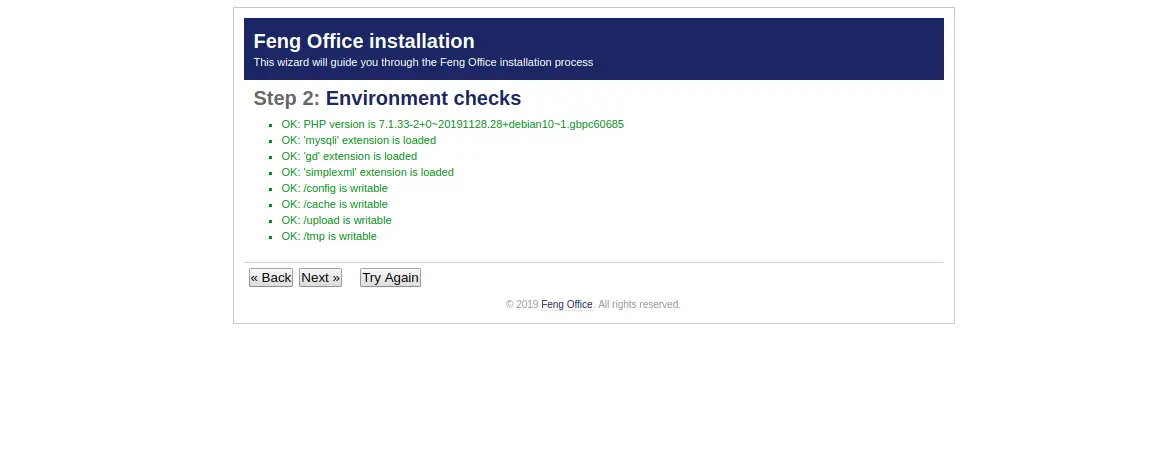
确保所有先决条件都已正确安装。然后,单击“下一步”按钮。您应该会看到以下页面:
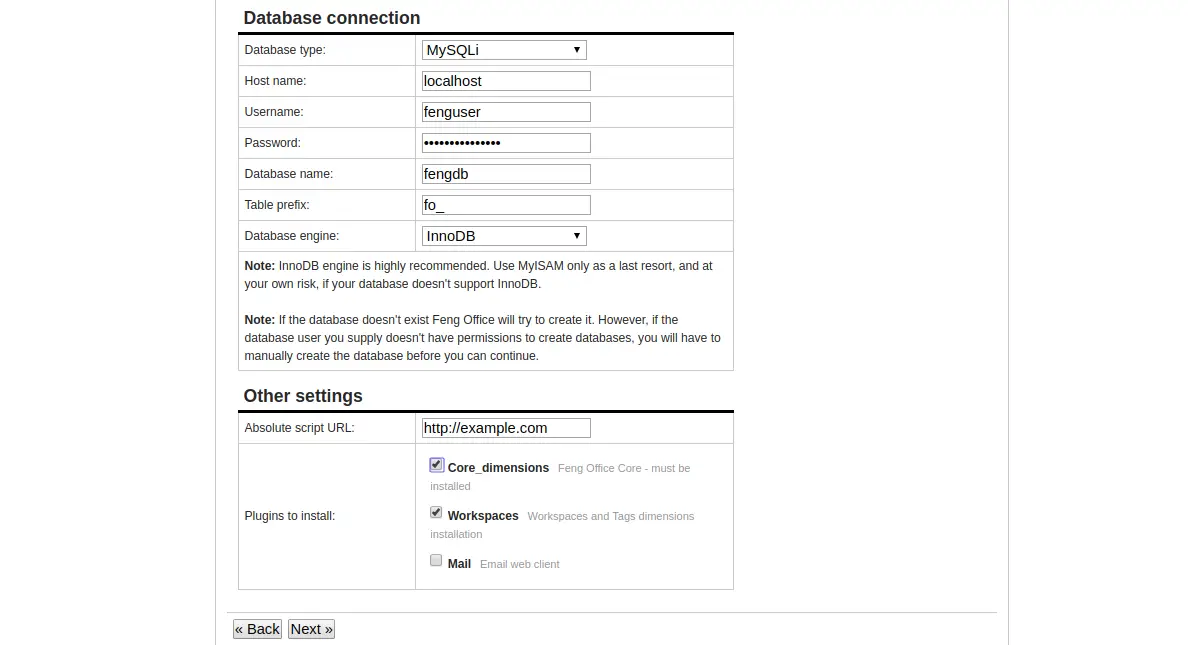
现在,提供您的数据库名称、数据库用户名、密码,选择 Core_dimensions 和 Workspaces 模块,然后单击下一步按钮。您应该会看到以下页面:
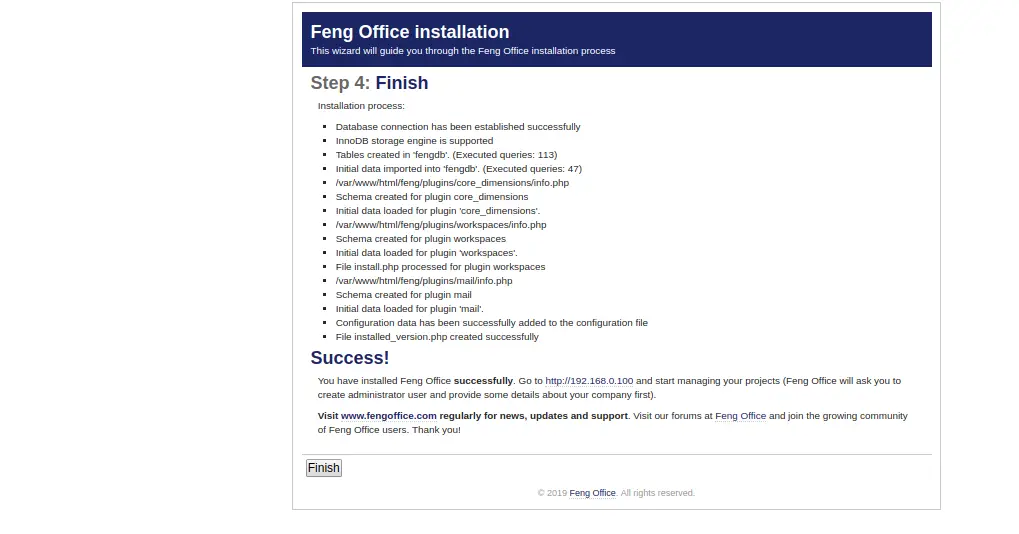
现在,单击“完成”按钮以完成安装。您应该会看到以下页面:
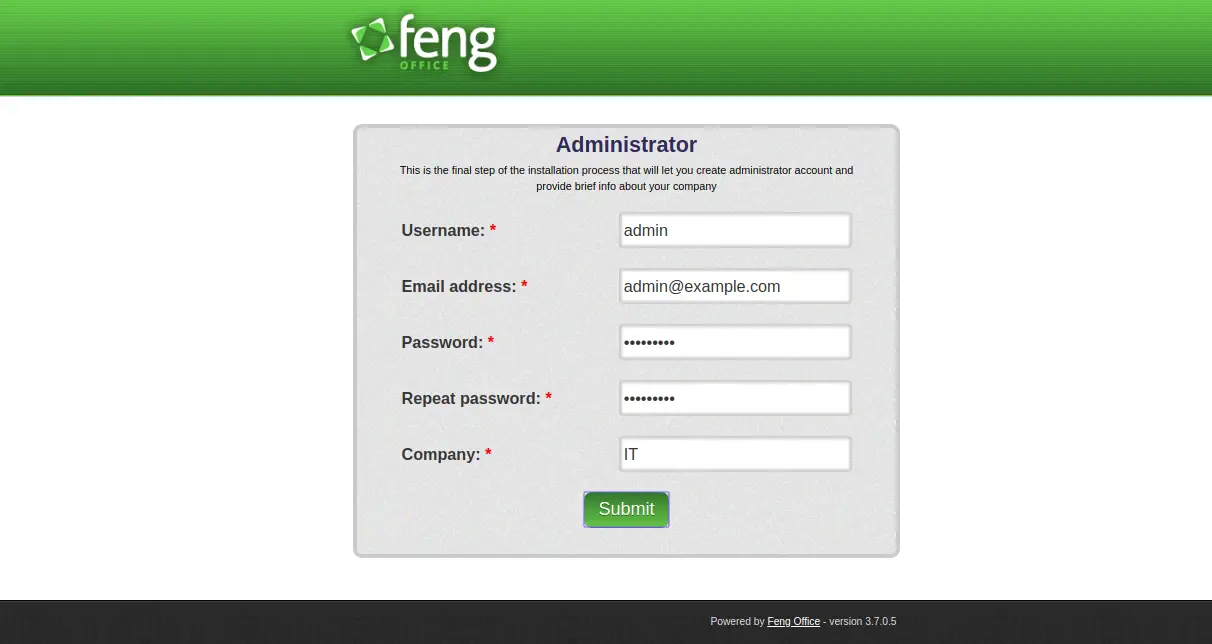
提供您的管理员用户名、电子邮件、密码,然后单击“提交”按钮。您将被重定向到 Feng Office 登录页面:
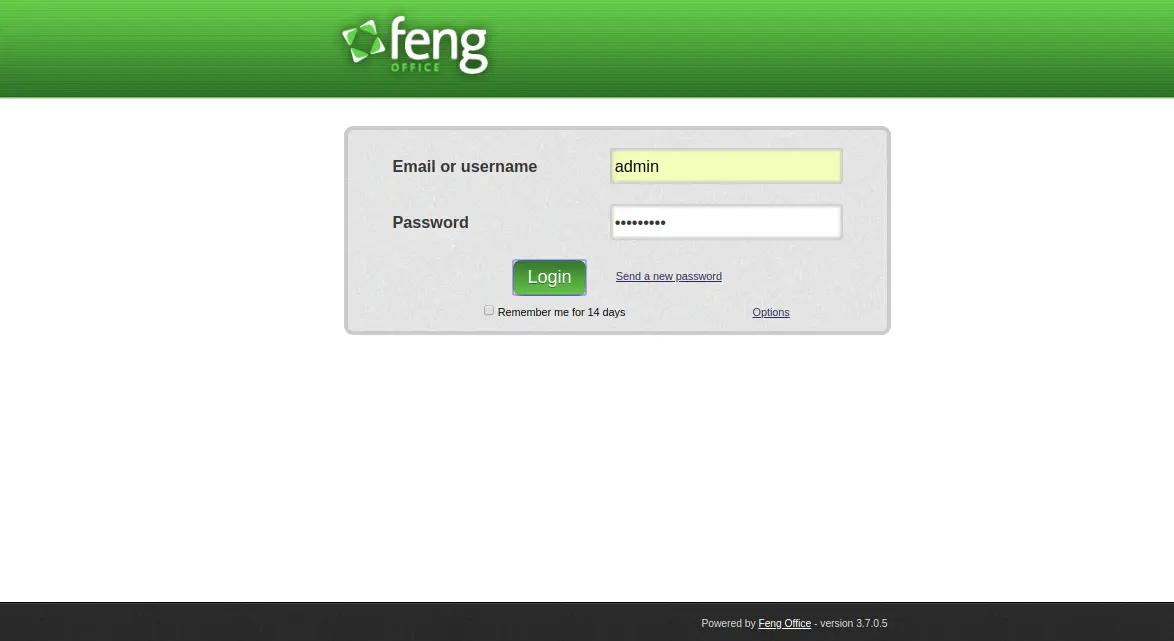
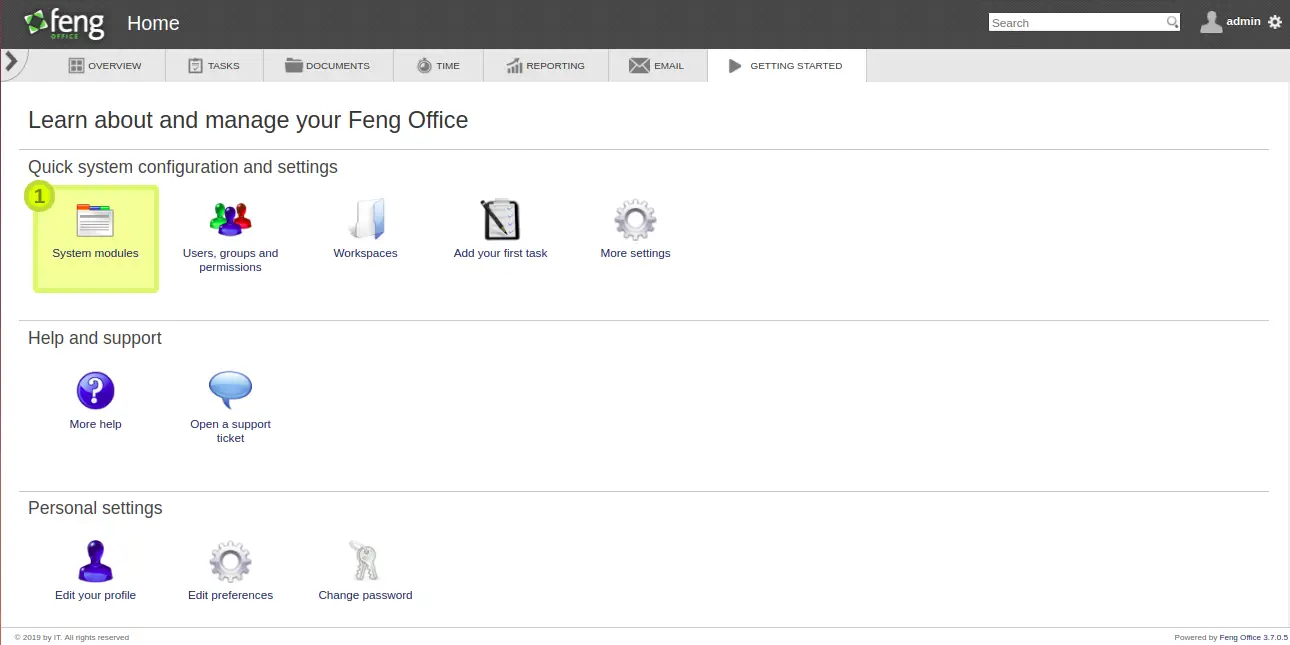
现在,提供您的管理员用户名和密码,然后单击“登录”按钮。您应该在以下页面中看到 Feng Office 仪表板:
使用 Lets Encrypt 免费 SSL 保护 Feng Office
Feng Office 现已安装并配置完毕。接下来,建议使用 Lets Encrypt 免费 SSL 来保护它。为此,您需要在服务器上安装 Certbot 客户端。 Certbot 是一个 Lets Encrypt 客户端,可用于为您的域下载和安装 SSL 证书。
首先,使用以下命令在您的服务器中添加 Certbot 存储库:
add-apt-repository ppa:certbot/certbot添加存储库后,更新存储库并使用以下命令安装 Certbot:
apt-get update -y
 apt-get install certbot python-certbot-apache -y
Certbot 现已安装并可以使用。
运行以下命令为您的域获取并安装 SSL 证书:
certbot --apache -d example.com您将被要求提供您的电子邮件地址并同意服务条款。
Saving debug log to /var/log/letsencrypt/letsencrypt.log
Plugins selected: Authenticator apache, Installer apache
Enter email address (used for urgent renewal and security notices) (Enter 'c' to
cancel):

- - - - - - - - - - - - - - - - - - - - - - - - - - - - - - - - - - - - - - - -
Please read the Terms of Service at
https://letsencrypt.org/documents/LE-SA-v1.2-November-15-2017.pdf. You must
agree in order to register with the ACME server at
https://acme-v02.api.letsencrypt.org/directory
- - - - - - - - - - - - - - - - - - - - - - - - - - - - - - - - - - - - - - - -
(A)gree/(C)ancel: A
接下来,您需要选择是否将 HTTP 流量重定向到 HTTPS,删除 HTTP 访问,如下所示:
- - - - - - - - - - - - - - - - - - - - - - - - - - - - - - - - - - - - - - - -
1: No redirect - Make no further changes to the webserver configuration.
2: Redirect - Make all requests redirect to secure HTTPS access. Choose this for
new sites, or if you're confident your site works on HTTPS. You can undo this
change by editing your web server's configuration.
- - - - - - - - - - - - - - - - - - - - - - - - - - - - - - - - - - - - - - - -
Select the appropriate number [1-2] then [enter] (press 'c' to cancel): 2
选择选项 2 为您的域下载并安装免费的 SSL 证书,然后按 Enter 键完成安装。
现在,您可以使用 URL https://example.com 安全地访问您的 Feng Office。
结论
恭喜!您已在 Debian 10 服务器上成功安装、配置和保护 Feng Office。您现在可以使用 Feng Office Web 界面轻松管理您的项目。