在 Rocky Linux 上开始使用 Podman(Docker 替代方案)
本教程适用于这些操作系统版本
- 洛基Linux 8.4
- 洛基Linux 8.4
在此页
- 先决条件
- 在 Rocky Linux 上安装 Podman
- Podman 重要配置
- 设置新用户
- Podman 基本用法
- 搜索容器图像
- 管理容器镜像
- 使用 Podman 运行容器
- 使用 Podman 检查容器日志
- 使用 Podman 停止容器
- 使用 Podman 设置自定义音量
- SSH 到正在运行的容器
- 清理环境
Podman 是一种 Linux 原生工具,用于使用开放容器计划 (OCI) 容器和容器映像部署应用程序。它支持多种容器镜像格式,包括Docker镜像和OCI容器镜像。此外,Podman 支持管理 pod、容器组。
Podman 是一个无守护进程的工具,作为一个没有服务的单一二进制命令行运行。它提供了一个类似于Docker的命令行,你可以使用一个别名,比如alias docker=podman。
为了运行容器和管理容器镜像,Podman 依赖于 libpod 和 OCI 容器运行时,例如 runc、crun 和 runv。
先决条件
在本指南中,您将学习如何在 Rocky Linux 系统上安装 Podman。此外,您还将学习 Podman 管理容器和容器镜像的基本用法。
在开始之前,请确保满足以下要求:
- 操作系统:Rocky Linux 8.4(绿黑曜石)
- Root 特权:用于安装新软件包和编辑系统配置
现在让我们开始 Podman 安装。
在 Rocky Linux 上安装 Podman
默认情况下,Rocky Linux appstream 存储库提供 podman 包。
1. 执行下面的 DNF 命令以显示有关 podman 软件包的信息。
sudo dnf info podman您将看到类似如下的输出。
Last metadata expiration check: 0:07:09 ago on Tue 16 Nov 2021 09:30:27 AM UTC.
Available Packages
Name         : podman
Version      : 3.3.1
Release      : 9.module+el8.5.0+710+4c471e88
Architecture : x86_64
Size         : 12 M
Source       : podman-3.3.1-9.module+el8.5.0+710+4c471e88.src.rpm
Repository   : appstream
Summary      : Manage Pods, Containers and Container Images
URL          : https://podman.io/
License      : ASL 2.0 and GPLv3+
Description  : podman (Pod Manager) is a fully featured container engine that is a simple
             : daemonless tool.  podman provides a Docker-CLI comparable command line that
             : eases the transition from other container engines and allows the management of
             : pods, containers and images.  Simply put: alias docker=podman.
             : Most podman commands can be run as a regular user, without requiring
             : additional privileges.
             :
             : podman uses Buildah(1) internally to create container images.
             : Both tools share image (not container) storage, hence each can use or
             : manipulate images (but not containers) created by the other.
             :
             : Manage Pods, Containers and Container Images
             : podman Simple management tool for pods, containers and images
Appstream 存储库提供了 Podman 包版本 3.3.1。
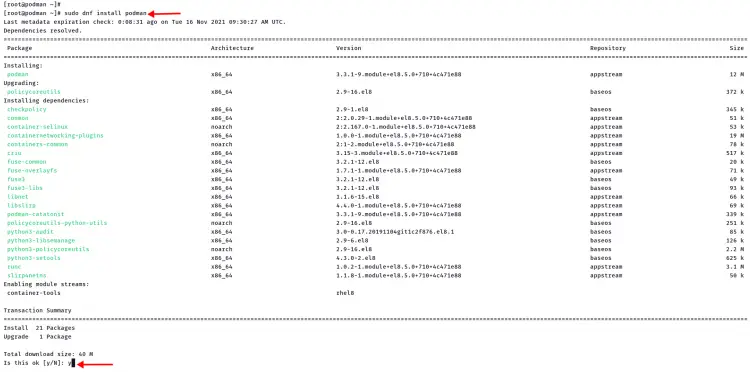
2. 使用下面的 DNF 命令安装 Podman。
sudo dnf install podman输入 y 确认并按 Enter 继续安装。
3. 如果 Podman 安装完成,请使用以下命令进行验证。
podman version您将看到类似如下的输出。
Version:      3.3.1
API Version:  3.3.1
Go Version:   go1.16.7
Built:        Wed Nov 10 01:48:06 2021
OS/Arch:      linux/amd64
Podman 重要配置
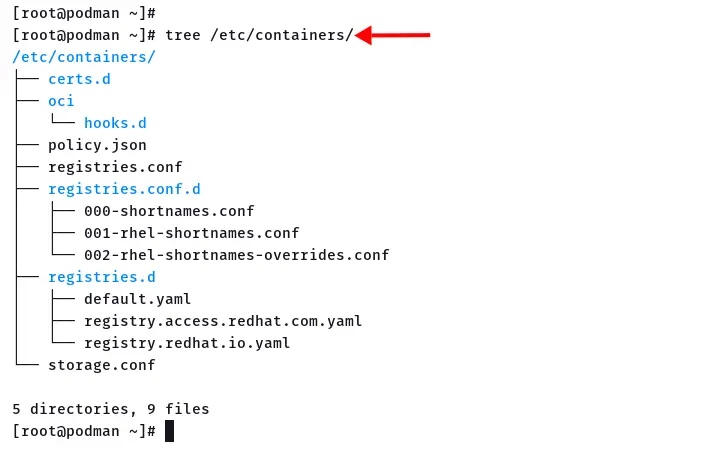
Podman 软件包附带一些位于 /etc/containers 目录中的默认配置。
以下是您必须知道的一些 Podman 配置。
- policy.json。镜像签名策略配置。
- registries.conf。可用容器映像注册表的列表,例如 Docker 注册表、RHEL 容器映像注册表和 Fedora 容器映像注册表。
- storage.conf。 Podman 的默认存储配置。包括驱动程序、位置等。
- 目录 registries.d/。额外的注册表配置和图像签名
- 目录 registries.conf.d/。容器镜像别名的附加配置。
设置新用户
在此步骤中,您将创建一个新用户并通过运行 Docker 映像 hello-world 来验证 Podman 安装。
1. 运行以下命令添加新用户 johndoe。
useradd -m -s /bin/bash johndoe
passwd johndoe
为用户 johndoe 键入新的强密码。
2. 接下来,使用以下命令以用户 johndoe 身份登录。
su - johndoe3. 现在执行以下命令以运行基于 Docker 映像 hello-world 的新容器。
podman run hello-world您将看到输出 Hello World 消息,这意味着容器正在运行但现在已退出。
? docker.io/library/hello-world:latest
Trying to pull docker.io/library/hello-world:latest...
Getting image source signatures
Copying blob 2db29710123e done
Copying config feb5d9fea6 done
Writing manifest to image destination
Storing signatures

Hello from Docker!
This message shows that your installation appears to be working correctly.

To generate this message, Docker took the following steps:
 1. The Docker client contacted the Docker daemon.
 2. The Docker daemon pulled the "hello-world" image from the Docker Hub.
    (amd64)
 3. The Docker daemon created a new container from that image which runs the executable that produces the output you are currently reading.
 4. The Docker daemon streamed that output to the Docker client, which sent it to your terminal.

To try something more ambitious, you can run an Ubuntu container with:
 $ docker run -it ubuntu bash

Share images, automate workflows, and more with a free Docker ID:
 https://hub.docker.com/

For more examples and ideas, visit:
 https://docs.docker.com/get-started/
4. 使用下面的 Podman 命令检查系统上的容器状态
podman ps -a您将看到基于 Docker 镜像 hello-world 的容器,当前状态为已退出。
CONTAINER ID  IMAGE                                 COMMAND     CREATED        STATUS                    PORTS       NAMES
cea9bbfeac4d  docker.io/library/hello-world:latest  /hello      6 minutes ago  Exited (0) 6 minutes ago              recursing_shaw
Podman 基本用法
在这一步中,您将学习 Podman 管理容器和容器镜像的基本用法。
搜索容器图像
1. 要使用 Podman 查找容器镜像,请使用以下命令。在这个例子中,我们搜索了名为 nginx 的容器镜像。
podman search nginx您会看到来自多个注册中心的大量容器镜像。
2. 您可以使用选项--limit n 限制来自每个容器镜像注册表的搜索结果。
podman search nginx --limit 3现在您将看到每个注册表都有 3 个名为 nginx 的容器镜像结果。
INDEX              NAME                                                DESCRIPTION                                      STARS       OFFICIAL    AUTOMATED
fedoraproject.org  registry.fedoraproject.org/f29/nginx                                                                 0
fedoraproject.org  registry.fedoraproject.org/f29/origin-nginx-router                                                   0
redhat.com         registry.access.redhat.com/ubi8/nginx-120           Platform for running nginx 1.20 or building ...  0
redhat.com         registry.access.redhat.com/ubi8/nginx-118           Platform for running nginx 1.18 or building ...  0
redhat.com         registry.access.redhat.com/rhscl/nginx-18-rhel7     Nginx 1.8 server and a reverse proxy server      0
centos.org         registry.centos.org/bamachrn/nginx-header                                                            0
centos.org         registry.centos.org/centos/nginx                                                                     0
centos.org         registry.centos.org/centos/nginx-110-centos7                                                         0
docker.io          docker.io/library/nginx                             Official build of Nginx.                         15839       [OK]
docker.io          docker.io/jwilder/nginx-proxy                       Automated Nginx reverse proxy for docker con...  2096                    [OK]
docker.io          docker.io/nginxinc/nginx-unprivileged               Unprivileged NGINX Dockerfiles                   54
管理容器镜像
Podman 支持 OCI 和 Docker 镜像格式。在此阶段,您将使用 Podman 管理容器镜像。
1. 使用以下命令下载容器镜像 nginx:alpine。
podman pull nginx:alpine选择您要使用的容器注册表,然后按 Enter 确认。对于此示例,我们将使用 Docker 注册表。
? Please select an image:
    registry.fedoraproject.org/nginx:alpine
    registry.access.redhat.com/nginx:alpine
    registry.centos.org/nginx:alpine
  ? docker.io/library/nginx:alpine
下载过程将开始。
? docker.io/library/nginx:alpine
Trying to pull docker.io/library/nginx:alpine...
Getting image source signatures
Copying blob a4e156412037 done
Copying blob a2402c2da473 done
Copying blob e0bae2ade5ec done
Copying blob 97518928ae5f done
Copying blob 3f3577460f48 done
Copying blob e362c27513c3 done
Copying config b46db85084 done
Writing manifest to image destination
Storing signatures
b46db85084b80a87b94cc930a74105b74763d0175e14f5913ea5b07c312870f8
2. 如果容器映像下载过程完成,请使用以下命令验证下载器映像。
podman images以下是您将获得的类似输出。
REPOSITORY                     TAG         IMAGE ID      CREATED      SIZE
docker.io/library/nginx        alpine      b46db85084b8  3 days ago   24.7 MB
docker.io/library/hello-world  latest      feb5d9fea6a5  7 weeks ago  19.9 kB
使用 Podman 运行容器
下载容器镜像 nginx:alpine 后,您将学习如何使用 Podman 运行新容器。
1.执行以下命令运行基于镜像nginx:alpine的容器。
podman run -it --rm -d -p 8080:80 --name web nginx:alpine您将获得容器的随机字符串和编号。
2. 使用以下命令验证系统上运行的容器。
podman ps您将看到类似如下的输出。

容器名称 web 是 Up 并在主机上公开端口 8080。
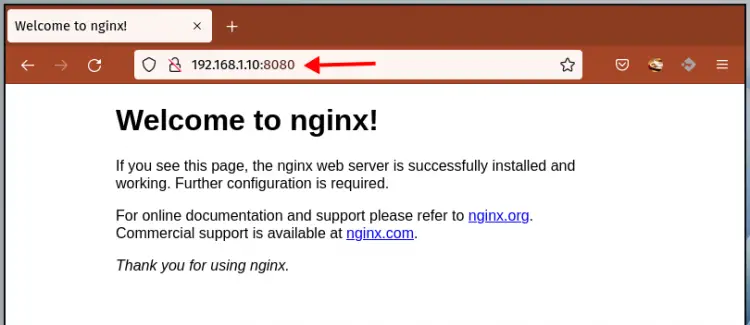
3. 现在打开您的网络浏览器并在地址栏中输入 Rocky Linux IP 地址。对于此示例,Rocky Linux 机器的 IP 地址为 192.168.1.10。
http://192.168.1.10:8080/
您将看到来自容器 web 的默认 index.html,它基于容器图像 nginx:alpine。
使用 Podman 检查容器日志
现在您将学习使用选项 logs 检查容器日志的 Podman 命令。
1.查看容器的日志,可以使用下面的Podman命令。
podman logs web您将看到容器 web 的详细日志。
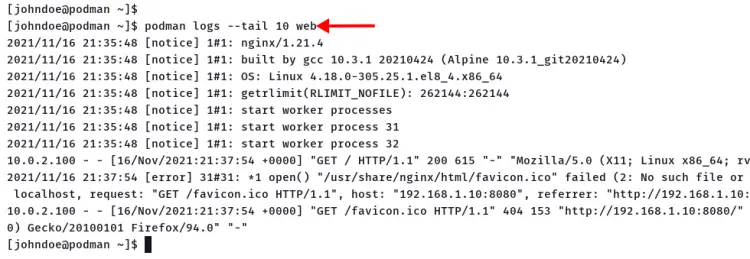
2. 要限制容器日志输出,请使用选项--tail n。
podman logs --tail 10 web下面是容器 web 类似的日志输出。
使用 Podman 停止容器
1. 要停止容器 Web,请使用下面的 Podman 命令。
podman stop web现在容器 web 将被停止。
2. 使用以下命令进行验证。
podman ps
podman ps -a
您将看到容器 Web 被自动删除,因为您在运行容器时使用了选项 --rm。

使用 Podman 设置自定义卷
在此步骤中,您将学习如何使用 Podman 管理卷。
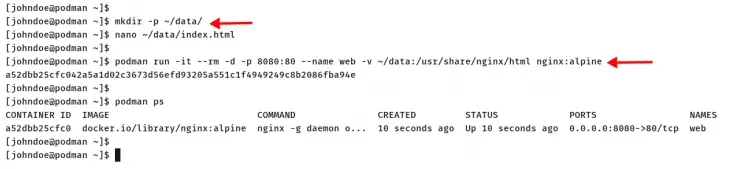
1. 创建新的目录数据和自定义文件 index.html。这将替换 Nginx 容器上的默认 Nginx index.html 文件。
mkdir -p ~/data/
nano ~/data/inde.html
复制并粘贴以下 HTML 脚本。
<!doctype html>
<html lang="en">
<head>
  <meta charset="utf-8">
  <title>Welcome to Container Nginx</title>
</head>
<body>
  <h2>Hello from Nginx container - Managed with Podman</h2>
</body>
</html>
保存脚本并退出。
2. 接下来,执行以下命令来创建一个具有自定义卷的新容器。
podman run -it --rm -d -p 8080:80 --name web -v ~/data:/usr/share/nginx/html nginx:alpine使用选项 -v data:/usr/share/nginx/html 为您的新容器设置自定义卷。 data 目录将挂载到容器目录 /usr/share/nginx/html。
3. 使用下面的 Podman 命令检查正在运行的容器。
podman ps新容器名称 web 与自定义卷一起 Up。
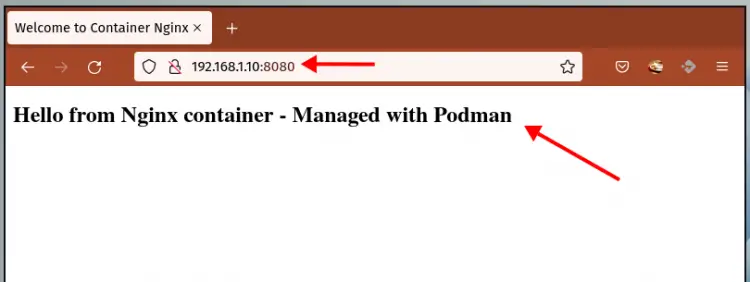
4. 打开您的 Web 浏览器并输入端口为 8080 的服务器 IP 地址。
http://192.168.1.10:8080/
现在您将看到如下所示的自定义 index.html 页面。
SSH 到正在运行的容器
在此步骤中,您将访问正在运行的容器的 shell。
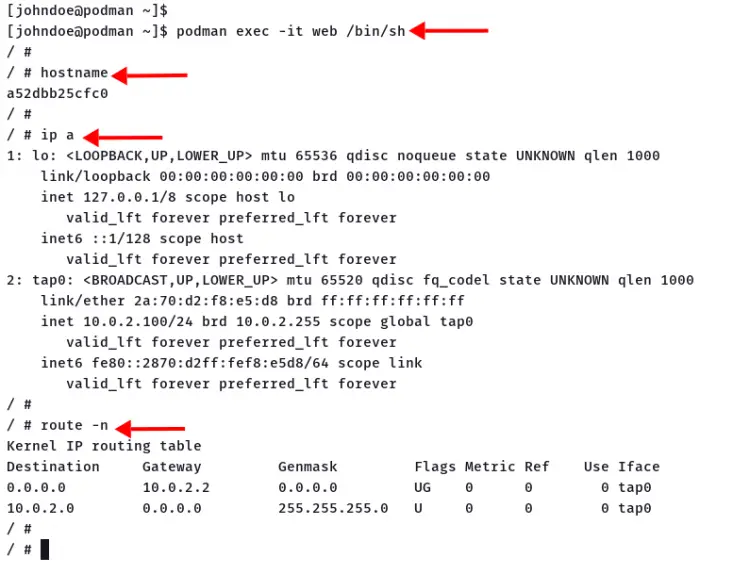
1. 要登录到正在运行的容器,请使用带有 exec 选项的 Podman,如下所示。
podman exec -it web /bin/sh2. 登录容器后,检查容器主机名、IP 地址和路由表。
hostname

ip a
route -n
现在键入 exit 并按 Enter 从容器中注销。
清理环境
在最后一步中,您将清理环境。
1. 使用以下命令停止容器 web。
podman stop web2. 接下来,使用下面的 podman 命令删除状态为 Exited 的所有容器。
podman rm $(podman ps --filter "status=exited" -q)现在您已经完成了 Podman 管理容器和容器镜像的基本用法。
结论
恭喜!您已经在 Rocky Linux 系统上成功安装了 Podman。此外,您还了解了 Podman 管理容器和容器镜像的基本用法。
对于下一步,您可能对基于 Docker 镜像格式或 OCI 容器镜像规范创建自定义容器镜像感兴趣。