如何在 Debian 10 上使用 PHP、MariaDB 和 Lets Encrypt SSL 安装 Lighttpd
在此页
- 要求
- 开始
- 安装Lighttpd
- 安装 MariaDB 服务器
- 安装 PHP 和 PHP-FPM
- 创建Lighttpd 虚拟主机
- 使用 Lets Encrypt 免费 SSL 保护 Lighttpd
- 访问Lighttpd Web 界面
- 结论
Lighttpd 是一个免费的、开源的、高速的网络服务器,专为对速度要求严格的环境而设计。与其他 Web 服务器(例如 Apache 和 Nginx)相比,它需要的内存占用量低,而且运行 AJAX 应用程序的速度特别快。 Lighttpd 还允许我们使用 FastCGI、SCGI 和 CGI 接口托管以其他编程语言编写的 Web 应用程序。如果您的服务器遇到负载问题,Lighttpd 是您的最佳选择。
在本教程中,我们将学习如何在支持 PHP-FPM 和 MariaDB 的 Debian 10 上安装 Lighttpd,我们将使用 Lets Encrypt SSL 证书保护网络服务器。
要求
- 运行 Debian 10 的服务器。
- 已为您的服务器设置根密码。
我将在本教程中使用域名 example.com。将下面所有文件名和配置设置中的 example.com 替换为您自己的域名。
入门
在开始之前,您需要使用最新版本更新您的系统。您可以通过运行以下命令来执行此操作:
apt-get update -y
 apt-get upgrade -y
服务器更新后,重新启动服务器以应用更改。
安装Lighttpd
默认情况下,Lighttpd 在 Debian 10 默认存储库中可用。您只需运行以下命令即可安装它:
apt-get install lighttpd -y安装完成后,启动Lighttpd服务并使用以下命令使其在系统重启后启动:
systemctl start lighttpd
 systemctl enable lighttpd
您还可以使用以下命令检查 Lighttpd 的状态:
systemctl status lighttpd您应该得到以下输出:
? lighttpd.service - Lighttpd Daemon
   Loaded: loaded (/lib/systemd/system/lighttpd.service; enabled; vendor preset: enabled)
   Active: active (running) since Fri 2019-09-06 02:09:35 EDT; 29s ago
 Main PID: 4445 (lighttpd)
    Tasks: 1 (limit: 1138)
   Memory: 1.4M
   CGroup: /system.slice/lighttpd.service
           ??4445 /usr/sbin/lighttpd -D -f /etc/lighttpd/lighttpd.conf

Sep 06 02:09:35 debian systemd[1]: Starting Lighttpd Daemon...
Sep 06 02:09:35 debian systemd[1]: Started Lighttpd Daemon.
Sep 06 02:09:36 debian systemd[1]: /lib/systemd/system/lighttpd.service:6: PIDFile= references path below legacy directory /var/run/, updating
lines 1-12/12 (END)
完成后,您可以继续下一步。
安装 MariaDB 服务器
您可以通过运行以下命令来安装 MariaDB 服务器:
apt-get install mariadb-server mariadb-client -y安装后,您需要保护 MariaDB 安装。您可以通过运行以下脚本来保护它:
mysql_secure_installationAnswer all the questions as shown below:
Change the root password? [Y/n] n
Remove anonymous users? [Y/n] Y
Disallow root login remotely? [Y/n] Y
Remove test database and access to it? [Y/n] Y
Reload privilege tables now? [Y/n] Y
完成后,您可以继续下一步。
安装 PHP 和 PHP-FPM
接下来,您需要将 PHP、PHP-FPM 和 FastCGI 安装到您的系统中。默认情况下,Debian 10 附带 PHP 7.3 版。您只需运行以下命令即可安装它:
apt-get install php php-cgi php-fpm php-mysql -y安装所有包后,您需要编辑 php.ini 文件并将 cgi.fix_pathinfo 设置为 1。您可以使用以下命令完成此操作:
nano /etc/php/7.3/fpm/php.ini更改以下行:
cgi.fix_pathinfo=1
完成后保存并关闭文件。
默认情况下,PHP 指向 UNIX 套接字 /var/run/php/php7.3-fpm.sock。因此,您需要配置 PHP-FPM 池以设置 PHP 侦听 TCP 套接字。
您可以通过编辑 /etc/php/7.3/fpm/pool.d/www.conf 文件来做到这一点:
nano /etc/php/7.3/fpm/pool.d/www.conf找到以下行:
listen = /run/php/php7.3-fpm.sock
并将其替换为以下行:
listen = 127.0.0.1:9000
完成后保存并关闭文件。然后,重启 PHP-FPM 服务以应用配置更改:
systemctl restart php7.3-fpm接下来,您需要修改 15-fastcgi-php.conf 文件:
nano /etc/lighttpd/conf-available/15-fastcgi-php.conf找到以下几行:
"bin-path" => "/usr/bin/php-cgi",
"socket" => "/var/run/lighttpd/php.socket",
并用以下内容替换它们:
"host" => "127.0.0.1",
"port" => "9000",
完成后保存并关闭文件。然后,使用以下命令启用 FastCGI 和 FastCHI-PHP 模块:
lighty-enable-mod fastcgi
 lighty-enable-mod fastcgi-php
最后,重新启动 Lighttpd 服务以应用更改:
systemctl restart lighttpd创建Lighttpd虚拟主机
接下来,您将需要创建一个新的虚拟主机文件以使用 Lighttpd 测试 PHP。您可以使用以下命令创建它:
nano /etc/lighttpd/conf-available/example.com.conf添加以下行:
$HTTP["host"] == "www.example.com" {
    server.document-root = "/var/www/html/"
    server.errorlog      = "/var/log/lighttpd/example.com-error.log"
}
完成后保存并关闭文件。然后,使用以下命令启用虚拟主机:
ln -s /etc/lighttpd/conf-available/example.com.conf /etc/lighttpd/conf-enabled/接下来,使用以下命令在 Lighttpd 文档根目录中创建一个示例 index.php 文件:
nano /var/www/html/index.php添加以下行:
<?php phpinfo(); ?>
保存并关闭文件。然后,使用以下命令将 Lighttpd 文档根目录的所有权更改为 www-data:
chown -R www-data:www-data /var/www/html/最后,重新启动 Lighttpd 服务以应用所有配置更改:
systemctl restart lighttpd使用 Lets Encrypt Free SSL 保护 Lighttpd
首先,您需要安装 Certbot 工具以使用 Let's Encrypt 保护您的 Web 服务器。默认情况下,最新版本的 Certbot 在 Debian 10 默认存储库中不可用。
您可以使用以下命令添加 Certbot 存储库:
apt-get install software-properties-common
 add-apt-repository ppa:certbot/certbot
接下来,更新存储库并使用以下命令安装 Certbot:
apt-get update -y
 apt-get install certbot -y
接下来,使用以下命令创建一个 Let's Encrypt 证书:
certbot certonly --webroot -w /var/www/html/ -d www.example.com您将被要求提供您的电子邮件地址并接受许可条款,如下所示:
Saving debug log to /var/log/letsencrypt/letsencrypt.log
Plugins selected: Authenticator webroot, Installer None
Enter email address (used for urgent renewal and security notices) (Enter 'c' to
cancel):

- - - - - - - - - - - - - - - - - - - - - - - - - - - - - - - - - - - - - - - -
Please read the Terms of Service at
https://letsencrypt.org/documents/LE-SA-v1.2-November-15-2017.pdf. You must
agree in order to register with the ACME server at
https://acme-v02.api.letsencrypt.org/directory
- - - - - - - - - - - - - - - - - - - - - - - - - - - - - - - - - - - - - - - -
(A)gree/(C)ancel: A

- - - - - - - - - - - - - - - - - - - - - - - - - - - - - - - - - - - - - - - -
Would you be willing to share your email address with the Electronic Frontier
Foundation, a founding partner of the Let's Encrypt project and the non-profit
organization that develops Certbot? We'd like to send you email about our work
encrypting the web, EFF news, campaigns, and ways to support digital freedom.
- - - - - - - - - - - - - - - - - - - - - - - - - - - - - - - - - - - - - - - -
(Y)es/(N)o: Y
成功下载证书后,您应该会看到以下输出:
IMPORTANT NOTES:
 - Congratulations! Your certificate and chain have been saved at:
   /etc/letsencrypt/live/example.com/fullchain.pem
   Your key file has been saved at:
   /etc/letsencrypt/live/example.com/privkey.pem
   Your cert will expire on 2019-12-06. To obtain a new or tweaked
   version of this certificate in the future, simply run certbot
   again. To non-interactively renew *all* of your certificates, run
   "certbot renew"
 - If you like Certbot, please consider supporting our work by:

   Donating to ISRG / Let's Encrypt:   https://letsencrypt.org/donate
   Donating to EFF:                    https://eff.org/donate-le
接下来,您需要将证书和私钥合并到一个文件中。您可以使用以下命令执行此操作:
cat /etc/letsencrypt/live/example.com/cert.pem /etc/letsencrypt/live/example.com/privkey.pem > /etc/letsencrypt/live/example.com/web.pem接下来,您需要编辑 Lighttpd 虚拟主机文件并定义 Lets Encrypt SSL 证书路径。
您可以使用以下命令执行此操作:
nano /etc/lighttpd/conf-enabled/example.com.conf更改文件如下所示:
$HTTP["host"] == "www.example.com" {
    server.document-root = "/var/www/html/"
}

$SERVER["socket"] == ":443" {
ssl.engine = "enable"
ssl.pemfile = "/etc/letsencrypt/live/example.com/web.pem" # Combined Certificate
ssl.ca-file = "/etc/letsencrypt/live/example.com/chain.pem" # Root CA
server.name = "www.example.com" # Domain Name OR Virtual Host Name
server.document-root = "/var/www/html/" # Document Root
server.errorlog = "/var/log/lighttpd/example.com_error.log"
accesslog.filename = "/var/log/lighttpd/example.com_access.log"
}

$HTTP["scheme"] == "http" {
$HTTP["host"] == "www.example.com" { # HTTP URL
url.redirect = ("/.*" => "https://www.example.com$0") # Redirection HTTPS URL
}
}
保存并关闭文件。然后重新启动 Lighttpd 服务以应用配置更改:
systemctl restart lighttpd访问 Lighttpd Web 界面
Lighttpd 安装并配置了 PHP 和 PHP-FPM 支持。现在,是时候对其进行测试了。
打开 Web 浏览器并输入 URL https://www.example.com。您将被重定向到以下页面:
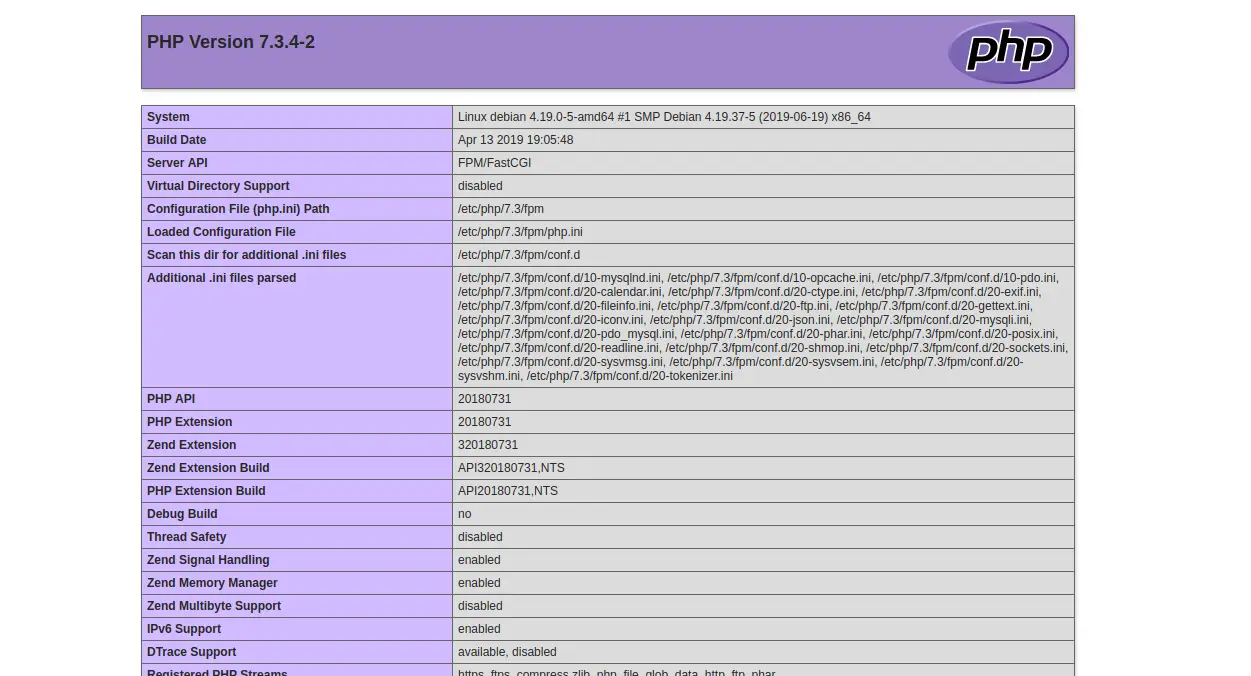
上面的页面表明 PHP 与 FastCGI 配合良好。
结论
恭喜!您已经在 Debian 10 上成功安装和配置了支持 PHP-FPM 和 FastCGI 的 Lighttpd Web 服务器。您现在可以轻松地托管自己的 Web 服务器。有关详细信息,请访问 Lighttpd Doc 上的 Lighttpd 官方文档页面。